Discussion Forum - Northstar Chevelle Club
| Post Info | TOPIC: Winter work on 71 Convert, Round 3 | ||||||||
|---|---|---|---|---|---|---|---|---|---|
|
President

|
|
||||||||
|
1K+ Club
|
|
||||||||
|
1K+ Club
|
|
||||||||
|
President
|
|
||||||||
|
1K+ Club
|
|
||||||||
|
1K+ Club
|
|
||||||||
|
President
|
|
||||||||
|
1K+ Club
|
|
||||||||
|
President
|
|
||||||||
|
1K+ Club
|
|
||||||||
|
President
|
|
||||||||
|
1K+ Club
|
|
||||||||
|
1K+ Club
|
|
||||||||
|
President
|
|
||||||||
|
1K+ Club
|
|
||||||||
|
President
|
|
||||||||
|
1K+ Club
|
|
||||||||
|
1K+ Club
|
|
||||||||
|
1K+ Club
|
|
||||||||
|
1K+ Club
|
|
||||||||
|
1K+ Club
|
|
||||||||
|
President
|
|
||||||||
|
1K+ Club
|
|
||||||||
|
President
|
|
||||||||
|
1K+ Club
|
|
||||||||
|
President
|
|
||||||||
|
1K+ Club
|
|
||||||||
|
President
|
|
||||||||
|
1K+ Club
|
|
||||||||
|
President
|
|
||||||||
|
Active Member

|
|
||||||||
|
1K+ Club
|
|
||||||||
|
President
|
|
||||||||
|
1K+ Club
|
|
||||||||
|
3K+ Club
|
|
||||||||
|
1K+ Club
|
|
||||||||
|
1K+ Club
|
|
||||||||
|
1K+ Club
|
|
||||||||
|
President
|
|
||||||||
|
1K+ Club
|
|
||||||||
|
President
|
|
||||||||
|
1K+ Club
|
|
||||||||
|
1K+ Club
|
|
||||||||
|
President
|
|
||||||||
|
1K+ Club
|
|
||||||||
|
1K+ Club
|
|
||||||||
|
President
|
|
||||||||
|
1K+ Club
|
|
||||||||
|
1K+ Club
|
|
||||||||
|
3K+ Club
|
|
||||||||
|
|||||||||


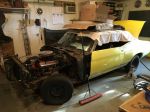
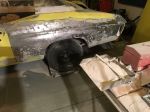
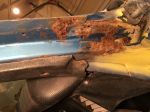
 Waaay easier to adjust door with fender off.


|
|
||
| Chatbox | |
|---|---|
|
Please log in to join the chat!
|
|