Discussion Forum - Northstar Chevelle Club

Members Login
Username 
 
Password 
    Remember Me  
Post Info TOPIC: Update "The 40+ Watt Garage"


2K+ Club

Status: Offline
Posts: 2788
Date:
Update "The 40+ Watt Garage"
Permalink  


Our new house pushed all the right buttons except the attached garage sucks. It's really only good for parking a car & lawn tractor.

One of the "deals" Sheryl & I struck was we'd build a detached shop/garage. It'll be big enough to store the boat, my pickup, the Roadster, and Blackie - with enough space for benches and a work area.

Finished dimensions will be 32' wide, 36' deep, 10' ceilings. (We had to go with 10' ceilings due to restrictions from the city.) The old 40 Watt had 9'8" ceilings, and a lift can work in there, so I'll be happy.+

They broke ground yesterday. 


-- Edited by John D on Thursday 16th of March 2023 05:10:30 PM


Attachments
__________________


John D. - St. Louis Park, MN.

1965 El Camino - LT-1, 4L60e, 4wh discs, SC&C susp.
2013 F-150 Platinum - Twin Turbo 3.5

2018 Factory Five MkIV Roadster build thread


2K+ Club

Status: Offline
Posts: 2437
Date:
40 Watt Update
Permalink  


Exciting times. Is that PEX tubing I see on top of the foam?


__________________

Kevin

Northwestern Ohio


2K+ Club

Status: Offline
Posts: 2788
Date:
RE: PEX
Permalink  


Yessir... The new shop will have radiant in-floor heat.


__________________


John D. - St. Louis Park, MN.

1965 El Camino - LT-1, 4L60e, 4wh discs, SC&C susp.
2013 F-150 Platinum - Twin Turbo 3.5

2018 Factory Five MkIV Roadster build thread


Founding Member

Status: Offline
Posts: 2740
Date:
RE: ceiling
Permalink  


Can you do a vaulted ceiling over the lift stall? Looking forward to a visit!


__________________

Derek Kiefer - Mantorville, MN

69 Malibu Pro-Touring stroker LS1-383/T56 - 69 SS396-325/3spd project


2K+ Club

Status: Offline
Posts: 2788
Date:
RE: 40+
Permalink  


Not with the truss system on this building... One of the city restrictions is that the "outbuilding" needs to match (in appearance/style) the main house, and cannot be taller than it. One of the parameters is we wanted attic storage in the garage. The house has NONE... it's vaulted to the rafters ceiling on 90% of the main level. There's nowhere to stash/store "stuff" in the house - unlike the Quebec house which had garage attic storage. We've already had to alter the roof pitch on the new garage to accomodate the City, and to maintain storage in its attic "vaulting" isn't possible. (After 40yrs. of crawling like a reptile under ramps & jackstands, just being able to sit on a roller stool under a car will be a luxury.)


__________________


John D. - St. Louis Park, MN.

1965 El Camino - LT-1, 4L60e, 4wh discs, SC&C susp.
2013 F-150 Platinum - Twin Turbo 3.5

2018 Factory Five MkIV Roadster build thread


2K+ Club

Status: Offline
Posts: 2437
Date:
40W
Permalink  


I’ve learned that a high percentage of things I have in storage will never be used. In fact I spend a great deal of time now trying to dispose of it.


__________________

Kevin

Northwestern Ohio


Founding Member

Status: Offline
Posts: 2740
Date:
RE: "The 40+ Watt Garage" (New Location)
Permalink  


dashboard wrote:

I’ve learned that a high percentage of things I have in storage will never be used. In fact I spend a great deal of time now trying to dispose of it.


 Ain't that the truth!


__________________

Derek Kiefer - Mantorville, MN

69 Malibu Pro-Touring stroker LS1-383/T56 - 69 SS396-325/3spd project


2K+ Club

Status: Offline
Posts: 2788
Date:
Permalink  
 

Lots of progress the last few days...


Attachments
__________________


John D. - St. Louis Park, MN.

1965 El Camino - LT-1, 4L60e, 4wh discs, SC&C susp.
2013 F-150 Platinum - Twin Turbo 3.5

2018 Factory Five MkIV Roadster build thread


2K+ Club

Status: Offline
Posts: 2788
Date:
Permalink  
 

I've been pretty lax on updates with the construction...


Attachments
__________________


John D. - St. Louis Park, MN.

1965 El Camino - LT-1, 4L60e, 4wh discs, SC&C susp.
2013 F-150 Platinum - Twin Turbo 3.5

2018 Factory Five MkIV Roadster build thread


President

Status: Offline
Posts: 7253
Date:
The 40+ Watt Garage
Permalink  


Gonna have to change the name to 100 watt garage for this one. Looks like good progress considering the weather. It will nice to get the roof on so you can quit shoveling out the garage.


__________________

Mitch D.   River Falls, WI

Lifetime member of the "Cars apart Club"

Some Assembly Required

1966 Chevelle SS 396 M20

1970 Chevelle SS 396 M20

1967 Camaro SS 350 rs


2K+ Club

Status: Offline
Posts: 2437
Date:
RE: "The 40+ Watt Garage" (New Location)
Permalink  


Lost in the 60s wrote:

Gonna have to change the name to 100 watt garage for this one. 


 Or LED garage.

Have you decided on a boiler for the floor heat?  


__________________

Kevin

Northwestern Ohio


2K+ Club

Status: Offline
Posts: 2788
Date:
Permalink  
 

Here's the specs on the boiler/heater
Takagi


__________________


John D. - St. Louis Park, MN.

1965 El Camino - LT-1, 4L60e, 4wh discs, SC&C susp.
2013 F-150 Platinum - Twin Turbo 3.5

2018 Factory Five MkIV Roadster build thread


Active Member

Status: Offline
Posts: 471
Date:
Permalink  
 

Non condensing? Didn’t know that was an option. I spent a lot of time last winter dealing with my drain freezing due to the condensation from the boiler. My boiler puts out 5 gallons of water a day.


__________________

Chris S.

Oak Grove

'68 Malibu (His)

'68 442 (Hers)


2K+ Club

Status: Offline
Posts: 2437
Date:
40+ Watt
Permalink  


Time for an update JD.


__________________

Kevin

Northwestern Ohio


President

Status: Offline
Posts: 7253
Date:
RE: "The 40+ Watt Garage" (New Location)
Permalink  


Chris S wrote:

Non condensing? Didn’t know that was an option. I spent a lot of time last winter dealing with my drain freezing due to the condensation from the boiler. My boiler puts out 5 gallons of water a day.


 I'd be running the hose into a 5 gallon pail and throwing it outside.

In my previous shop, I had heat tape out to the catch box in the ground and plugged that in when we were going to wash vehicles in the winter. It works...


__________________

Mitch D.   River Falls, WI

Lifetime member of the "Cars apart Club"

Some Assembly Required

1966 Chevelle SS 396 M20

1970 Chevelle SS 396 M20

1967 Camaro SS 350 rs


2K+ Club

Status: Offline
Posts: 2788
Date:
RE: 40+ Watt Update
Permalink  


Not much to update... Builder's going through some BS with the inspector about "as submitted/approved" vs. what's there... (that's his problem) Sparky's have been in, and have 90% of the rough-in done. Boxes are placed, light cans installed, etc. Insulators are scheduled for Monday to do the 1" spray-foam on the inside. This is in lieu of "Tyvek" or a "wrap". This'll seal the outer sheathing directly to the studs, add rigidity. What's cool about it is that you can still get down the wall if you need to. The remaining space will be fiberglass batts.


__________________


John D. - St. Louis Park, MN.

1965 El Camino - LT-1, 4L60e, 4wh discs, SC&C susp.
2013 F-150 Platinum - Twin Turbo 3.5

2018 Factory Five MkIV Roadster build thread


2K+ Club

Status: Offline
Posts: 2788
Date:
"The 40+ Watt Garage" - Update 1
Permalink  


Boy have i been bad about updating progress!!

There's been a LOT of work since the last pictures I posted:

Insulation and sheetrock going up... Mid February

40Watt_022.png

Sheetrock is complete on the wood portion of the building...

40Watt_023.png

OK, nearly complete...

40Watt_024.png

The best addition to any garage - pull-down attic ladder!

40Watt_025.png

Early March (while I was in the hospital)  1" foam board & firring strips on the block. Due to the building being cut into the hillside, and subsequent backfill loading, the back wall is 12" thick, the side walls are 8". 

40Watt_026.png


40Watt_027.png

Taped & mudded!

40Watt_028.png


40Watt_029.png

40Watt_030.png


I contracted them to prime the entire interior, and paint-only on the ceiling.

40Watt_031.png


Attachments
__________________


John D. - St. Louis Park, MN.

1965 El Camino - LT-1, 4L60e, 4wh discs, SC&C susp.
2013 F-150 Platinum - Twin Turbo 3.5

2018 Factory Five MkIV Roadster build thread


2K+ Club

Status: Offline
Posts: 2788
Date:
"The 40+ Watt Garage" Update #2
Permalink  


This past weekend Sheryl & I tackled the walls and window/door trim. I really do not want to ever have to "cut-in" 120 linear feet of wall to ceiling joint again!

40Watt_032.png

40Watt_033.png+

40Watt_034.png+


And the finished job. It's a light gray, with a tinge of blue to it.

This past Tues & Weds I did the "trim-out" on the electrical. Installed the switches, outlets, and lights. The cord reel and droplight were take outs from the old 40 Watt.

40Watt_035.png

40Watt_036.png

40Watt_037.png


Attachments
__________________


John D. - St. Louis Park, MN.

1965 El Camino - LT-1, 4L60e, 4wh discs, SC&C susp.
2013 F-150 Platinum - Twin Turbo 3.5

2018 Factory Five MkIV Roadster build thread


President

Status: Offline
Posts: 7253
Date:
RE: Two Updates! "The 40+ Watt Garage"
Permalink  


Looks GREAT, John. Any date for getting doors on ?
You need to upgrade the name now. At least to 60 watt...razz


__________________

Mitch D.   River Falls, WI

Lifetime member of the "Cars apart Club"

Some Assembly Required

1966 Chevelle SS 396 M20

1970 Chevelle SS 396 M20

1967 Camaro SS 350 rs


1K+ Club

Status: Offline
Posts: 1297
Date:
Two Updates!
Permalink  


Looking great!

__________________

Bruce L. - Lakeville MN

1971 Malibu Convert


Founding Member

Status: Offline
Posts: 2740
Date:
Permalink  
 

Nice work! That stepped wall is going to be real tempting to pile full of junk... it's the law of horizontal surfaces.

__________________

Derek Kiefer - Mantorville, MN

69 Malibu Pro-Touring stroker LS1-383/T56 - 69 SS396-325/3spd project


President

Status: Offline
Posts: 7253
Date:
RE: Two Updates! "The 40+ Watt Garage"
Permalink  


Derek69SS wrote:

Nice work! That stepped wall is going to be real tempting to pile full of junk... it's the law of horizontal surfaces.


 You mean FSS...flat surface syndrome. I've been in his other garage a few times and he doesn't seem to be as affected by it as many of us are. Although, this garage is a LOT bigger and yes a handy place like that wall WILL be tempting.


__________________

Mitch D.   River Falls, WI

Lifetime member of the "Cars apart Club"

Some Assembly Required

1966 Chevelle SS 396 M20

1970 Chevelle SS 396 M20

1967 Camaro SS 350 rs


2K+ Club

Status: Offline
Posts: 2788
Date:
Permalink  
 

OTTGOS.jpg


Attachments
__________________


John D. - St. Louis Park, MN.

1965 El Camino - LT-1, 4L60e, 4wh discs, SC&C susp.
2013 F-150 Platinum - Twin Turbo 3.5

2018 Factory Five MkIV Roadster build thread


President

Status: Offline
Posts: 7253
Date:
Permalink  
 

Yeah, like that...laughing


__________________

Mitch D.   River Falls, WI

Lifetime member of the "Cars apart Club"

Some Assembly Required

1966 Chevelle SS 396 M20

1970 Chevelle SS 396 M20

1967 Camaro SS 350 rs


2K+ Club

Status: Offline
Posts: 2788
Date:
Update "The 40+ Watt Garage"
Permalink  


Not too much going on around here. The guys were waiting for the "thaw" to be able to start backfill and grading.

They also came out and cleaned/scrubbed all the "muck" off the concrete floor.

This allowed me to get the control joints filled. Doing this wasn't part of the contract, and I wanted to use some commercial-grade product, not "big box" store stuff. I did some research and settled on some goo from Emecole. It's their 85/90 product. Well... this started a little bit of a problem. I called their support line, and talked to them about coverage.

Me: "How many lineal feet will one cartridge do at a 1/2" depth, will a little overfill for shaving"? Them: "One kit (3 tubes) will do 30 feet." Me: "At what depth of fill?" Them: "We make our calculations based on the standard 4" slab thickness" Me: "Well, let's do some math... 30' @ 4", so I should be able to get 220' @ +/- 1/2" easily with one kit." Them: "I agree" Me: "Can I add one additional tube just to be safe?" Them: "Sure, we can add single tubes once you've bought a kit."

This stuff is expensive!... but I wanted a commercial grade product that I'd never have to re-do in my lifetime. Other factors were quick dry-time, and the ability to shave it flush with the surrounding floor. This product fit the bill.

My kit arrives, I get some time, scrape and vacuum out all the control joints and get set up to start squeezing goo into cracks. One thing you must understand, is that this product cures chemically - like body filler - once mixed it "kicks" and you're committed (it is a two chamber tube, and the product(s) mix in the swirly nozzle)... you can't take a break mid-tube, tape off the end, and come back in 15 minutes.

I get going. Started in a spot that wouldn't be visible later, just in case I screw up, and to "learn" a technique for application, etc. It's going great! The stuff flows out easily, self levels, about the consistency of honey. I get about 12 lineal feet done and BOOM... Tube's empty! Yep, that's right... twelve feet on one tube and I'm empty - I've got another 210 feet to go - and two more tubes to do. Ain't a gonna happen folks.

Making an already long story a little shorter, let's say that after a few phone calls, some emails, some pictures, the people at Emecole took care of me. They are now evaluating "coverage", and are figuring out their advertising, text content, and marketing error.


Attachments
__________________


John D. - St. Louis Park, MN.

1965 El Camino - LT-1, 4L60e, 4wh discs, SC&C susp.
2013 F-150 Platinum - Twin Turbo 3.5

2018 Factory Five MkIV Roadster build thread


President

Status: Offline
Posts: 7253
Date:
RE: Update "The 40+ Watt Garage"
Permalink  


I used a small diameter polyester rope in the cuts on the back half of my new building and pushed it down with a scraper to ~1/2", to make certain the sealant didn't try to fill the whole cut. I got a lot more than 12 ft but it still takes more than a person expects. I, actually, hate those cuts and told the concrete crew NOT to cut the back slab, but the building didn't have doors yet. I was woke up the next morning at 7 am sharp to a saw cutting the slab. I wasn't happy, but let them finish. When I had the front half done, a year later, I locked the doors and didn't let them cut it. I'll put up with the few hairline cracks mine has developed over 2 years compared to those damned cuts gathering dust, which they still will.


__________________

Mitch D.   River Falls, WI

Lifetime member of the "Cars apart Club"

Some Assembly Required

1966 Chevelle SS 396 M20

1970 Chevelle SS 396 M20

1967 Camaro SS 350 rs


2K+ Club

Status: Offline
Posts: 2788
Date:
Permalink  
 

compared to those damned cuts gathering dust, which they still will.

That was one of my concern/gripes... that crap in there gathering moisture, then it gets 31 degs, expands and I get a chunk-out. The other is rolling hard-wheeled things like an engine hoist or toolbox across the sharp edge of the joint and causing an "implode" on the edge.

This product is (their words) "Hockey Puck hard". When the joint is filled, it bonds to the irregular edges. After it's shaved off flush with a blade, a rolling object doesn't "transition or drop off" into the crack (pressuring that crisp edge of cement, or smacking into the opposing side) and breaking it off.


__________________


John D. - St. Louis Park, MN.

1965 El Camino - LT-1, 4L60e, 4wh discs, SC&C susp.
2013 F-150 Platinum - Twin Turbo 3.5

2018 Factory Five MkIV Roadster build thread


President

Status: Offline
Posts: 7253
Date:
Permalink  
 

I hope it works that way for you...thumbsup


__________________

Mitch D.   River Falls, WI

Lifetime member of the "Cars apart Club"

Some Assembly Required

1966 Chevelle SS 396 M20

1970 Chevelle SS 396 M20

1967 Camaro SS 350 rs


2K+ Club

Status: Offline
Posts: 2437
Date:
Update
Permalink  


Your concrete floor was poured in cold weather; the contractor more than likely would have requested the concrete supplier add calcium chloride to the mix. Calcium chloride accelerates curing time in cold weather, generates warmth and prevents the moisture within the product from freezing as the slab begins to cure.
As the new floor began to cure and cool those control joints functioned just as they were designed to and allowed the slab to crack at the ‘control joint’. Without heat in the building the floor contracted even more.
Depending on the temperature of the floor, my guess is the slab crack below the cut control joint allowed the fluid, self leveling joint compound to seep to a greater depth than you estimated.
I used twine, twisting it and packed it into the joint then applied the joint compound and come back with a razor blade and sliced off the excess.
My suggestion, wait until you’ve activated the in floor heat system. Once operational the floor temp will not vary more than a couple degrees.
Just my two cents, worth exactly what you paid for it.


__________________

Kevin

Northwestern Ohio


1K+ Club

Status: Offline
Posts: 1166
Date:
RE: Update "The 40+ Watt Garage"
Permalink  


My mother had the horizontal surface issue.

I truly believe I got it from her.

My Dad was a "neatnick"

Probably why they divorced.

That said I truly believe she had and undiagnosed form of AHSS

ADVANCED HORIZONTAL SURFACE SYNDROME

John, Shop looks great!!

Karl


__________________

More ambition than brains,

If you have more than 5 of anything, best to stop counting!


2K+ Club

Status: Offline
Posts: 2788
Date:
Permalink  
 

Latest installment - Primary workbench!

One of my many pet peeves is a wobbly, unstable workbench. Another is lack of depth. Yeah, it's a waste of sheetgoods for a deeper than 24" surface (can't just rip a sheet in half, and double your coverage...), but I like a deeper bench. I also like some concealed storage underneath. I modeled this bench after what I built at the "old" 40 Watt - taking what I liked (and didn't like) and building this setup.

One of the difficulties was securing it to the wall. From inside/visible going in - 1/2" sheetrock, screwed to 3/4" firring strip, glued to 1" foam, glued to concrete block. The wall system isn't going anywhere, but it wasn't built to anchor heavy stuff. I had to go through it all and get into concrete and spread the load across the wall - hence the 6" TapCon bolts.

The benchtop is 3/4" MDF. It has been sealed with 2 qts. of clear lacquer. MDF is a great surface. It's smooth, dimensionally stable, but it's a flippin' sponge - It has to be sealed or painted or the 1st time something liquid gets on it, it'll soak in and swell up. The cabinet faces are also sealed 1/2" MDF. I just laid out the door openings, cut them with a circular saw & rip-fence. This left a tiny uncut area at the corners, holding everything together. Installed the hinges at this point, mounted the panels to the framework, and cut the corners with a handsaw... instant doors.

(You can jab & jibe at me all day long about my benchvise mounting provisions, but that puppy ain't goin' anywhere. You can pound/beat/twist on whatever you're working on, and the effort & force goes into the part... not moving the bench around!)

Getting closer. The trim-out guys are supposed to start today, getting trim boards, soffit, etc. up and done. Then final grading.


-- Edited by John D on Thursday 11th of May 2023 06:25:07 AM


-- Edited by John D on Thursday 11th of May 2023 06:25:39 AM

Attachments
__________________


John D. - St. Louis Park, MN.

1965 El Camino - LT-1, 4L60e, 4wh discs, SC&C susp.
2013 F-150 Platinum - Twin Turbo 3.5

2018 Factory Five MkIV Roadster build thread


President

Status: Offline
Posts: 378
Date:
Update
Permalink  


Looks great!


__________________

Hankster

Columbus, MN

'71 Chevelle SS frame-off, restro-mod, 402/375hp, Tremec TKO 600 5-speed, 3:90 12-bolt posi

'60 VW Beetle currently in the CAC


1K+ Club

Status: Offline
Posts: 1297
Date:
Permalink  
 

VERY NICE!
Lots of thought and planning there to get what you want.

__________________

Bruce L. - Lakeville MN

1971 Malibu Convert


Founding Member

Status: Offline
Posts: 2740
Date:
RE: Update "The 40+ Watt Garage"
Permalink  


Very nice! I like about a 30" top. Anything less isn't enough, and any more it gets hard to reach over/around the inevitable piles to reach outlets and switches... also, my wife's cooking seems to keep making my arms get shorter. headscratch


__________________

Derek Kiefer - Mantorville, MN

69 Malibu Pro-Touring stroker LS1-383/T56 - 69 SS396-325/3spd project


2K+ Club

Status: Offline
Posts: 2437
Date:
Update
Permalink  


Very nice, definitely serious horizontal surfaces there.

__________________

Kevin

Northwestern Ohio


President

Status: Offline
Posts: 7253
Date:
Permalink  
 

I LIKE it !!
I didn't see any framing for shelves, is this just for the big stuff ?
Cutting the doors out the way you did is genius... you KNOW they are going to fit.

__________________

Mitch D.   River Falls, WI

Lifetime member of the "Cars apart Club"

Some Assembly Required

1966 Chevelle SS 396 M20

1970 Chevelle SS 396 M20

1967 Camaro SS 350 rs


2K+ Club

Status: Offline
Posts: 2788
Date:
Update "The 40+ Watt Garage"
Permalink  


I didn't see any framing for shelves, is this just for the big stuff

I did install supports/hangers for interior cabinet shelves, that cover about 80% of the interior spaces. They're about 1/2-way height, 1/2-way depth of the total area. The last 30 or so inches of cabinet on each end is full height, the rest has a shelf. 

Lots of thought and planning there to get what you want.


I did many CAD drawings of the benchwork before building. An element of it was a bit of a thin overhang (to clamp things to), but not enough overhang to be fragile. Another was working height - the benchtop is at 39" (works for ME height), not the "kitchen standard" of repurposed cabinets, or "big box" base cabinets purchased for a workshop.

During the planning of this I discovered an interesting quirk about lumber/sheetgoods. We all know a 2x4 isn't TWO by FOUR inches (1-1/2 x 3-1/2)... but a sheet of plywood IS 48" by 98" (4' x 8'), but MDF for some unknown particular quirk of the universe is 49" by 97" (???***???) Whatever... it's built.


-- Edited by John D on Thursday 11th of May 2023 08:38:31 PM

__________________


John D. - St. Louis Park, MN.

1965 El Camino - LT-1, 4L60e, 4wh discs, SC&C susp.
2013 F-150 Platinum - Twin Turbo 3.5

2018 Factory Five MkIV Roadster build thread


President

Status: Offline
Posts: 7253
Date:
Permalink  
 

Alright !! more flat surface area for important "stuff "...thumbsup


__________________

Mitch D.   River Falls, WI

Lifetime member of the "Cars apart Club"

Some Assembly Required

1966 Chevelle SS 396 M20

1970 Chevelle SS 396 M20

1967 Camaro SS 350 rs


1K+ Club

Status: Offline
Posts: 1166
Date:
Permalink  
 

Sooo, MDF, (medium density fiberboard), I had to look it up.

Sounds a lot like LP siding.

Obviously quality, a stable engineered material.

Your sealing will help to minimize the formaldehyde in product.

Appears to be a great product for your use.

Your skills and knowledge in almost everything never fail to impress me.

Looks great, John.

My posts are usually about other people's skills and knowledge.

You always impress me with yours,

Karl


__________________

More ambition than brains,

If you have more than 5 of anything, best to stop counting!


1K+ Club

Status: Offline
Posts: 1166
Date:
Permalink  
 

Sooo, MDF, (medium density fiberboard), I had to look it up.

Sounds a lot like LP siding.

Obviously a quality, stable engineered material.

Your sealing will help to minimize the formaldehyde in product.

Appears to be a great product for your use.

Your skills and knowledge in almost everything never fail to impress me.

Looks great, John.

My posts are usually about other people's skills and knowledge.

You always impress me with yours,

Karl


-- Edited by more ambition than brains on Thursday 11th of May 2023 09:08:19 PM

__________________

More ambition than brains,

If you have more than 5 of anything, best to stop counting!


2K+ Club

Status: Offline
Posts: 2788
Date:
Update
Permalink  


Haven't posted anything in a long time... the socket on my phone is jacked up - can't plug in and transfer pictures (luckily it'll still charge, but that's it). I'll figure something out... either transfer everything to the internal SD card, eject it, and transfer to PC, or email them to myself.

__________________


John D. - St. Louis Park, MN.

1965 El Camino - LT-1, 4L60e, 4wh discs, SC&C susp.
2013 F-150 Platinum - Twin Turbo 3.5

2018 Factory Five MkIV Roadster build thread


1K+ Club

Status: Offline
Posts: 1166
Date:
RE: Update "The 40+ Watt Garage"
Permalink  


Hope you get it fixed soon, miss your reports.

Karl


__________________

More ambition than brains,

If you have more than 5 of anything, best to stop counting!


2K+ Club

Status: Offline
Posts: 2788
Date:
August Update #1 "The 40+ Watt Garage"
Permalink  


Sorry about the long delay in posting updates. My phone is still jacked up, but I finally sat down and moved some pictures.

Lots has happened since the workbench build. The building has been backfilled, then graded, and temporary grass planted (erosion control), and the front curb poured.


Attachments
__________________


John D. - St. Louis Park, MN.

1965 El Camino - LT-1, 4L60e, 4wh discs, SC&C susp.
2013 F-150 Platinum - Twin Turbo 3.5

2018 Factory Five MkIV Roadster build thread


2K+ Club

Status: Offline
Posts: 2788
Date:
August Update #2 "The 40+ Watt Garage"
Permalink  


Then it was painting time!

40Watt_069.png


40Watt_070.png

40Watt_072.png


Attachments
__________________


John D. - St. Louis Park, MN.

1965 El Camino - LT-1, 4L60e, 4wh discs, SC&C susp.
2013 F-150 Platinum - Twin Turbo 3.5

2018 Factory Five MkIV Roadster build thread


2K+ Club

Status: Offline
Posts: 2788
Date:
Update "The 40+ Watt Garage"
Permalink  


Somewhere between paint and these photo's I did the "trim out" on the exterior. Connected and hung the exterior light fixtures, and power outlets. Up until August 14th, the entire building was being run off an extension cord from the house! Had to be very careful about power draw, tool usage, etc.

The plan from inception was to get rid of the overhead power lines to the house. They were low, and dangerously near trees, etc. The plan is/was to go underground from the pole to a new meter/breakout panel on the garage. Then underground again to the house (and use the old house meter box as a splice box). The new meter box has a 300A main breaker, then a 100A (new garage), and a 150A (house) sub-breakers. The garage itself has it's own panel (100A main), and several circuits.

Near mid-July, the Sparky, an excavation contractor, and I trenched from the house to the garage (me getting a sweat equity discount). A 2" pipe was laid in (24" below grade), and 1/0 conductors pulled in. These were just left in the panel boxes in preparation for "cut-over" day. The trench was backfilled 6", then the new gas line & tracer wire laid in. A little more backfill, then a new cable TV/Internet wire installed as well. Then full backfill & grading. Some grass seed and now we wait for Xcel Energy.

August 14th. After waiting about 5 weeks after payment in full and scheduling snafus Xcel Energy shows up. So does Mother Nature with the 1st rainstorm in WEEKS (Arrggg) angry
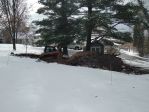
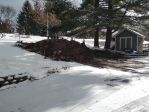
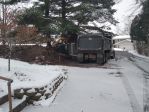
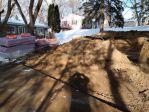
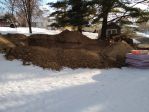
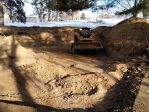
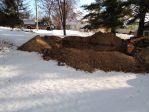
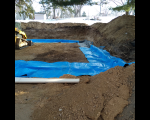
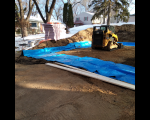
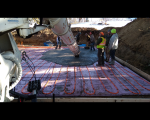
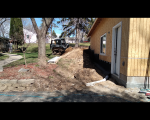
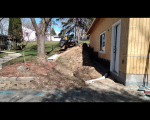
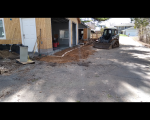
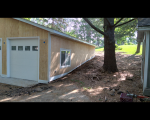
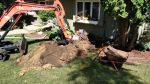
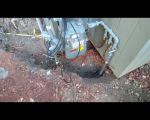
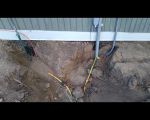
! My Sparky is here as well. Xcel Energy pulls out - not going to work in the rain for a non-emergency. They go to another job nearby that's dry. My Sparky has a few hours prep work he can do, so he sticks around. Wouldn't you know it about 2 hours later Xcel shows up again, starts unloading the backhoe, and says "We're gonna do the whole job... trench, pull, cut overhead, restore service, you guys ready??"  (Lucky my Electrician didn't bail!!)

By 4pm the power was restored, with the new meter in place, and 100A of juice on tap for the new shop  nana.


-- Edited by John D on Saturday 26th of August 2023 11:15:31 AM


Attachments
__________________


John D. - St. Louis Park, MN.

1965 El Camino - LT-1, 4L60e, 4wh discs, SC&C susp.
2013 F-150 Platinum - Twin Turbo 3.5

2018 Factory Five MkIV Roadster build thread


2K+ Club

Status: Offline
Posts: 2788
Date:
Update
Permalink  


Scroll up... there are 3 updates since the workbench!

__________________


John D. - St. Louis Park, MN.

1965 El Camino - LT-1, 4L60e, 4wh discs, SC&C susp.
2013 F-150 Platinum - Twin Turbo 3.5

2018 Factory Five MkIV Roadster build thread


President

Status: Offline
Posts: 7253
Date:
RE: Update "The 40+ Watt Garage"
Permalink  


Lookin' good.  nana


__________________

Mitch D.   River Falls, WI

Lifetime member of the "Cars apart Club"

Some Assembly Required

1966 Chevelle SS 396 M20

1970 Chevelle SS 396 M20

1967 Camaro SS 350 rs


1K+ Club

Status: Offline
Posts: 1297
Date:
Update
Permalink  


Good work
Looking forward to seeing the new place in person next month.

__________________

Bruce L. - Lakeville MN

1971 Malibu Convert


1K+ Club

Status: Offline
Posts: 1166
Date:
RE: Update "The 40+ Watt Garage"
Permalink  


Loving it!

Karl


__________________

More ambition than brains,

If you have more than 5 of anything, best to stop counting!

Page 1 of 1  sorted by
 
Quick Reply

Please log in to post quick replies.

Chatbox
Please log in to join the chat!