Discussion Forum - Northstar Chevelle Club

Members Login
Username 
 
Password 
    Remember Me  
Post Info TOPIC: Three bad lifters


Vice President

Status: Offline
Posts: 478
Date:
Three bad lifters
Permalink  


I check the valve train geometry back when I first installed the roller rockers by checking the pattern on the valve stem tip. Since then I found a much more accurate way to get good geometry, "at 1/2 valve lift the rocker should be 90* to the valve stem". I found the intakes could use an additional .250 and exhaust .200".

There is also the lifter plunger setting that could be up to .080 with one full turn of the adjuster, well I find that these lifters are short travel lifters and should be set to .010-.015" at the lifter, however this engine has always had a lot of lifter noise and is quieter with the lifters set tighter.

So I decided to rest all the lifters to .010" and check each lifter as I go. Found #5 & 7 exhaust were stuck down and found the #8 intake lifter is coming apart, the upper snap ring is out of place and the internal spring just keep pushing the push rod up as I loosen the adjuster. So need to get the manifold off and remove and insect the parts.


__________________

Bob W.

Lino Lakes


President

Status: Offline
Posts: 7259
Date:
Permalink  
 

Well, you were looking for something to do during the stay at home time, right ?

Speaking of something to do, haven't seen anything about the Impala restoration for a while.


__________________

Mitch D.   River Falls, WI

Lifetime member of the "Cars apart Club"

Some Assembly Required

1966 Chevelle SS 396 M20

1970 Chevelle SS 396 M20

1967 Camaro SS 350 rs


Vice President

Status: Offline
Posts: 478
Date:
Permalink  
 

After getting the manifold off I pulled the lifters one at a time. I found that the retainer, the part that holds the lifter together, was damaged by the push rod. These lifters have a small center to locate the push rod, so the push rod could set just inside the outer body of the lifter. So when I removed and installed the checking push rod, or when reinstalling the original push rod I damaged the retainer. YES I created this problem  banghead
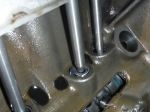
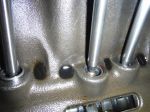
. I have just not ever seen a lifter that would not center the push rod each time you drop it in  dunno . On one lifter the retainer came out so the internals were being held in by the push rod , with the other two the retainer was deformed just enough to holding the plungers down. The good news is I was able to straighten the retainers clean and reassemble the lifters. I inspected all the other lifters for damage, I also inspected the face of each, all looked good.
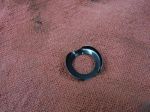
 lifters 003.JPG

lifters 007.JPG

lifters 010.JPG


-- Edited by Bobs_Place on Friday 17th of April 2020 08:08:45 PM

Attachments
__________________

Bob W.

Lino Lakes


Vice President

Status: Offline
Posts: 478
Date:
Permalink  
 

Lost in the 60s wrote:

Well, you were looking for something to do during the stay at home time, right ?

Speaking of something to do, haven't seen anything about the Impala restoration for a while.


I am about 7 week out of total hip replacement. I worked on the Impala, front fenders and doors, getting them ready to blast and prime just before the hip thing. After about 4 weeks sitting on my axx, it was time to get some things done. Didn't think working on the Impala would be the smart move with the lifting bending twisting and stretching. I didn't want to blast without being able to primer same day as the first week back out in the shop I could only work 2-3 hours, much better now almost a full day.

So as it turns out out a rocker arm or a push rod is a lot lighter then a door or fender thumbsup


__________________

Bob W.

Lino Lakes


President

Status: Offline
Posts: 7259
Date:
Permalink  
 

You're lucky the internal piston didn't come out of the lifter body at rpm. I had that happen on my LS5 and the piston fell into the center galley and when a lobe came around, it snapped the cam in 3 pieces. That led, of course, to a godawful replacement cam with 304 duration at .520 lift. Not very streetable anymore, but it sure was fun hammering the pedal at 3,000 and having the L60's go up in smoke at 30 mph..

I forgot about the hip replacement. Good you are being sensible about giving it time to heal.


__________________

Mitch D.   River Falls, WI

Lifetime member of the "Cars apart Club"

Some Assembly Required

1966 Chevelle SS 396 M20

1970 Chevelle SS 396 M20

1967 Camaro SS 350 rs


1K+ Club

Status: Offline
Posts: 1728
Date:
Permalink  
 

Did you look into replacing those retainers with snap rings? Those don’t seem very sturdy.


__________________

Chris P
East Central, Mn

66 Chevelle 300 deluxe


Vice President

Status: Offline
Posts: 478
Date:
Permalink  
 

67ss wrote:

Did you look into replacing those retainers with snap rings? Those don’t seem very sturdy.


 No I did not.

These retainers put the P/R cup deeper into the lifter than a snap ring would maybe .050-.100". It took a lot of force to snap the retainers in place, and the seemed to fit good.

I am running slightly higher then spec on spring pressure and going from 7/16 to a lighter 3/8 .080 push rods so the valve train should be stable at speed.

I am not to optimist that I will quiet down the lifter noise with the .010' setting so I will likely need a much deeper setting. That puts the push rod cups farther down and away from the retainers. Once adjusted, the push rod cup and retainer should not come in contact. Could the higher valve spring pressure be contributing to the valve train noise?

I have the lifter part no.( XJ-817-R) but cannot find an info on them except that they appear to be in the short travel category based on my measurements.  Are they "Anti Pumpups"?


__________________

Bob W.

Lino Lakes


1K+ Club

Status: Offline
Posts: 1728
Date:
Permalink  
 

I wouldn’t think spring pressures would make it noisy. Do you have roller rockers? Some say those can make things a bit louder. I also think headers make it seem like valvetrain noise when it is not.


__________________

Chris P
East Central, Mn

66 Chevelle 300 deluxe


Vice President

Status: Offline
Posts: 478
Date:
Permalink  
 

I suspect spring pressure because I know its high, 20-30# higher the high side of spec both seat and over the nose.

I do have rollers and would expect some noise. Some are consistently louder then others and some I think are not very loud at all.

I had a pickup that had a tic when cold, sounded just like a lifter, I saw some soot around the exhaust manifold/head I tightened the manifold bolt, no tic. I don't think the noise is headers or rocker, as there is less noise when the lifters are adjusted tighter.

After reading about shout travel lifters I was going to set them to the recommended setting of .010", this would give internal plunger .070" travel before it bottomed out and making noise. The problem with that theory is that there is a lot of oil in the lifter under the plunger to bleed out which prevents plunger from bottoming out and make noise! Rather, I think if the lifter is set to .010' plunger travel, with the excessive valve spring pressure, the lifter bleeds more oil from under the lifter plunger when cycled, if the lifter plunger return spring is not capable of returning the plunger fast enough then the clearance between the push rod and push rod seat would increase. If the lifter is set deeper, to .050 to .070" or so, the plunger return spring would be compressed to a higher pressure and hopefully capable of returning the plunger fast enough before the next cycle then the clearance/noise is eliminated.

At one full turn of the adjust, the lifter is bottomed out and the valve starts to open, that's about .080" plunger travel. I was set at 5/8 of a turn, I'll go tighter.


__________________

Bob W.

Lino Lakes


Vice President

Status: Offline
Posts: 478
Date:
Permalink  
 

Back on the Chevelle engine yesterday, just got the second set of push rods. Had to send first set back, they were the correct length but put the rocker roller tip to close to the edge of the valve stem banghead. With out a push rod I could not accurately check the contact pattern. I shortened the push rods by .100, that gave me a narrow pattern that is very close to center. thumbsup

While waiting for push rods and gaskets last week, I cleaned gasket surfaces and all the bolt holes in the heads and at the time I thought it all looked good. Later as I was sizing up the new push rods, I found a lot of trash and metal fillings that came from the bolt holes, two holes on each head are opened behind to the push rod area and will leak oil if not cleaned and sealed.  I used a tap to clean the treads but didn't seem like I was cutting new threads, I think the filings and trash was there from new and was never cleaned out. So drained the oil cut the filter opened looking to see if any debris made it to the pan or filter, all looked good,  I then laid a cloth in the lifter valley to catch the debris, then flushed the heads. I plugged the filter bypass to trap any debris and prevent it from getting past the filter. When the engine is ready to run I'll fill it with a bit thinner oil to flush, than drain and refill with the correct oil, replace the filter and again cut open to inspect. Hopefully it will all look good.


__________________

Bob W.

Lino Lakes


President

Status: Offline
Posts: 7259
Date:
Permalink  
 

I have a set of re-threading taps and dies to repair and clean damaged/dirty threads. They aren't hard enough to cut new threads and work well for what you did. I'm always concerned about removing more material when cleaning threads too.

__________________

Mitch D.   River Falls, WI

Lifetime member of the "Cars apart Club"

Some Assembly Required

1966 Chevelle SS 396 M20

1970 Chevelle SS 396 M20

1967 Camaro SS 350 rs


Vice President

Status: Offline
Posts: 478
Date:
Permalink  
 

Lost in the 60s wrote:

I have a set of re-threading taps and dies to repair and clean damaged/dirty threads. They aren't hard enough to cut new threads and work well for what you did. I'm always concerned about removing more material when cleaning threads too.


 I find it hard to believe that I actually cut threads, tap went in very easily. At work, we would always clean bolt hole with a taps as needed, some engine it was required on headbolt holes.  


__________________

Bob W.

Lino Lakes


Vice President

Status: Offline
Posts: 478
Date:
Permalink  
 

Last week, I cleaned and flushed the heads into the lifter valley were I placed a cloth to catch any debris, than removed the cloth, flush oil pan from cam area.

I set the lifters by using a .030" feeler gauge between the valve stem and rocker tip, then over tighten the rocker and opening the valve to bleed and bottom out the lifter, than back the rocker adjusting nut until the feeler gauge loosens, than lock the adjuster nut and remove the feeler gauge.

Before installing the distributor I reset the curve to 26* at idle and 34* all in by about 2400 RPM, than installed a different vacuum advance canister which should make about 18* more at cruise.

Filled and flushed with 5-30, drained and cut the filter, found filter very clean, 2-3 specks in the filter, the drain pan was clean after sitting then dumping. Fill the crank case with the good stuff and installed a new filter.

 Took the car for a test beet, ran good, very little to no lifter noise.    Big improvement!  nana


__________________

Bob W.

Lino Lakes


1K+ Club

Status: Offline
Posts: 1260
Date:
Permalink  
 

Don't you love it when a plan comes together? thumbsup


__________________


'69 Convertible,  Lemans Blue, 454, 200 4R, 12 Bolt. 

Jon H.  Lino Lakes


1K+ Club

Status: Offline
Posts: 1169
Date:
Permalink  
 

A level of precision I could only watch or dream about!

Congrats and happy motoring.

Karl

__________________

More ambition than brains,

If you have more than 5 of anything, best to stop counting!

Page 1 of 1  sorted by
 
Quick Reply

Please log in to post quick replies.

Chatbox
Please log in to join the chat!