Discussion Forum - Northstar Chevelle Club

Members Login
Username 
 
Password 
    Remember Me  
Post Info TOPIC: It's time for overdrive


Vice President

Status: Offline
Posts: 476
Date:
It's time for overdrive
Permalink  


I ordered a Legend 700 (Jan 2017) shortly after Chris S. ordered his. I spent a lot of time contemplating other options. One big considerations was the gear ratios, I did not want a deep 1st gear with a tall OD gear. I have a very good running M22 that I am very happy with and hate to see it go away, so the Gear Vendors Overdrive was another option. I think ether option would be a grate upgrade. With GVO added to may trans, gear ratios are very similar with a slightly deeper 1st in the LGT700. Not Knowing when the 700 would be shipped and not wanting to wait another summer I ordered a Gear Vendors OD back around April or May, just haven't had time to get started on it until now.

I acquired an old Muncie case years ago that I'll use to help with fitting the OD in the car as I will have to do some mods to the tunnel in the original Ujoint area. Not happy with that but the floor was already chopped up by a previous owner which I repaired during the restoration.

I'll have to modify the exhaust, X pipe will have to go than probably do a H pipe. The drive shaft will be shortened. Both of these changes would have been required for ether the LGT or the GVO.

Started the install about a two weeks ago, tunnel mods are going good. So into the CAC for hopefully not to long.


Attachments
__________________

Bob W.

Lino Lakes


3K+ Club

Status: Offline
Posts: 4764
Date:
Permalink  
 

That's another way to skin the overdrive cat.  You'll love it once you're on the highway again. 

Keep us posted on the project!


__________________

Stan S.-Twin Cities 'South Metro'

1972 Malibu Convertible 2nd time around 

1999 SS Camaro LS1-6 speed

Forum influenced terms: 'Link Paste', 'Stanitized', & 'Revolving garage door...' 


Vice President

Status: Offline
Posts: 476
Date:
Permalink  
 

I used the empty Muncie case along with the GVO extension housing to help fit the overdrive unit into it's proper location. Had to notch the floor support back of the O.D. unit but no cutting/welding on the tunnel, just reshape for clearance. Was then able to figure driveline angles and shaft length. I'll have to raise the rear of the car about 1.5in. to the increase the driveshaft angle and reduce the working angle between the trans and D shaft. The car has settled over time so that puts the ride height in the rear back up to where I like it, I'll deal with the front later.

The drive shaft will have to be shortened just over 15 in. to about 39 1/2 in. I didn't like the slip yoke from GVO as it seemed short, after adding in the 3/4 in for movement the yoke would not fully engage the support bushing. I decided to shorten my original yoke to a more acceptable length.

I pulled the tail housing and side cover from the trans, flushed in clean solvent, inspected and reassembled with the GVO housing, than adjusted shift linkage.

The clutch will be next.


Attachments
__________________

Bob W.

Lino Lakes


Vice President

Status: Offline
Posts: 476
Date:
Permalink  
 

I pulled the bell housing and pressure plate, all looked good. I have a new pressure plate and disc that I picked up at a swap meet cheep $10 last year. I want to replace the disk from the car with the new disc, that disc appears to have a much stiffer spring center than the disc from the car. The clutch was a bit jumpy but the real problem I was having with the clutch "I think" was on deceleration the car would jerk back and forth from about 2000 rpm to idle, I would always have to push the clutch in to stop it. I tightened the posy, adjusted drive line angles, replaced rear suspension bushings, nothing stop the jerking. I'm hoping the weak center springs are the cause.

I'll decide later on the flywheel and clutch assembly and after I test out the new disc, I may still have some trans leaks that I want to clear up also, will add that to the list for the winter.

I didn't like the looks of the pilot bushing so I replaced with new. The new bushing went in tight. When I installed the trans, it didn't just slide in, had to wiggle a lot to get the trans tight to the housing, I thought the disc wasn't centered but after adjusting the freeplay, than holding the peddle down I could not turn the trans freely. I should have checked the pilot bushing. Out with the trans and found the bushing to be tight, with some strip of sand paper and an old input shaft I opened up the clearance. Good now, back in with the trans


Attachments
__________________

Bob W.

Lino Lakes


President

Status: Offline
Posts: 7268
Date:
Permalink  
 

Could the jerking on deceleration be caused by timing, as it is fully vacuum advanced and the cam may be aggressive enough to not want to idle down smooth. The only time I've had that situation with a clutch, is when some of the dampener springs were broken.

I hope you researched that LUK part number. They are not known to service high performance, mostly stock replacement.

__________________

Mitch D.   River Falls, WI

Lifetime member of the "Cars apart Club"

Some Assembly Required

1966 Chevelle SS 396 M20

1970 Chevelle SS 396 M20

1967 Camaro SS 350 rs


Vice President

Status: Offline
Posts: 476
Date:
Permalink  
 

I have heard/read about timing advance causing the jerking, seems to me I've had the vacuum advance disconnected when setting up the distributor, I don't think it had any affect on the jerking. The engine is not slow to return to idle. I have found that the condition is lessened with a higher idle or when the solenoid for the a/c is not adjusted correctly and causing a higher than normal idle.

I wasn't clear on the two clutch discs, the 8 spring is the disc I am removing and installing the 5 spring, with the 5 spring looking like a much stiffer spring center

As for the Luk part number, I did not do any research but just wanted to see if the jerking changes or goes away, I'll just finish out the season with it, and hopefully help me decide on what clutch to install.

Your comment on the broken damper springs is interesting. Could the dampening of the clutch disc with the broken springs be similar to the weaker 8 spring disc?


__________________

Bob W.

Lino Lakes


President

Status: Offline
Posts: 7268
Date:
Permalink  
 

Yes, the 8 springs do look softer than the 5 spring hub. Some of them, also, appear shiny, like they are collapsed and spinning around loose. That will definitely cause the jumpy clutch while engaging.

__________________

Mitch D.   River Falls, WI

Lifetime member of the "Cars apart Club"

Some Assembly Required

1966 Chevelle SS 396 M20

1970 Chevelle SS 396 M20

1967 Camaro SS 350 rs


Vice President

Status: Offline
Posts: 476
Date:
Permalink  
 

The Exhaust took way longer to modify than I expected, the X pipe interfered with the GVO so it had had to go, may put in a cross over in later .  The trans slipped right in like it should, with the clutch peddle depressed and trans in gear I was able to turn the output shaft very easily by hand. Got the drive shaft back from the DL shop and installed. After raising the rear of the car and some rear axle adjustment the Ujoint angles came out very good.

Need to do the electrical hookups and put the interior back together.


__________________

Bob W.

Lino Lakes


Vice President

Status: Offline
Posts: 476
Date:
Permalink  
 

The wiring is fairly easy, just plugin harnesses to the GVO control unit, the control shuts off the over drive at low speed so as not to burn up the OD clutch. It uses oil pressure from an internal pump to provide the pressure to apply the clutch, the pump turn only when the drive shaft turns. The harnesses are than wired to the power and ground, speed sender, manual control and solenoid. They also provide a shift knob with an on/off switch that can be used to control the overdrive, for normal driving they recommend using the clutch for a smoother shift. 

So, I thought why not signal the GVO to go to over drive from the clutch switch but only in 4th gear. So after some time with paper and pencil I was able to com up with a wiring diagram that I thought would work. I used a signal from a 4th gear switch (that switch was used to control timing on these cars back on the 70s) the clutch switch and a hand full of relays to control the over drive instead of the gear shift knob switch.

I finished the trans install, adjusted the clutch, fill the trans and GVO with oil. Than made all wiring connections and tested, assembled the interior.

Only had time for a short drive two nights ago, no highway and needed to make some shift linkage adjustments, so only got into OD at low speed 45-55mph. Shifted very nice from what I could tell.

Today I readjusted the linkage and headed for the highway, pounded out all 4 gears,  than just stuffed the clutch one more time I had over drive.nana To down shift from OD to 4th push the clutch, move the stick into neutral and back to 4th gear, cycle the clutch again and back in OD. Works Great.thumbsup 


Attachments
__________________

Bob W.

Lino Lakes


3K+ Club

Status: Offline
Posts: 4764
Date:
Permalink  
 

Nice job Bob!  beers  Glad it worked the way you designed it.

We've got some pretty smart folks in this club.


__________________

Stan S.-Twin Cities 'South Metro'

1972 Malibu Convertible 2nd time around 

1999 SS Camaro LS1-6 speed

Forum influenced terms: 'Link Paste', 'Stanitized', & 'Revolving garage door...' 


1K+ Club

Status: Offline
Posts: 1723
Date:
Permalink  
 

Very cool.


__________________

Chris P
East Central, Mn

66 Chevelle 300 deluxe


President

Status: Offline
Posts: 7268
Date:
Permalink  
 

Wow, Bob, that's 5 more relay's than I want to have to figure out...doh


__________________

Mitch D.   River Falls, WI

Lifetime member of the "Cars apart Club"

Some Assembly Required

1966 Chevelle SS 396 M20

1970 Chevelle SS 396 M20

1967 Camaro SS 350 rs


Vice President

Status: Offline
Posts: 476
Date:
Permalink  
 

I was hoping to do it with less relays, but rather than install a separate clutch switch which would not require a relay I thought it would be easier and more reliable to use the existing clutch switch and a relay to isolate the starter circuit from the clutch signal for the GVO. The 4th gear switch just operates opposite from what I needed, the contacts were closed when they needed to be opened and opened when I needed the closed, so another relay reversed  the signal. The relays are very reliable especially when used in a clean, dry environment and with very low amperage, so I don't use them sparing-lee.

 I may at some time add one more relay for a full throttle kick down to down shift the GVO , the Gear Vendor people say it works extremely well, and I will like it.stirpot  
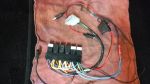
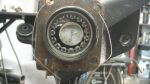
Once again I'll use the throttle switch that triggers the air door under the hood.thumbsup


__________________

Bob W.

Lino Lakes


Vice President

Status: Offline
Posts: 476
Date:
Permalink  
 

As part of installing the overdrive I need to change the gear ratio. The 3.31 was great on the highway in OD but first gear is just to tall, have to slip the clutch to much from a stop and the clutch gets jumpy after driving for a bit. I decided to install the 4.11 from my other housing, OD will be about 2-3 mph faster than the 3.31 in 4th. Eventually I will go to a gear somewhere between the 3.31 and the 4.11 but wanted to try the 4.11 to help me decide.

I checked the backlash and pattern before removing the 4.11 gear, the BL was high and the pattern was not very acceptable.hyper 
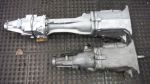
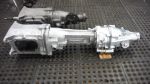
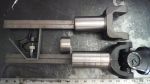
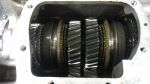
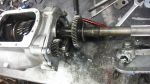
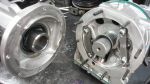
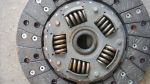
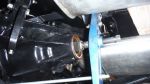
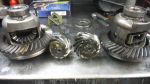
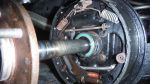
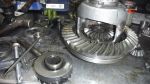
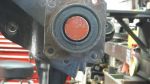
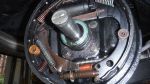
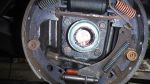
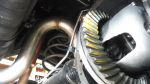
Than pulled the diff assembly from the housing. Rather than pounding on the pinion to remove it, I decided to build a fixture to push the pinion and save the bearings from getting a beating.
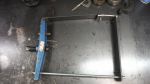
thumbsup The fixture worked great.

Had to order shim kits to properly setup the diff gears. Will also have to replace an axle seal again on the right side, I'll try to locate the seal inward if I can to hopefully get away from the worn surface on the axle.


Attachments
__________________

Bob W.

Lino Lakes


Vice President

Status: Offline
Posts: 476
Date:
Permalink  
 

I found some shims (from a another project) that were good enough to use temporarily to set pinion depth. The gears showed a better pattern by adding more shim until I was up to about .010. I that point the pattern started showing that pinion was to deep, so I pulled .004 back out. I'll  measure and replace this shim pack with the correct shim when they get here.

I then shimmed the clutch packs for the posy, cleaned up the right side brakes and diff housing to get ready for final assembly.

I also check the ends on both housings with the alignment bare, only one end showed very good. I don't see any spline ware on the axles so I don't think the misalignment is a problem. Future plans are to install Impala housing ends for 11in brakes and eliminate the "C" clips.

After the shims arrived I installed a .032 shim pack and bearing on to the pinion, assembled into the housing, than installed the diff case, set the back lash (.004-.005) and bearing preload. Painted the gears, pattern cam out good.


Attachments
__________________

Bob W.

Lino Lakes

Page 1 of 1  sorted by
 
Quick Reply

Please log in to post quick replies.

Chatbox
Please log in to join the chat!