Discussion Forum - Northstar Chevelle Club

Members Login
Username 
 
Password 
    Remember Me  
Post Info TOPIC: Winter work on 71 Convert, Round 3


1K+ Club

Status: Offline
Posts: 1299
Date:
Winter work on 71 Convert, Round 3
Permalink  


My 71 convert is in the shop this winter and the 59 Nomad is in storage.

Plan is to stay focused and not delve into a full restoration.

step one is to replace the old gas tank (leaks form the top if full, and yes it is the one i got from you ~4 years ago), and patch up the trunk.

also want to clean up the in interior, perhaps recover the seats, fix the odometer and clean up the engine and under the hood.

still unsure of the paint status, will be fixing several areas (like the door seam i had to weld up on the upper drivers door, as it had split ~3")

will post some updates with pictures as it gets moving


-- Edited by BLyke on Thursday 2nd of November 2017 07:05:33 PM

__________________

Bruce L. - Lakeville MN

1971 Malibu Convert


Active Member

Status: Offline
Posts: 491
Date:
RE: Winter work on 71 (and hopefully a brief time in the CAC)
Permalink  


Hey Bruce,

If you need a hand this winter let me know. I don't have any car projects this winter. My 71 is hibernating for once. I am pretty close to you in Farmington. I have lots of tools.

__________________

'Gear Lube' 
emoticon-tv-002.gif


President

Status: Offline
Posts: 378
Date:
Permalink  
 

if you need, I have a gas tank, straps and sending unit out of the '71 donor car that I bought.


I also have some other parts.  I can send you a list if you would like.


Hank


__________________

Hankster

Columbus, MN

'71 Chevelle SS frame-off, restro-mod, 402/375hp, Tremec TKO 600 5-speed, 3:90 12-bolt posi

'60 VW Beetle currently in the CAC


President

Status: Offline
Posts: 7257
Date:
Permalink  
 

BLyke wrote:

My 71 convert is in the shop this winter and the 59 Nomad is in storage.

Plan is to stay focused and not delve into a full restoration.

will post some updates with pictures as it gets moving


 laughinglaughing yeah, right Bruce   laughinglaughing

Ask some of us how well that plan works.  rolleyes

Seriously, I hope you stick with the plan and have it back on the road for summer. I have done that with my '66 twice now and it does help to keep the interest and motivation going. Hang a calendar in the garage with a BIG circle around MAY 15th as the day you drive it back out...thumbsup


__________________

Mitch D.   River Falls, WI

Lifetime member of the "Cars apart Club"

Some Assembly Required

1966 Chevelle SS 396 M20

1970 Chevelle SS 396 M20

1967 Camaro SS 350 rs


1K+ Club

Status: Offline
Posts: 1299
Date:
Permalink  
 

thanks guys,
I'm still doing the assessment trying to decide how far to take it (starting to think long term a repacement body at 13K is looking more like the way to go should i want to go the whole wayrolleyes)
i did put up a 2016 calendar on the wall and will have several dates circled. 5/15 is a good one, also the out of storage date for the Nomad and the back to the 50 weekend.

The car has a lot of resto-muddifacation, bondo, long hair fiberglass, Great Stuff foam, and chunk-o-steel patches. i knew this when i bought the car, but seeing it ripped down to bare metal is a real dose of reality.
Also looks like the gas sending unit was at one time accessed with a chisel with out pilling the tank. then it was "fixed with RTV"
Will get a list of parts needed, i think the tank and straps will be fine.


-- Edited by BLyke on Sunday 27th of December 2015 10:06:16 AM

__________________

Bruce L. - Lakeville MN

1971 Malibu Convert


President

Status: Offline
Posts: 7257
Date:
Permalink  
 

It would be FAR less expensive than 13k to find a clean, southern roller and build/use it as a donor.
I've heard of a goofball who drives all over the country and does things like that...doh


__________________

Mitch D.   River Falls, WI

Lifetime member of the "Cars apart Club"

Some Assembly Required

1966 Chevelle SS 396 M20

1970 Chevelle SS 396 M20

1967 Camaro SS 350 rs


1K+ Club

Status: Offline
Posts: 1299
Date:
Permalink  
 

Lost in the 60s wrote:

It would be FAR less expensive than 13k to find a clean, southern roller and build/use it as a donor.
I've heard of a goofball who drives all over the country and does things like that...doh


It may be even cheaper to do an "as needed update on a tight budget" and keep driving it all over the place without worry.


__________________

Bruce L. - Lakeville MN

1971 Malibu Convert


1K+ Club

Status: Offline
Posts: 1299
Date:
Permalink  
 

Here are a few pics of the inital areas i have delved into so far

1 Starting point, holes in the lower panel

2 The "great stuff" covered with some sore of undercoating on the opposite side

3 The area with the bondo removes and a patch panel (Yes i know i can buy new parts. Trying to get good at making then so i can do it on cars that they are not available for in the future. if it is a dud all that is lost is some time and  something will have hopefully been learned)

4 Part of the pile of stuff i removed

5 The leaky gas tanks and Stan's old one that will go in once i decide what to do with the trunk. the reality is the all the metal (floor, supports, wheel houses and fenders) should probably be replaced. the good news the hinges seen solidrolleyes

-- Edited by BLyke on Tuesday 29th of December 2015 09:13:43 PM


-- Edited by BLyke on Tuesday 29th of December 2015 09:25:49 PM


-- Edited by BLyke on Tuesday 29th of December 2015 09:26:34 PM

Attachments
__________________

Bruce L. - Lakeville MN

1971 Malibu Convert


1K+ Club

Status: Offline
Posts: 1299
Date:
Permalink  
 

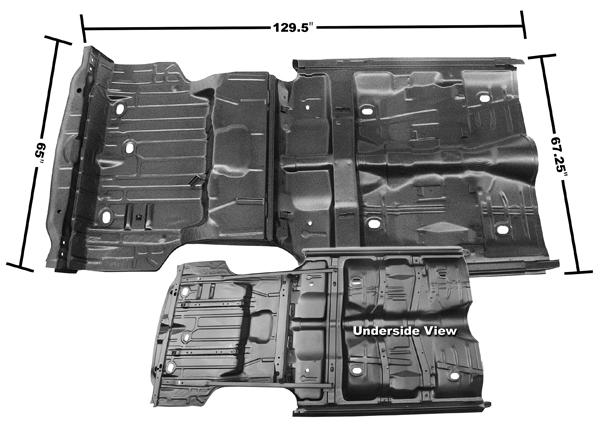
to really do it right.... this is all i would need to fix the floors

Sheet%20Metal_1291566317.jpg


__________________

Bruce L. - Lakeville MN

1971 Malibu Convert


President

Status: Offline
Posts: 7257
Date:
Permalink  
 

COOL, now they come with the trunk floor attached too ...nana

Maybe we can get a quantity discount on 2 or 3...thumbsup

Who is making them and cost ?


__________________

Mitch D.   River Falls, WI

Lifetime member of the "Cars apart Club"

Some Assembly Required

1966 Chevelle SS 396 M20

1970 Chevelle SS 396 M20

1967 Camaro SS 350 rs


President

Status: Offline
Posts: 7257
Date:
Permalink  
 

I think I found it. Made by Dynacorn and $2800 freakin' dollars ??? !!!

The 1 piece passenger floor is $900 and 1 piece trunk is $500...that's $1400. What the heck makes the all-in-one worth twice as much ??
I'm quite confidant I can weld the 2 pieces together to save $1400...rolleyes


__________________

Mitch D.   River Falls, WI

Lifetime member of the "Cars apart Club"

Some Assembly Required

1966 Chevelle SS 396 M20

1970 Chevelle SS 396 M20

1967 Camaro SS 350 rs


2K+ Club

Status: Offline
Posts: 2761
Date:
Permalink  
 

The floors are really that bad to need it from front to back?


__________________

Chris - Ramsey, MN.

Dear Optimist, Pessimist, and Realist.

While you guys were busy arguing about the glass of water. I drank it!

Sincerly,

The opportunist.


1K+ Club

Status: Offline
Posts: 1299
Date:
Permalink  
 

Chris R wrote:

The floors are really that bad to need it from front to back?


 Still doing the assessment, and I'm sure that it is possible to get by with less.
The point to ponder for me is where to draw the line, as this winters plan is to primarily just address functional issues.
Mitch's point on the cost of getting it in one price to your door for ~2850 is a good question.

Perhaps they may charge more for the labor that we do for our ownrolleyes.

it would be the way to go, except i need the parts on top of the floor too


__________________

Bruce L. - Lakeville MN

1971 Malibu Convert


President

Status: Offline
Posts: 7257
Date:
Permalink  
 

If the floor needs ~50% replaced, go the 1 piece route. You will spend 4 times as much time patching in pans and braces. I know our time doesn't seem valuable, but you end up with a better floor when done too. I will never again install a 7 piece trunk kit after the experience with my 2 Chevelles...doh

I also installed a 1 piece passenger floor in the GTO and it seems to take a long time to carefully extract the old one and then, you are done. The new one makes  the time spent worthwhile when you see it...thumbsup 

The hard part of this for you, is the 1 piece needs to be installed from the bottom. It can be done with a couple floor jacks and cribbing, but is more than you hoped to get into this winter. You will need to brace the body well internally while doing this procedure.

As for the factory bracing above the floor, you can make patches for them from sheet metal.

Throw some pics on here of what you have, Bruce.


__________________

Mitch D.   River Falls, WI

Lifetime member of the "Cars apart Club"

Some Assembly Required

1966 Chevelle SS 396 M20

1970 Chevelle SS 396 M20

1967 Camaro SS 350 rs


3K+ Club

Status: Offline
Posts: 4764
Date:
Permalink  
 

Bruce,

You might want to go back through and look at my long post on the frame off restoration of the Malibu, as it sounds like yours is in similar condition to what mine was before we started:  Stanitization Thread Link

Regarding the 1 piece floor pan, I bought mine from Denny at Auto City Classics in Isanti so you might want to give him a call as he'll match or beat pricing where he can for our club members.  I think it was around $600 or so for the one without rockers and was Dynacorn brand.  It fit good, but honestly Tim did most of that work other than me cleaning up the original rockers.  I agree with Mitch that it is the best way to go for the floor pan replacement.

Good luck!

Stan


__________________

Stan S.-Twin Cities 'South Metro'

1972 Malibu Convertible 2nd time around 

1999 SS Camaro LS1-6 speed

Forum influenced terms: 'Link Paste', 'Stanitized', & 'Revolving garage door...' 


1K+ Club

Status: Offline
Posts: 1299
Date:
Permalink  
 

Thanks guys, as Dirty Harry once said "a man's got to know his limitations".
For this winter, time, space and the over all scope may keep the "Sanitation" process from kicking in.
For good or bad, I'm well aware of how fast the slide down the slippery slope can go into the depths of the CAC.
No daylight in the trunk and a gas tank that does not leak out the top may be the baby step for now.

__________________

Bruce L. - Lakeville MN

1971 Malibu Convert


President

Status: Offline
Posts: 7257
Date:
Permalink  
 

BLyke wrote:

Thanks guys, as Dirty Harry once said "a man's got to know his limitations".
For this winter, time, space and the over all scope may keep the "Sanitation" process from kicking in.
For good or bad, I'm well aware of how fast the slide down the slippery slope can go into the depths of the CAC.
No daylight in the trunk and a gas tank that does not leak out the top may be the baby step for now.


 There's a lot to be said for KISS too. If you don't have the time/funds/space/desire to get into a full blown resto, your stated goal is a step towards the end result. If you need a whole trunk, I still recommend the 1 piece. The 3 piece pan set really turns into 7 pieces that take a LOT of time to get aligned correctly. I have a thread on the one we installed in my '66 Malibu last winter. Not a fun job after we had slid the 1 piece in the SS right behind it in about 10 hours. Once that trunk is in, you have a solid foundation for the wheel houses, passenger floor and drops to quarter skins in the future.

If you need help, look at setting up a tech session Saturday. I have a floor jack and plasma cutter with experience in this sort of work...thumbsup


__________________

Mitch D.   River Falls, WI

Lifetime member of the "Cars apart Club"

Some Assembly Required

1966 Chevelle SS 396 M20

1970 Chevelle SS 396 M20

1967 Camaro SS 350 rs


1K+ Club

Status: Offline
Posts: 1299
Date:
Permalink  
 

thanks Mitch,
I actually learned a lot at your place last winter seeing your work and understand how it should be done and think you are right on the full one piece replacement.
Once i start down that path, all that will be left is the metal in the middle and the door jams.
For now a water tight trunk and a gas tank i can fill up will be a big improvement.


-- Edited by BLyke on Saturday 9th of January 2016 04:02:02 PM

__________________

Bruce L. - Lakeville MN

1971 Malibu Convert


President

Status: Offline
Posts: 7257
Date:
Permalink  
 

BLyke wrote:

thanks Mitch,
I actually learned a lot at your place last winter seeing your work and understand how it should be done and think you are right on the full one piece replacement.
Once i start down that path, all that will be left is the metal in the middle and the door jams.
For now a water tight trunk and a gas tank i can fill up will be a big improvement.


-- Edited by BLyke on Saturday 9th of January 2016 04:02:02 PM


 My last post was referring to the trunk floor. How much do you need to repair that ? The 7 piece trunk kit is very time consuming and can be difficult to get a good fit.


__________________

Mitch D.   River Falls, WI

Lifetime member of the "Cars apart Club"

Some Assembly Required

1966 Chevelle SS 396 M20

1970 Chevelle SS 396 M20

1967 Camaro SS 350 rs


1K+ Club

Status: Offline
Posts: 1299
Date:
Permalink  
 

it really needs the whole thing to be "right", and i will some day replace it with the one that comes with all the supports and the drop downs on the sides.
this will require Quarters and wheel houses.
there is so much filler in some places that when i ground it off it was a open hole.


-- Edited by BLyke on Sunday 20th of March 2016 08:25:00 AM

__________________

Bruce L. - Lakeville MN

1971 Malibu Convert


1K+ Club

Status: Offline
Posts: 1299
Date:
Permalink  
 

Moving on to the interior.. more shoddy work under the carpet, but only 2 areas that "must" have new metal. rust on either side below the kick panels.
The old sound deadening material was stuck to the carpet and in many places broke into pieces. Tore it all out to be sure there was solid material under it.
Looking at options on replacing with reproduction vs the "X-mat" type.
What have some of you used and any regrets? As you may have gathered, at this point it is function over originality

Thanks
Bruce

__________________

Bruce L. - Lakeville MN

1971 Malibu Convert


President

Status: Offline
Posts: 7257
Date:
Permalink  
 

If the floor repair will be permanent, use the good stuff. If it's all temporary, use the cheapest or none. New carpet will have the jute backing and will help some for now.


__________________

Mitch D.   River Falls, WI

Lifetime member of the "Cars apart Club"

Some Assembly Required

1966 Chevelle SS 396 M20

1970 Chevelle SS 396 M20

1967 Camaro SS 350 rs


1K+ Club

Status: Offline
Posts: 1299
Date:
Permalink  
 

Lost in the 60s wrote:

If the floor repair will be permanent, use the good stuff. If it's all temporary, use the cheapest or none. New carpet will have the jute backing and will help some for now.


 is ~5 to 6 years temporary??? this car will be a multi year restoration once i start down that path.


__________________

Bruce L. - Lakeville MN

1971 Malibu Convert


President

Status: Offline
Posts: 7257
Date:
Permalink  
 

BLyke wrote:
Lost in the 60s wrote:

If the floor repair will be permanent, use the good stuff. If it's all temporary, use the cheapest or none. New carpet will have the jute backing and will help some for now.


 is ~5 to 6 years temporary??? this car will be a multi year restoration once i start down that path.


 In my world it is...thumbsup

I wouldn't spend $2-300 on sound deadener/heat reducer products to tear them out again. Actually, you probably wouldn't get them to come off later, just toss it all away with the entire floor.


__________________

Mitch D.   River Falls, WI

Lifetime member of the "Cars apart Club"

Some Assembly Required

1966 Chevelle SS 396 M20

1970 Chevelle SS 396 M20

1967 Camaro SS 350 rs


1K+ Club

Status: Offline
Posts: 1299
Date:
Permalink  
 

Thanks Mitch,


__________________

Bruce L. - Lakeville MN

1971 Malibu Convert


2K+ Club

Status: Offline
Posts: 2439
Date:
Permalink  
 

If you can find a home carpet installer they often have sizable pieces of padding scrap. I've used it as a sound deadener and if works great. I have it in both my Elky and Special, I ran it up the aft bulkhead in the Elky and put it behind the back seat in the Special; it makes a big difference in both and helps reduce the trunk noise in the convertible.

__________________

Kevin

Northwestern Ohio


1K+ Club

Status: Offline
Posts: 1299
Date:
Permalink  
 

dashboard wrote:

If you can find a home carpet installer they often have sizable pieces of padding scrap. I've used it as a sound deadener and if works great. I have it in both my Elky and Special, I ran it up the aft bulkhead in the Elky and put it behind the back seat in the Special; it makes a big difference in both and helps reduce the trunk noise in the convertible.


 Thanks Kevin,

That sounds like a potential option, it certainly fits with my budget refurbishing "short term" approach to make the car a better driver for now  .

So you have that and the Jute backing under the carpet?.


__________________

Bruce L. - Lakeville MN

1971 Malibu Convert


2K+ Club

Status: Offline
Posts: 2439
Date:
Permalink  
 

Yes. In the convertible it made a significant difference when I installed it under and behind the rear seat.

__________________

Kevin

Northwestern Ohio


1K+ Club

Status: Offline
Posts: 1299
Date:
Permalink  
 

dashboard wrote:

Yes. In the convertible it made a significant difference when I installed it under and behind the rear seat.


Thanks, sounds like a plan.


__________________

Bruce L. - Lakeville MN

1971 Malibu Convert


1K+ Club

Status: Offline
Posts: 1299
Date:
Permalink  
 

Got the new bucket seat covers and the rear set and carpet would be here next week it looks like.
Arrived a 3-4 weeks earlier than I thought they would, looks like its time to get going on the rest of the car.


-- Edited by BLyke on Friday 11th of March 2016 05:58:04 PM

__________________

Bruce L. - Lakeville MN

1971 Malibu Convert


President

Status: Offline
Posts: 7257
Date:
Permalink  
 

Are you going to do the upholstery ?

__________________

Mitch D.   River Falls, WI

Lifetime member of the "Cars apart Club"

Some Assembly Required

1966 Chevelle SS 396 M20

1970 Chevelle SS 396 M20

1967 Camaro SS 350 rs


1K+ Club

Status: Offline
Posts: 1299
Date:
Permalink  
 

Lost in the 60s wrote:

Are you going to do the upholstery ?


 yep, I did my Nomad and was happy with the results.

i purchased covers, not ready to try sewing up my own...yet.


__________________

Bruce L. - Lakeville MN

1971 Malibu Convert


President

Status: Offline
Posts: 7257
Date:
Permalink  
 

BLyke wrote:
Lost in the 60s wrote:

Are you going to do the upholstery ?


 yep, I did my Nomad and was happy with the results.

i purchased covers, not ready to try sewing up my own...yet.


 Sounds like a meeting/tech session...thumbsup

I replaced the seat upholstery in my '38 and decided I would never do that again. The covers fit poorly and actually started coming apart from trying to get all the buckles out of the listings.

I have a complete Legendary interior kit for the '66 sitting here. If the fit is better, maybe with some "inspiration" I would be willing to try this again.


__________________

Mitch D.   River Falls, WI

Lifetime member of the "Cars apart Club"

Some Assembly Required

1966 Chevelle SS 396 M20

1970 Chevelle SS 396 M20

1967 Camaro SS 350 rs


1K+ Club

Status: Offline
Posts: 1299
Date:
Permalink  
 

Hi Mitch, my guess is that you might be the only one interested. maybe ill just give you a few days notice before i get ready to do them?

__________________

Bruce L. - Lakeville MN

1971 Malibu Convert


President

Status: Offline
Posts: 7257
Date:
Permalink  
 

BLyke wrote:

Hi Mitch, my guess is that you might be the only one interested. maybe ill just give you a few days notice before i get ready to do them?


 Sounds like a possibility, thanks.


__________________

Mitch D.   River Falls, WI

Lifetime member of the "Cars apart Club"

Some Assembly Required

1966 Chevelle SS 396 M20

1970 Chevelle SS 396 M20

1967 Camaro SS 350 rs


1K+ Club

Status: Offline
Posts: 1299
Date:
Permalink  
 

Well it seems to be time for an update
The good news it looks like i have nearly completed the official list plus some other areas that popped up
The bad news is it would seen the winter of 2015/16 ended some time ago!
Fired it up for the first time in ~10 months this week
Still needs to do some body work and make a call on paint job (DIY or Macco special) to cover until if/when a full restoration can start
Seat covers are still in the box, as is the new carpet. they will not go in the car until the paint is decided and done.
Had a neck injury 2 months ago which has limited work and prior to that is was getting the 59 to BTT50's

Hope to make one of the meetings this fall
Stan,
you tank worked out great, i can actually fill up now without gas seeping out the top
a functioning odometer looks to be a plus too.

__________________

Bruce L. - Lakeville MN

1971 Malibu Convert


3K+ Club

Status: Offline
Posts: 4764
Date:
Permalink  
 

BLyke wrote:

Stan,
you tank worked out great, i can actually fill up now without gas seeping out the top
a functioning odometer looks to be a plus too.


Great to hear Bruce!  beers

I put a new sending unit in my '71 a couple of weeks ago since the fuel gauge wasn't working, and didn't notice the 'direct replacement' float arm was bent differently, so now full reads 3/4 on the fuel gauge.  After it uses up a 1/4 tank, it's accurate from there.  Just need to wrap my head around running the car out of most of the gas and dropping the tank again to adjust the arm...  banghead


__________________

Stan S.-Twin Cities 'South Metro'

1972 Malibu Convertible 2nd time around 

1999 SS Camaro LS1-6 speed

Forum influenced terms: 'Link Paste', 'Stanitized', & 'Revolving garage door...' 


1K+ Club

Status: Offline
Posts: 1299
Date:
Permalink  
 

Well it gives you a chance to get out driving Stan so not all bad.
Gas gauges seem like the should be easy, but have seen a lot that are not.
My worst was a 69 Spitfire, it was out of gas with over 1/8 still showing.
How do you like the new car overall?


-- Edited by BLyke on Thursday 1st of September 2016 09:42:06 PM

__________________

Bruce L. - Lakeville MN

1971 Malibu Convert


3K+ Club

Status: Offline
Posts: 4764
Date:
Permalink  
 

BLyke wrote:

Well it gives you a chance to get out driving Stan so not all bad.
Gas gauges seem like the should be easy, but have seen a lot that are not.
My worst was a 69 Spitfire, it was out of gas with over 1/8 still showing.
How do you like the new car overall?


-- Edited by BLyke on Thursday 1st of September 2016 09:42:06 PM


I don't want to steal your thread Bruce, but first of all I hope you are feeling better now.  Nothing worse than neck or back problems.  They can put a guy down for awhile!

I'm in the process of 'Stanitizing' the '71, and have already spent over my budget and have the dirty nails and sore muscles to show for it.  Here's the 'short' list so far:

-Replaced the bad battery and starter with a GM style gear reduction starter the same as what Chris P. recommended on the vert

-Replaced front anti-sway bar and end links with a 1.25" setup

-Replaced all 4 cheapo KMart shocks that the previous owner installed along with 1" lowering springs that I had leftover from the vert resto

-Replaced the heater core and blower fan (heater core was disconnected by previous owner as it was leaking, fun job taking out the inner fender and most of the under dash to get to it.)

-Replaced the water pump due to my over tightening of the heater hose fitting when I replaced the heater core which cracked the pump casting...

-Rebuilt the Holley 670 cfm Street Avenger carb (1st time breaking down a Holley, and it turned out really good)

-Dropped the tank and replaced said fuel gauge sending unit

-Had the entire car polished/exterior detailed trying to make the paint a little shinier since the previous owner had it painted in acrylic enamel instead of base coat/clear coat (at least good enough until I may repaint it in the future... lol)

-Replaced the 80's tuck and roll upholstered package tray (best $20 I spent so far!)

-Got the factory AC running (required in hot Kansas...) by replacing the compressor (twice because of bad ones), evap, condenser, drier/filter, AC hoses, and converted all to R134A.  That was where the budget was blown (pun intended), but it now blows low 40 degree air while tooling around town at 35 mph

-Installed new speakers and AM/FM/MP3 player sounds system

-Painted the grill black and polished the stainless trim around it

-Last night I finished the Jeep GJC steering box swap, so it drives MUCH better (drove it to work this a.m.)

-If time permits this weekend, I have a new air gap intake manifold on the shelf along with disty rebuild parts and plug wires that I want to put on the engine

-Oh, almost forgot I still need to install the satellite antenna for XM radio tunes

Luckily the interior has new upholstery, but they didn't replace the foam in the seats, so I'm going to have the front seat foam replaced in Nov. when we stop driving the car.  The main reason for doing all this work other than I'm a glutton for punishment, is that the Chevelle club has a weekend Fall cruise in mid Oct. to Lake of the Ozarks, so I want it to be road worthy for the 2.5-3 hour drive down there.

Phew!  That's enough.  Sorry to derail your thread. 


Attachments
__________________

Stan S.-Twin Cities 'South Metro'

1972 Malibu Convertible 2nd time around 

1999 SS Camaro LS1-6 speed

Forum influenced terms: 'Link Paste', 'Stanitized', & 'Revolving garage door...' 


1K+ Club

Status: Offline
Posts: 1299
Date:
Permalink  
 

Not exactly like dropping in a 454 or LS1, but i dud put on some parts I've had a long tome on the engine to clean it up a bit

Baby Steps... Bob (as in what about).


-- Edited by BLyke on Monday 19th of December 2016 10:11:42 PM

Attachments
__________________

Bruce L. - Lakeville MN

1971 Malibu Convert


3K+ Club

Status: Offline
Posts: 4764
Date:
Permalink  
 

Yes Bruce... one step at a time!  Looks good.

Was yours a Mulsanne Blue Code 26 car at one time from the blue overspray near the wipers?


__________________

Stan S.-Twin Cities 'South Metro'

1972 Malibu Convertible 2nd time around 

1999 SS Camaro LS1-6 speed

Forum influenced terms: 'Link Paste', 'Stanitized', & 'Revolving garage door...' 


President

Status: Offline
Posts: 7257
Date:
Permalink  
 

"overspray near the wipers"....I didn't notice that until I read your comment...cool

Some shine under the hood never hurts, Bruce. I don't remember, did you drive it last summer ? I never got mine off the roto until a month ago...rolleyes


__________________

Mitch D.   River Falls, WI

Lifetime member of the "Cars apart Club"

Some Assembly Required

1966 Chevelle SS 396 M20

1970 Chevelle SS 396 M20

1967 Camaro SS 350 rs


1K+ Club

Status: Offline
Posts: 1299
Date:
Permalink  
 

Yes it was originally a blue car, very few traces left.
I did drop it off the jack stands and drove it a bit this fall, just to a void a full year in the CAC
Did a minor rebuild of the carburetor which really made a difference in performance.
Hope to get back to the seats before the covers have a birthday.
Merry Christmas guys

__________________

Bruce L. - Lakeville MN

1971 Malibu Convert


President

Status: Offline
Posts: 7257
Date:
Permalink  
 

I hear ya on the covers having a birthday. Mine is all still sitting in the basement....maybe bring yours to Karl's ?? He may be looking for something for people to see ?


__________________

Mitch D.   River Falls, WI

Lifetime member of the "Cars apart Club"

Some Assembly Required

1966 Chevelle SS 396 M20

1970 Chevelle SS 396 M20

1967 Camaro SS 350 rs


1K+ Club

Status: Offline
Posts: 1299
Date:
Permalink  
 

Getting back to the car. Did not get a good before picture with all the blue paint on the lenses.
Used a razor on the first one and got it off but the lens was scratched. Used 1000 grit whet on the second then some headlight polish.
The before and after in the picture is correct, just purely coincidental
Planning to finish up the body prep, to a still TBD level.


Attachments
__________________

Bruce L. - Lakeville MN

1971 Malibu Convert


President

Status: Offline
Posts: 7257
Date:
Permalink  
 

Looks like they cleaned up nicely.


__________________

Mitch D.   River Falls, WI

Lifetime member of the "Cars apart Club"

Some Assembly Required

1966 Chevelle SS 396 M20

1970 Chevelle SS 396 M20

1967 Camaro SS 350 rs


1K+ Club

Status: Offline
Posts: 1299
Date:
Permalink  
 

May be hitting the point of no return as far as keeping it simple goes.
bumpers are off, trim and seals are removed, need to rebuild the hinge on the passengers side

  • so might as well pull the fender to do it
  • really should do both sides
  • as long as it is a part jam the door openings
  • and the firewall
  • and the trunk opening
  • and, and ,and...

So now consider taking it back to original blue paint color.....


__________________

Bruce L. - Lakeville MN

1971 Malibu Convert


President

Status: Offline
Posts: 7257
Date:
Permalink  
 

Just couldn't leave it alone and put it back together to drive, could you...laughing

At this point is where it gets harder to keep the momentum going and get it done. The more you take apart, the more you find that needs repair and it doesn't seem to end.

I'm so tired of seeing mine in pieces for 15 months, I'm ready to haul it all off to a paint shop and tell them to call when it's done. And then I would need to haul it to BJ and try to recover half of what it cost to finish...doh


__________________

Mitch D.   River Falls, WI

Lifetime member of the "Cars apart Club"

Some Assembly Required

1966 Chevelle SS 396 M20

1970 Chevelle SS 396 M20

1967 Camaro SS 350 rs


3K+ Club

Status: Offline
Posts: 4764
Date:
Permalink  
 

BLyke wrote:

May be hitting the point of no return as far as keeping it simple goes.
bumpers are off, trim and seals are removed, need to rebuild the hinge on the passengers side

  • so might as well pull the fender to do it
  • really should do both sides
  • as long as it is a part jam the door openings
  • and the firewall
  • and the trunk opening
  • and, and ,and...

So now consider taking it back to original blue paint color.....


Welcome to the snowball effect Bruce!

Was yours a Code 26 Mulsanne Blue originally?  My favorite color!  thumbsup


__________________

Stan S.-Twin Cities 'South Metro'

1972 Malibu Convertible 2nd time around 

1999 SS Camaro LS1-6 speed

Forum influenced terms: 'Link Paste', 'Stanitized', & 'Revolving garage door...' 


1K+ Club

Status: Offline
Posts: 1299
Date:
Permalink  
 

Finished making my "Custom Bumper mounts" to compensate for a slightly bent frame, totally Foose inspired (excel my work is just to get it back where it should be not pulled in a bit to the body)

Mitch,
still only have one foot over the edge, i could still turn back ...

Stan,
yes that is the blue and if i jump off the ledge it will be the original color. Kids are lobbying for a darker metallic Blue, for when i give it to them...


-- Edited by BLyke on Tuesday 28th of February 2017 10:55:46 PM

__________________

Bruce L. - Lakeville MN

1971 Malibu Convert


1 2 38  >  Last»  | Page of 8  sorted by
 
Quick Reply

Please log in to post quick replies.

Chatbox
Please log in to join the chat!