Discussion Forum - Northstar Chevelle Club

Members Login
Username 
 
Password 
    Remember Me  
Post Info TOPIC: Suggestions for Powder Coating rear axel housing.


2K+ Club

Status: Offline
Posts: 2734
Date:
Suggestions for Powder Coating rear axel housing.
Permalink  


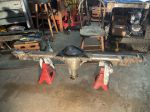
Hi everyone. Thinking about powder coating the axel housing.  Is there a possibility of getting media in the housing?  Will I have to wash the housing out.  There is a company in Wabasha, near lake city.

I want to leave the pinion shaft in place.  I hear that the pinion flange seal will melt and have to be replaced.  would there be anything else that can’t be in an oven for 30 minutes at 450 degrees?  Would that mess with the oil that is remaining in the pinion gears.  Thus I would have to remove and clean the bearings.  I hopefully can reuse the bearings, the crush sleeve and put the pinion nut back in the same spot.

I guess it might be advisable to go with new bearings and a new crush sleeve.  I am trying to avoid setting gears up.  


__________________

Jim L

Lake City


Secretary

Status: Offline
Posts: 2940
Date:
Permalink  
 

PLan on removing it all completely. Don't forget the little vent valve at the top of the pumpkin area. A good shop will want it all out, they will want to blast it completely clean, then they will blow it completely empty again before spraying it and baking. We did a tour of powder coating technologies as a club several years ago and that was pretty much what dud said the process was.

I had mine done by someone who was starting their business @ 12 years ago and that was pretty much his take on it too.

Some guys like to fully weld the tubes to the center before getting it done too.

I haven't really done more than "helping" with my rear end, but I would plan on new pinion seal, axle seals, crush sleeve and pinion nut at a minimum. If the bearings are nice, I suppose you could re-use them, but I'm of the opinion that since you're in there, do it once. Tom at www.12bolt.com is who I got my rebuild kit from. 


__________________

Bryan-NW 'burbs
1972 Malibu
Vaguely stock appearing, and the opposite of restored.
1999 std bore 5.7, Vortec heads, Holley Stealth Ram, GM cam
700R4, Viking coilovers, 12 bolt 4.10 posi, and a whole bunch more


1K+ Club

Status: Offline
Posts: 1196
Date:
Permalink  
 

We just did a rear diffi. for a G-Body.

A friend of Chris R. did the build.
He is only 20 minutes south of me.

Took it to him, he gutted it. Dropped at Inthermo.
Stripped clean, did not powder coat cleaned up well after stripping.
Scot used Rustoleum on it including backing plates.
It was not very pitted, so it came out well and still easy to touch up.
Everything but the housing, inspection cover, axles and backing plates were replaced, new.
3:73 posi for Scots' 78 Malibu.

The last thing I had powder coated was the Strato Bench for the White Elky, 80% is hidden.
The Frame for that car was also Powder coated, came out fantastic.
I have various brackets for bumpers, engine, etc. that were powder coated, in stock many years.
I may have some 1956 pieces powder coated besides frame however, not much.
Rustoleum, satin black aerosol is our "go to " product.

Highly unlikely that we will ever show a car.
I don't visualize ANYTHING we own with mirrors and shrouding under it.

My 1956 LT-4 project frame will definitely be powder coated.
However, the Aerosol products work really well for us the majority of the time.

Karl


__________________

More ambition than brains,

If you have more than 5 of anything, best to stop counting!


2K+ Club

Status: Offline
Posts: 2734
Date:
Permalink  
 

The owner of the company https://jlmpowdercoating.com/powder-coating-services/media-blasting/. Stoped by tonight.  Guess what, he is a former student and jr high bb player.  He said he could media blast the springs and backing plates and then power coat.  He suggested that they take the housing to a place in the lakeville area that acid dips parts for them.  Then I could either paint or have it powder coated.  I wonder if that’s the place Karl noted?


__________________

Jim L

Lake City


1K+ Club

Status: Offline
Posts: 1196
Date:
Permalink  
 

Yup!
Inthermo, Jake is owner.

952-469-1515
Corner of Cedar and hiway 70.

Karl

__________________

More ambition than brains,

If you have more than 5 of anything, best to stop counting!


2K+ Club

Status: Offline
Posts: 2734
Date:
Permalink  
 

bowtie wrote:

PLan on removing it all completely. Don't forget the little vent valve at the top of the pumpkin area. A good shop will want it all out, they will want to blast it completely clean, then they will blow it completely empty again before spraying it and baking. We did a tour of powder coating technologies as a club several years ago and that was pretty much what dud said the process was.

I had mine done by someone who was starting their business @ 12 years ago and that was pretty much his take on it too.

Some guys like to fully weld the tubes to the center before getting it done too.

I haven't really done more than "helping" with my rear end, but I would plan on new pinion seal, axle seals, crush sleeve and pinion nut at a minimum. If the bearings are nice, I suppose you could re-use them, but I'm of the opinion that since you're in there, do it once. Tom at www.12bolt.com is who I got my rebuild kit from. 


Thanks Bryan.  I am waiting for information back from the powder coat company regarding the quote.   They are waiting for info from the acid dip company. Tom Lowe helped me with a rebuild of m SS 12 bolts yeas ago.  He was very helpful.  I am trying to avoid setting up the gear pattern by using the shims that were in place and not messing with pinion gears.  My concern now is that I will have to remove the bearing races if I have the housing acid dipped to remove all rust. 


__________________

Jim L

Lake City


President

Status: Offline
Posts: 7321
Date:
Permalink  
 

Once you remove the carrier, you should plan to make final adjustments for proper tooth engagement/original contact pattern anyway. Just slapping it back together usually results in a whine, as the gears never seem to find the same set. If the bearings show any wear, they should be replaced too, along with all the seals. Re-using the pinion seal is just asking for it to leak as soon as you put the new lube in. Just strip it all and take it naked...thumbsup

Inthermo is not an acid bath, it is a phosphorus solution that will remove all dirt, oil/grease and paint. It does not remove rust or etch the metal in any way. They dip the part in a solution after, that SLOWS the tendency for flash rust for a few days. It is water soluble and should be rinsed off before any final prep work and application of paint/powder product.

I had the entire front clip of my Camaro stripped there and the metal was too smooth to paint and since it cleaned the insides too, I wasn't going to hand sand it all. I had all the parts LIGHTLY sand blasted after for "tooth" for the paint to adhere properly.


__________________

Mitch D.   River Falls, WI

Lifetime member of the "Cars apart Club"

1966 Chevelle SS 396 M20

1970 Chevelle SS 396 M20

1967 Camaro SS/RS 350 M20


2K+ Club

Status: Offline
Posts: 2734
Date:
Permalink  
 

I’ve decided no to use thermo or power coat. Going to paint with Karls go to paint, rustolum.  Housing is cleaned and almost throughly  striped, no rust,  with a wire brushed.   I hear you Mitch about the leak.  What I don’t understand is if pinion is left in place and using the same side shims,, etc. with low miles since rebuild there will be a wine?  the pinion and ring gear were replaced when the gear ratio were replaced in 1998, I am guessing less Ryan 1500 miles.  Is this wine as the ring gear contacts the ring gear.  I am not at all confident in setting up a gear pattern.

I was planning on using an etch primer or should I use a metal wash or epoxy primer?


__________________

Jim L

Lake City


President

Status: Offline
Posts: 7321
Date:
Permalink  
 

The pattern will be very close just putting everything back in the same place and you may be just fine. Any whine would be slight and premature wear shouldn't be an issue, as long as the carrier and pinion bearings aren't getting replaced. I doubt you are going to drive the car enough to wear it out.
Since you are going to paint, I guess your plan would be the best route.
If you use an etch primer, make certain the top coat is compatible with it. Using only Rustoleum products should provide compatibility. Using a metal wash/prepaint wax and grease remover first is always a good idea to get the surface completely oil free. IF Rustoleum has an epoxy primer, I would use that. If not, use what they recommend.

AFTER you have reassembled the carrier, I would replace the pinion seal.

__________________

Mitch D.   River Falls, WI

Lifetime member of the "Cars apart Club"

1966 Chevelle SS 396 M20

1970 Chevelle SS 396 M20

1967 Camaro SS/RS 350 M20


2K+ Club

Status: Offline
Posts: 2734
Date:
Permalink  
 

On the pinion seal, it took me 4 try’s to get the seal in the SS not to leak.  I only recently found out why.  Evidently the truck and the passenger 12 bolt housings are. A little different.  I guess they stopped making the pass car seal and only made the truck seal.  Thus the seal cannot be installed all the way in to the housing nose,  so you have to put on a 1/8” spacer first.  I plan to use a w ash/grease remover than wipe again with Lacquer just before priming.


I wonder it that is also true on the 10 bolt seal???


AC3A8FAA-C9C3-4D89-92DA-59548E55FA71.jpeg


Attachments
__________________

Jim L

Lake City


1K+ Club

Status: Offline
Posts: 1196
Date:
Permalink  
 

WEAR Protective Gloves throughout entire process.

First clean with soap and water, blow dry. Window cleaner works well also. Spray, wipe, blow dry.
THEN WIPE WITH WAX AND GREASE REMOVER (Prep-Sol). BLOW DRY AFTER WIPING.
Rough everything with 80-100 grit sandpaper.
Use coarse scuff pad to try and get to inside corners.
There are some spray and wipe acid wash products available for additional clean/etching surface.
Use lint free wipes.
Lastly, immediately before applying rustoleum, wipe again and with "prep-sol" product, wipe and blow dry.
I usually use a "tack" rag to wipe just prior to first coat to minimize dirt/dust on part/panel
Plan on 3-4 coats using cans Rustoleum Primer/Color aerosol.
I prefer the regular spray nozzle as opposed to the trigger style.
Trigger style has a pattern and can be sprayed upside down if I remember correctly..
Even coats, overlap allow flash time between coats, each coat a little wetter as film builds.


HAVE FUN!!!

Karl


-- Edited by more ambition than brains on Saturday 15th of January 2022 07:01:40 PM

__________________

More ambition than brains,

If you have more than 5 of anything, best to stop counting!


2K+ Club

Status: Offline
Posts: 2734
Date:
Permalink  
 

Thanks for the tips Karl.  More cleaning and sanding scheduled for Monday and Tuesday.  Then get everything ready for paint on Wednesday.  Final wipe down and paint on Thursday.  Hope to have a photo to share on Friday.  Nothing ever seems to happen on time.


__________________

Jim L

Lake City


Active Member

Status: Offline
Posts: 164
Date:
Permalink  
 

I replaced the pinion seal in my 10 bolt last spring, Jim.  I installed it all the way in, no leaks.  So, I’m assuming it’s the correct passenger car seal.


-- Edited by ghaasl on Saturday 15th of January 2022 08:16:37 PM

__________________

In today’s digital world, don’t be afraid to embrace some analog.  My father tells me I was born 30 years late.

 1968 Malibu

Gavin H. Otsego


2K+ Club

Status: Offline
Posts: 2734
Date:
Permalink  
 

Good to know thanks.


__________________

Jim L

Lake City

Page 1 of 1  sorted by
 
Quick Reply

Please log in to post quick replies.

Chatbox
Please log in to join the chat!