Discussion Forum - Northstar Chevelle Club

Members Login
Username 
 
Password 
    Remember Me  
Post Info TOPIC: Andrew's Chevelle


President

Status: Offline
Posts: 7274
Date:
Andrew's Chevelle
Permalink  


Some of the members know Andrew had a boo-boo with his car last spring/summer and was struggling to get it repaired. I found out about it this past March and in April, took it out of the body shop that didn't have the equipment to repair it and brought it to my place to re-install the engine and trans that they had removed. We need it to move under its own power at Centerline.

Sorry, Andrew, I'm going to show the restoration process...razz 
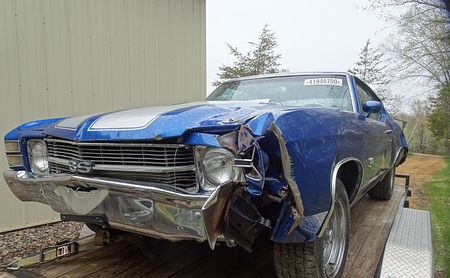
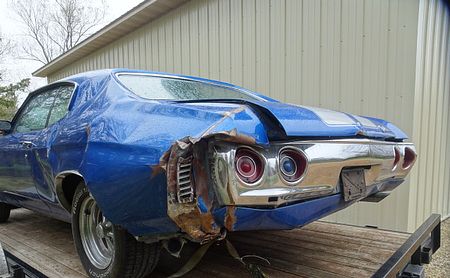
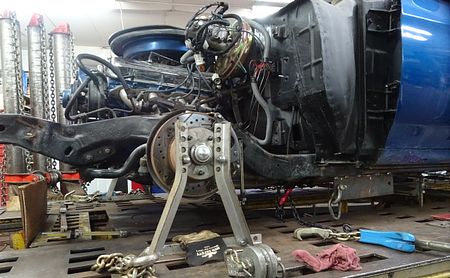
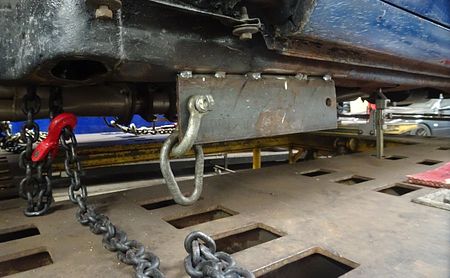
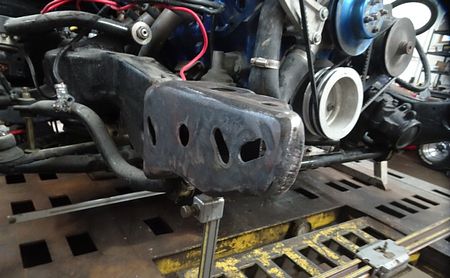
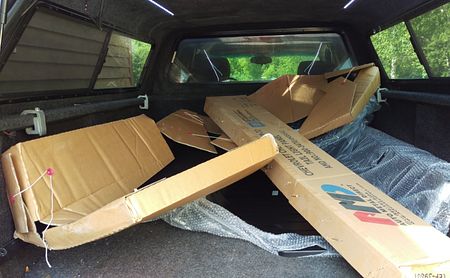
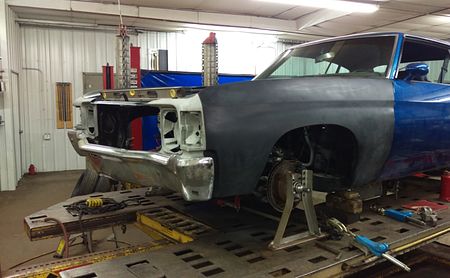
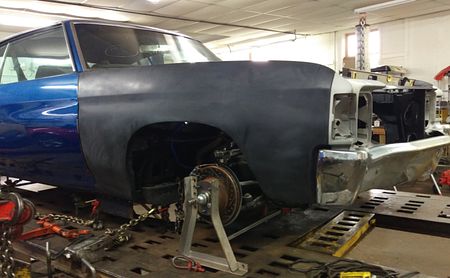
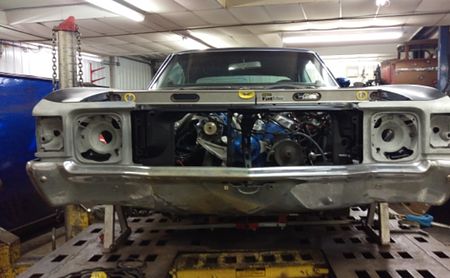
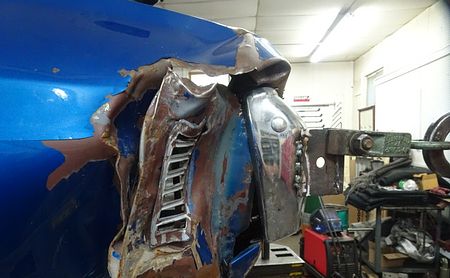
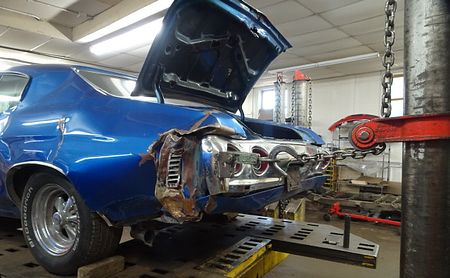
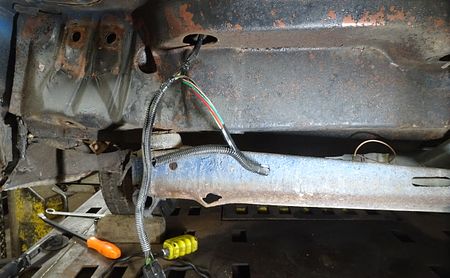
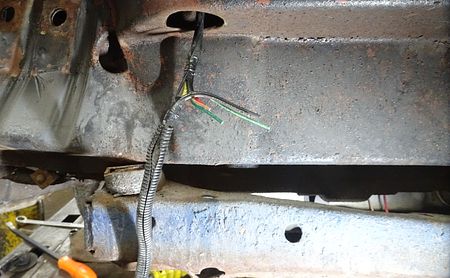
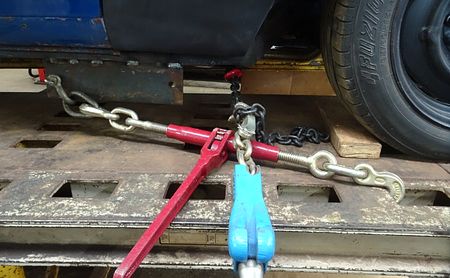
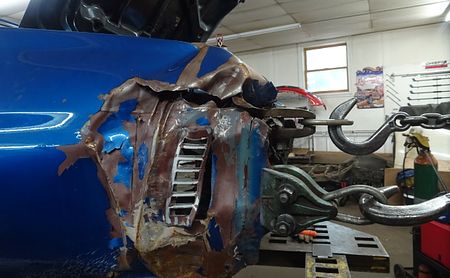
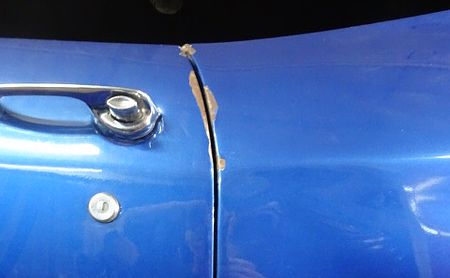
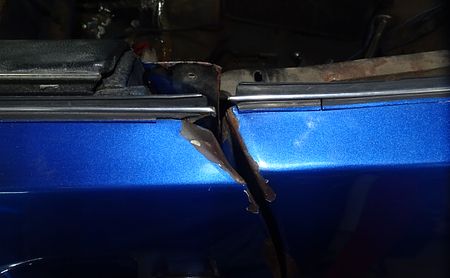
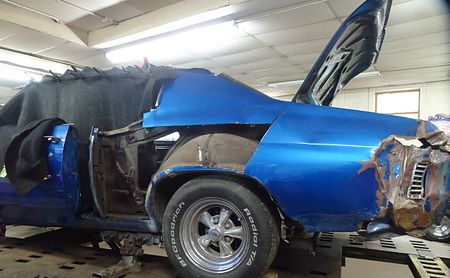
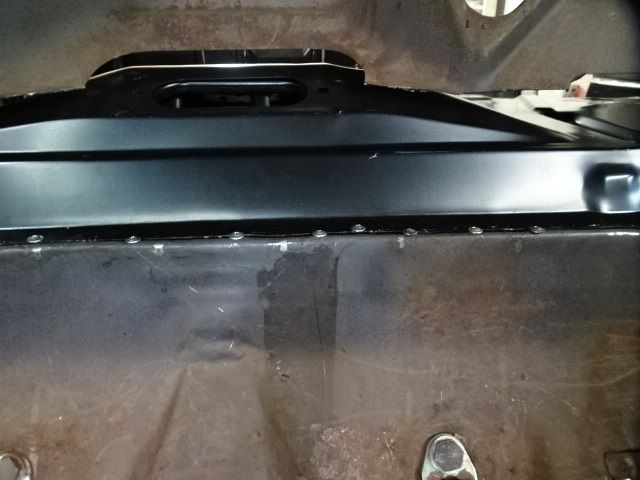
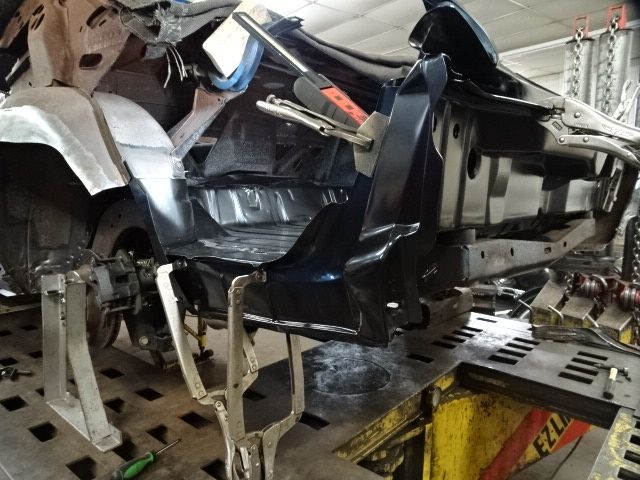
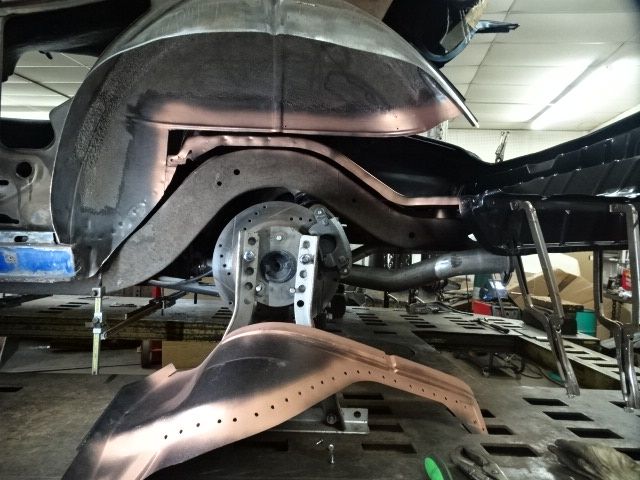
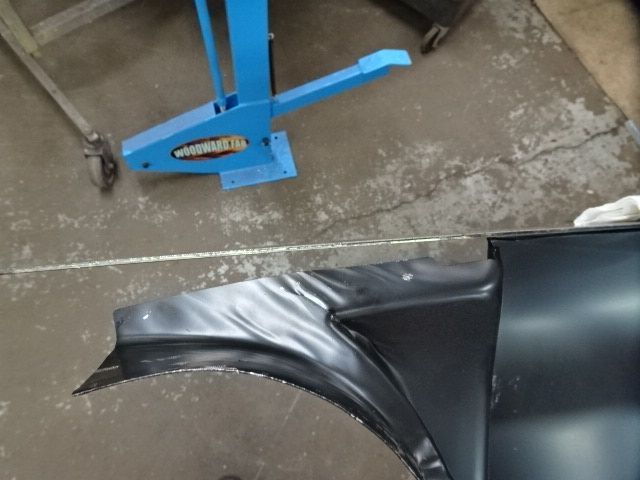
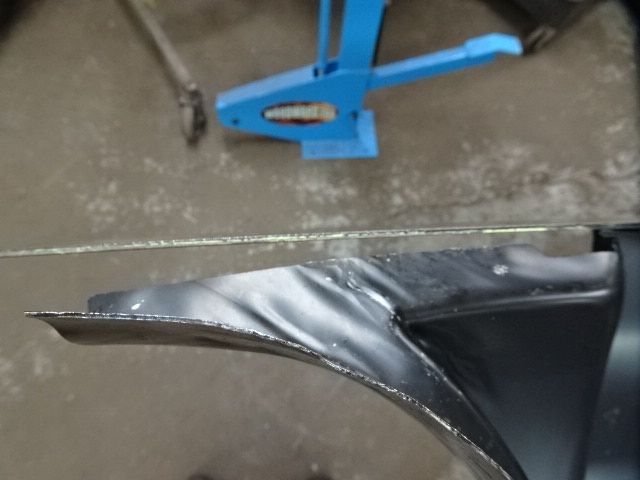
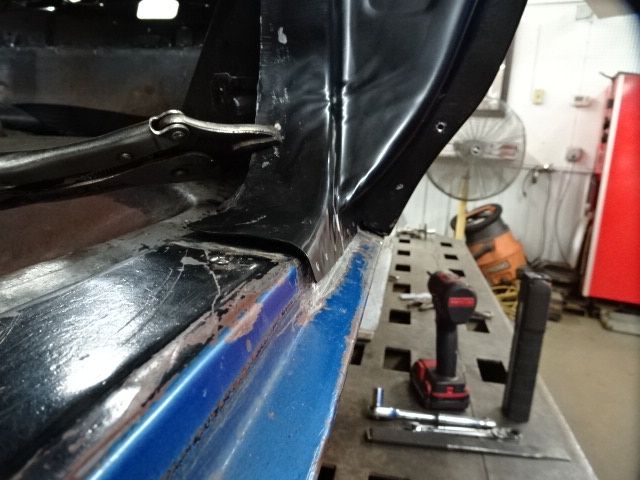
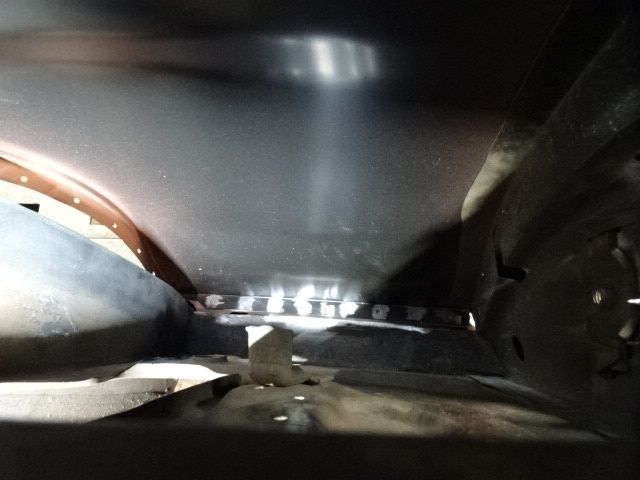
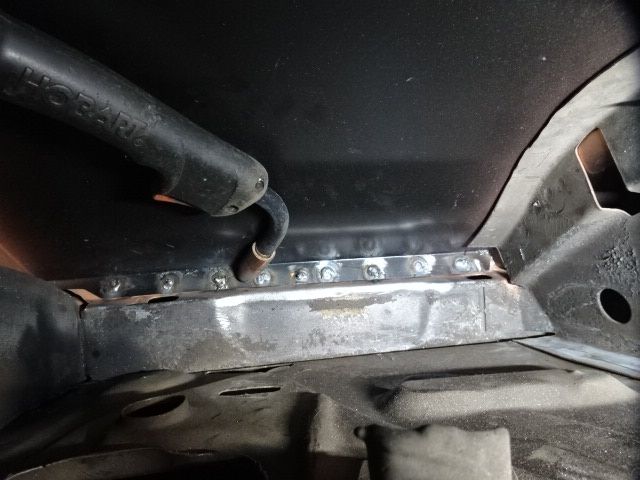
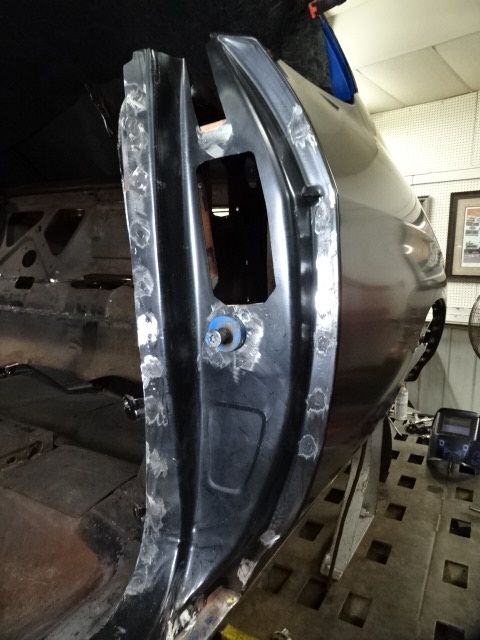
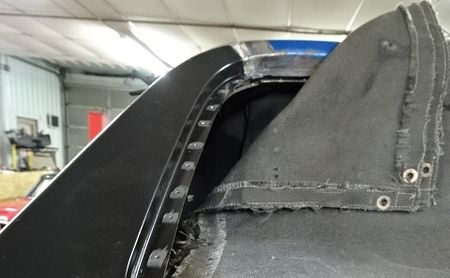
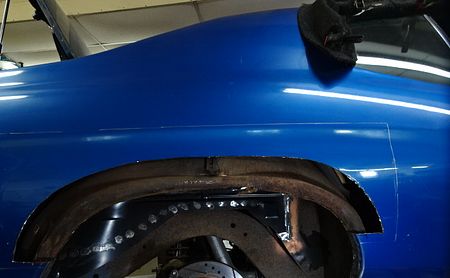
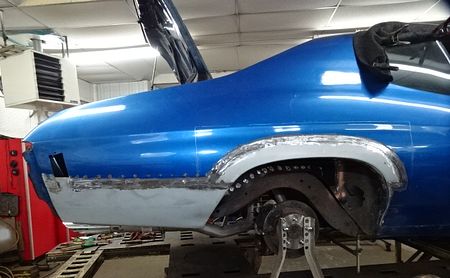
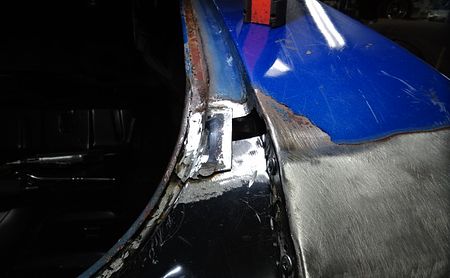
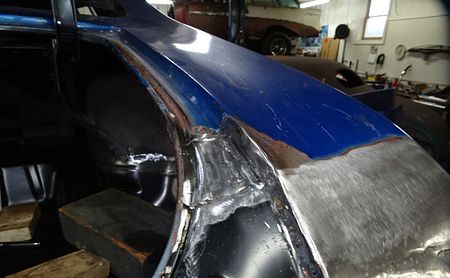
We're going to get this done...thumbsup

DSC07533.JPG?width=450&height=278&crop=f


Yesterday, I finally got it over to Centerline and on a frame rack. I had most of the front clip off by 3 pm and got the core support and wheels off this morning. It is clamped on the rack and Dave, the owner, and I got gauges on it after lunch. I forget to get a pic of it in that state, but tomorrow morning, we start pulling the damage out of the front.

DSC07654.JPG?width=450&height=278&crop=f

DSC07651.JPG?width=450&height=278&crop=f

It took a pretty nasty hit on the left frame rail and is hurt, but they repair stuff far worse than this everyday. We'll have it back in shape in no time. I have a line on a restored, original, core support and fender extensions in Madison, WI and possibly both bumpers, with brackets in WI Rapids and will be making a parts run Thursday. I bought 2 very nice, original, front fenders from another member last week.

 DSC07652.JPG?width=450&height=278&crop=f

 Once we get the frontal damage straightened out, we turn it around and start on the back. The frame has a slight bow behind the wheels from the sheetmetal pulling, but won't be much to pull back. Lots of sheetmetal work at the back. Parts should be here later this week from AMD for the rear.

DSC07536.JPG?width=450&height=278&crop=f


-- Edited by Lost in the 60s on Tuesday 25th of May 2021 04:39:52 PM

__________________

Mitch D.   River Falls, WI

Lifetime member of the "Cars apart Club"

Some Assembly Required

1966 Chevelle SS 396 M20

1970 Chevelle SS 396 M20

1967 Camaro SS 350 rs


2K+ Club

Status: Offline
Posts: 2761
Date:
Permalink  
 

This is the first I have heard and seen this happened to Andrew. Ouch. Looks like he is going to need a quarter there too. Now is probably the best time to fix the trunk floor if its rusty.


__________________

Chris - Ramsey, MN.

Dear Optimist, Pessimist, and Realist.

While you guys were busy arguing about the glass of water. I drank it!

Sincerly,

The opportunist.


President

Status: Offline
Posts: 7274
Date:
Permalink  
 

I'll be replacing the entire trunk floor with a 1 piece, full quarter, and tail panel as well as repairing all 4 inner wheel houses with sections where the weld flanges are to the trunk and quarters. May need a trunk lid too. It is kinked, but someone did more damage at the lock area, attempting to get in the trunk after the rod got pulled out of the latch from distortion.

__________________

Mitch D.   River Falls, WI

Lifetime member of the "Cars apart Club"

Some Assembly Required

1966 Chevelle SS 396 M20

1970 Chevelle SS 396 M20

1967 Camaro SS 350 rs


Founding Member

Status: Offline
Posts: 2750
Date:
Permalink  
 

I have a trunk lid that I can give away. It has a few pinholes in the back side, but it's straight.
I think I got it from Stan a few years ago. You may want a better one, but this one's free if you need it.

__________________

Derek Kiefer - Mantorville, MN

69 Malibu Pro-Touring stroker LS1-383/T56 - 69 SS396-325/3spd project


3K+ Club

Status: Offline
Posts: 4764
Date:
Permalink  
 

Andrew's lucky to have you helping him out Mitch.  I think a lot of guys would have walked away from it with that kind of damage.  tiphat

Andrew-I know this is probably painful for you to share on the forum, but we all have our bad stories and just glad you're o.k. after going through that one!  And now we get to see Mitch work his magic.  thumbsup  


__________________

Stan S.-Twin Cities 'South Metro'

1972 Malibu Convertible 2nd time around 

1999 SS Camaro LS1-6 speed

Forum influenced terms: 'Link Paste', 'Stanitized', & 'Revolving garage door...' 


President

Status: Offline
Posts: 7274
Date:
Permalink  
 

Derek69SS wrote:

I have a trunk lid that I can give away. It has a few pinholes in the back side, but it's straight.
I think I got it from Stan a few years ago. You may want a better one, but this one's free if you need it.


 It might be good for an inner structure patch. That is caved in pretty good under the lock and most likely won't pull out well. I'll have to find a time to run down there.


__________________

Mitch D.   River Falls, WI

Lifetime member of the "Cars apart Club"

Some Assembly Required

1966 Chevelle SS 396 M20

1970 Chevelle SS 396 M20

1967 Camaro SS 350 rs


1K+ Club

Status: Offline
Posts: 1304
Date:
Permalink  
 

SShink wrote:

Andrew's lucky to have you helping him out Mitch.  I think a lot of guys would have walked away from it with that kind of damage.  tiphat

Andrew-I know this is probably painful for you to share on the forum, but we all have our bad stories and just glad you're o.k. after going through that one!  And now we get to see Mitch work his magic.  thumbsup  


 You have that right Stan, looking forward to seeing it back on the road.


-- Edited by BLyke on Wednesday 26th of May 2021 05:58:39 PM

__________________

Bruce L. - Lakeville MN

1971 Malibu Convert


President

Status: Offline
Posts: 7274
Date:
Permalink  
 

Trying to get Dave to stand still and help me with the frame work is difficult. He runs all over the building and has multiple people calling him all day. I got 45 minutes out of him this afternoon and we got both of the frame horns ironed out. I then put more gauges on to get a better look at where it's bent and then he had to go to an appointment...doh

This is where I left it yesterday.

DSC07655.JPG?width=450&height=278&crop=f

I welded these plates on the frame for attaching the chains we'll use to pull it all back in shape. You can see a couple of the alignment gauges hanging underneath too.

DSC07656.JPG?width=450&height=278&crop=f

We heated and did an initial shape up of the left horn.

DSC07657.JPG?width=450&height=278&crop=f

Then went back and worked out the low and high spots to get it as flat and square as possible. Came out very good.

Before

DSC07652.JPG?width=450&height=278&crop=f

DSC07658.JPG?width=450&height=278&crop=f

Had to do some of the same on the right rail, but it wasn't near as bent up.

DSC07659.JPG?width=450&height=278&crop=f

Tomorrow is chasing parts and I'll be back on it Friday. Dave had a major hernia operation last Friday and the only way to get him to not come to work is to go to Florida for a week with his fiance, so I am hoping we can get the frame work done Friday and I can be installing front sheetmetal next week.


__________________

Mitch D.   River Falls, WI

Lifetime member of the "Cars apart Club"

Some Assembly Required

1966 Chevelle SS 396 M20

1970 Chevelle SS 396 M20

1967 Camaro SS 350 rs


President

Status: Offline
Posts: 7274
Date:
Permalink  
 

I got back on the frame yesterday, but forgot the camera. Not much to show anyway, except the towers and chains we used to pull the frame rails left 5/8". I got the gauges lined up and the distance between the rails to spec yesterday. Then I picked up all the new metal for the back...1 piece trunk floor, full left quarter, tail panel and all wheel houses.

IMAG0442.jpg?width=450&height=278&crop=f

Today, I installed all the original parts I've acquired over the past 4 weeks for an initial test fit. It will need a fair amount of tweaking, as the parts seem to have some irregularities from previous use, but the fit is plenty close enough to turn the car around and get the back pulled out, as it is causing a twist in the frame thru the center area. That will be Monday's task. Stay tuned, that will be more interesting than the front.

IMAG0443.jpg?width=450&height=278&crop=f

IMAG0446.jpg?width=450&height=278&crop=f

IMAG0444.jpg?width=450&height=278&crop=f


-- Edited by Lost in the 60s on Friday 11th of June 2021 04:37:17 PM

__________________

Mitch D.   River Falls, WI

Lifetime member of the "Cars apart Club"

Some Assembly Required

1966 Chevelle SS 396 M20

1970 Chevelle SS 396 M20

1967 Camaro SS 350 rs


Active Member

Status: Offline
Posts: 461
Date:
Permalink  
 

Such amazing talent! I have had frames straightened, and they never looked that perfect.

__________________

Larry L.

Coon Rapids


President

Status: Offline
Posts: 7274
Date:
Permalink  
 

Here we go, rip, tear and dissect.  I welded a pulling tab on the bumper and pulled that out far enough to gain access to the mounting bolts and remove it. The quarter started unfolding with it.

DSC07684.JPG?width=450&height=278&crop=f

DSC07683.JPG?width=450&height=278&crop=f

Once the bumper was off, I went to remove the wiring, but it was routed thru small holes in the frame and I had to cut it all apart to get it out. The connectors weren't going to fit back thru those holes.

DSC07685.JPG?width=450&height=278&crop=f

DSC07687.JPG?width=450&height=278&crop=f

DSC07686.JPG?width=450&height=278&crop=f

Once that was cleared, I used 2 clamps on the quarter and tail panel, pulling them far enough to relieve the pressure on the frame and pull some of the deep buckles out.

DSC07689.JPG?width=450&height=278&crop=f

DSC07688.JPG?width=450&height=278&crop=f

I had the body locked to the rack in front of the left tire and 2 ratchets holding the front of the frame from going backward and another chain holding the front from pulling sideways to the left from the towers at the rear.

DSC07691.JPG?width=450&height=278&crop=f

DSC07692.JPG?width=450&height=278&crop=f

20 tons of pulling power made easy work of unfolding the quarter and getting the door pillar back where it belonged. I have a very even gap again.

DSC07690.JPG?width=450&height=278&crop=f

DSC07696.JPG?width=450&height=278&crop=f

This pic shows how far the quarter moved at impact. It had overlapped the door by almost a 1/2".

DSC07697.JPG?width=450&height=278&crop=f

Then I cut out a good size piece to get access to the reinforcement inner structure at the door pillar and to relieve more of the stress of the sail panel at the roof.

DSC07698.JPG?width=450&height=278&crop=f

There are still 2 shallow buckles but they are below the roof seam, so nothing to worry about.

DSC07699.JPG?width=450&height=278&crop=f

That's all for today, folks.


__________________

Mitch D.   River Falls, WI

Lifetime member of the "Cars apart Club"

Some Assembly Required

1966 Chevelle SS 396 M20

1970 Chevelle SS 396 M20

1967 Camaro SS 350 rs


President

Status: Offline
Posts: 7274
Date:
Permalink  
 

Larry Lucast wrote:

Such amazing talent! I have had frames straightened, and they never looked that perfect.


 Thanks Larry. Dave, the shop owner has been doing this for 40 years now and is VERY anal about the appearance and function of anything he/we work on.


__________________

Mitch D.   River Falls, WI

Lifetime member of the "Cars apart Club"

Some Assembly Required

1966 Chevelle SS 396 M20

1970 Chevelle SS 396 M20

1967 Camaro SS 350 rs


Secretary

Status: Offline
Posts: 2988
Date:
Permalink  
 

Lost in the 60s wrote:
Larry Lucast wrote:

Such amazing talent! I have had frames straightened, and they never looked that perfect.


 Thanks Larry. Dave, the shop owner has been doing this for 40 years now and is VERY anal about the appearance and function of anything he/we work on.


 I will second that. He is pretty well the go-to for most shops on the East side of town, and many from the west too. While the few "real" frame shops out there have the equipment, most aren't keeping up to date with technology and equipment like he does. I haven't been there since pre-Covid, but he was very proud to boast about his new setup which was state of the art.


__________________

Bryan-NW 'burbs
1972 Malibu
Vaguely stock appearing, and the opposite of restored.
1999 std bore 5.7, Vortec heads, Holley Stealth Ram, GM cam
700R4, Viking coilovers, 12 bolt 4.10 posi, and a whole bunch more


1K+ Club

Status: Offline
Posts: 1304
Date:
Permalink  
 

That is an impressive setup to straighten things out. good to see the Andrews car is getting fixed.

__________________

Bruce L. - Lakeville MN

1971 Malibu Convert


President

Status: Offline
Posts: 7274
Date:
Permalink  
 

Not much changed visually today. LOTS of time spent removing spot welds. I started drilling them, but I don't like the tip on the drills they have at work. By the time the top layer is drilled thru, most of the bottom layer is too, which I DON"T want to drill thru. I already have a handful of holes I need to weld shut and sand smooth. I went to a 3m 1991 stone to grind off the quarter panel material, leaving the substrate with only a slight amount of material gone. The stone is VERY slow, compared to a drill, but no time fixing a hole either.

I ground out all the welds on the quarter to trunk seal channel, but didn't bother with a pic of that.
 Tomorrow, I'll remove the rear glass and, hopefully, get the rest of the quarter off.


__________________

Mitch D.   River Falls, WI

Lifetime member of the "Cars apart Club"

Some Assembly Required

1966 Chevelle SS 396 M20

1970 Chevelle SS 396 M20

1967 Camaro SS 350 rs


Active Member

Status: Offline
Posts: 461
Date:
Permalink  
 

I would love to just stand there and watch how you do that.

__________________

Larry L.

Coon Rapids


1K+ Club

Status: Offline
Posts: 1304
Date:
Permalink  
 

Larry Lucast wrote:

I would love to just stand there and watch how you do that.


Had the same thought Larry, also "wouldn't that be a great tool to have?" (if money was no object).


__________________

Bruce L. - Lakeville MN

1971 Malibu Convert


President

Status: Offline
Posts: 7274
Date:
Permalink  
 

First thing this morning, I removed the rear window trim and went to cut the butyl seal with a hand cutter. Hmmm....when did the factory go to urethane ? That "stuff" is waaay harder to cut. Took me an hour...


Once the glass was out, I ground out the spot welds on the window channel. Doing it this way leaves the material below much better than drilling.


Finally time to remove the solder and spot welds at the roof seam. I save this for last, because I dislike this step. The solder is easy, but the panels were brazed at the ends too, which requires a lot more heat to melt. I did drill these spot welds, as the roof skin is over the quarter and I need a hole to plug weld back to.
But I did prevail and the quarter is removed.
From this point, this isn't much different than an extensive restoration, as most of the nasty, bent, stuff is off.

The frame does have a twist that we will need to take out, but the shop owner wanted the quarter off to eliminate any stress it was placing on the frame.


__________________

Mitch D.   River Falls, WI

Lifetime member of the "Cars apart Club"

Some Assembly Required

1966 Chevelle SS 396 M20

1970 Chevelle SS 396 M20

1967 Camaro SS 350 rs


2K+ Club

Status: Offline
Posts: 2689
Date:
Permalink  
 

Pretty sure my 66 use a urethane type product with some kind of material called a dam so the urethane like stuff didn’t squize over to the inside.  Some guy maybe by the name of Jeff’s camaro make and sells the stuff.


__________________

Jim L

Lake City


President

Status: Offline
Posts: 7274
Date:
Permalink  
 

I have been working on this, just not updating the thread as well as I could/should. I'll make brief comments on the progress, to keep this, somewhat short.
NONE of the 4 bolts in the trunk floor body mounts would come out, so I used a porta-power to make a little room for the sawzall and cut them off. Floor is junk anyway, so no loss.


I left the right side floor intact for now, to hold the quarter panel in place.


Then I crawled inside to drill out the spot welds at the leading edge to cabin pan.


I "thought" the spot welds I could see on the seat brace went all the way thru...NOT, I had to cut the brace off and drill out more welds under it.


The floor still wouldn't come loose, so I cut the next level off and found MORE welds under that. The floor had been put in, in 3 pieces and all of them had their own welds...


FINALLY got that out. Poor weld flange looks like a shredder got ahold of it. No worries, I'll straighten it out, but weld the new one along the leading edge anyway.


Next, I cut off all the rusted flange areas of both the inner and outer wheel houses.


-- Edited by Lost in the 60s on Monday 28th of June 2021 09:50:20 PM

__________________

Mitch D.   River Falls, WI

Lifetime member of the "Cars apart Club"

Some Assembly Required

1966 Chevelle SS 396 M20

1970 Chevelle SS 396 M20

1967 Camaro SS 350 rs


President

Status: Offline
Posts: 7274
Date:
Permalink  
 

Next day, I went at it with the crud thug and removed the undercoating to have clean metal to weld to.


I used the cut offs as a guide for cutting repair sections out of the new houses.


That lump of filler is what formed the lower 6" of the old, rusted out, houses.


They actually fit together and line up well.


Then I removed the rest of the floor and most of the tail panel above it.


The left tail pipe was bent badly over the axle and the extension pipe is gone from the crash. I got the numbers and did a search and both are obsolete, so I clamped on the pipe with the tower and pulled it out, but forgot the camera that day


Yep, the clamp should be right under the hanger. Even THAT seems to be obsolete.


__________________

Mitch D.   River Falls, WI

Lifetime member of the "Cars apart Club"

Some Assembly Required

1966 Chevelle SS 396 M20

1970 Chevelle SS 396 M20

1967 Camaro SS 350 rs


President

Status: Offline
Posts: 7274
Date:
Permalink  
 

Today was, sort of, fun. I placed the new floor, lined up the leading edge with the cabin pan, bolted it down with new mounts and welded the front onto the cabin pan. Not fun hunched inside doing all that, but the result was definitely fun...


New floor lined up well, but had a bow thru the center, so I used drill screws a bit of "influence" to convince it to lay flat.


Then I had to make a cocoon of burn blankets to protect the interior from weld spatter.


Floor welded


Welded the seat brace back on and screwed the bottom down for welding.


Got that done and cleaned up the welds a little so it doesn't look as much like amateur hour welding. That seat brace is rather thin material.


__________________

Mitch D.   River Falls, WI

Lifetime member of the "Cars apart Club"

Some Assembly Required

1966 Chevelle SS 396 M20

1970 Chevelle SS 396 M20

1967 Camaro SS 350 rs


1K+ Club

Status: Offline
Posts: 1304
Date:
Permalink  
 

Looking good Mitch!

__________________

Bruce L. - Lakeville MN

1971 Malibu Convert


President

Status: Offline
Posts: 7274
Date:
Permalink  
 

A little more progress today, after more disassembly.  I had left remnants of the tail panel and trunk drop on the right side quarter panel. I spent a few hours today removing them. The quarter panel is a replacement from way back in the cars history. It is brazed on and took some time to remove the remnants without damage to the quarter.

Between a mini belt sander and a cut off wheel, I was able to get the trunk drop flange off.

DSC07783.JPG?width=1920&height=1080&fit=

The tail panel was another matter. I had to melt the braze out of the seam with a torch and then cut it off in the seal gutter with the wheel. I then removed the weld flange with the mini sander to leave a good surface to weld the new panel too.

DSC07784.JPG?width=1920&height=1080&fit=

DSC07785.JPG?width=1920&height=1080&fit=

DSC07786.JPG?width=1920&height=1080&fit=

I then fitted the new tail panel to that quarter.

DSC07788.JPG?width=1920&height=1080&fit=

Moved to the left side and figured out the install sequence for all these pieces and then "tweaked" the trunk drop to fit better. I have very nice, close, gaps to weld to now.

DSC07789.JPG?width=1920&height=1080&fit=

DSC07790.JPG?width=1920&height=1080&fit=

Part of the trunk drop fits in behind the inner wheel house, so I had to make certain I could put that in after the quarter is fitted. I then was able to drill 28 plug weld holes in the inner patch, prep it and the car and weld it on.

DSC07792.JPG?width=1920&height=1080&fit=

DSC07793.JPG?width=1920&height=1080&fit=

Tomorrow, I will do final clean up of all areas that involve the quarter panel and test fit that.


__________________

Mitch D.   River Falls, WI

Lifetime member of the "Cars apart Club"

Some Assembly Required

1966 Chevelle SS 396 M20

1970 Chevelle SS 396 M20

1967 Camaro SS 350 rs


President

Status: Offline
Posts: 7274
Date:
Permalink  
 

With the holiday and other things distracting me, I haven't made as much progress on this as I would have liked, but it is getting there. The panel has a bit of a fitment issue in the door pillar. The factory put way too much curve in the lowest jam area and I had to try to get some back. The curve is too tight to get the panel in our stretcher jaws, so I beat the snot out of it with hammer on dolly to stretch the metal back out. I got about half of it back and then marked where I would cut a relief slot to get the rest.


After making the cut and drilling 103 holes to plug weld, I sprayed the bare metal with weld thru primer and was ready to make this panel part of the car.


All clamped and drill screwed in place.


Now the fun starts, figure out a way to weld the bottom to the rocker in the window well area.


With a few contortionist positions, I got them. Not pretty, but no one will see them.


Whole door pillar on and cleaned up. The bottom curve came out really nice.


On to the drip rail seam and roof.


That's all for today.


__________________

Mitch D.   River Falls, WI

Lifetime member of the "Cars apart Club"

Some Assembly Required

1966 Chevelle SS 396 M20

1970 Chevelle SS 396 M20

1967 Camaro SS 350 rs

AK


Active Member

Status: Offline
Posts: 138
Date:
Permalink  
 

I'm way overdue on posting as I've been watching progress. Multiple people have told me how fortunate I am that Mitch, Chris s and p and others have come to my rescue once again. I really do appreciate it!! I was pretty down last summer after the accident as I was thinking this was going to be a complete scrap heap. Mitch that metal work and straightening the frame in general has been extremely impressive to watch! She will drive once again!

__________________

Andrew K

Minneapolis

1971 Chevelle M22 468


1K+ Club

Status: Offline
Posts: 1304
Date:
Permalink  
 

The progress is good and we are all looking forward to seeing it back on the road!

__________________

Bruce L. - Lakeville MN

1971 Malibu Convert


President

Status: Offline
Posts: 7274
Date:
Permalink  
 

Well, I tried to post a lot more pics of the progress, but the page kept dropping half the pics. Not sure what is happening there. I'll try again later.

__________________

Mitch D.   River Falls, WI

Lifetime member of the "Cars apart Club"

Some Assembly Required

1966 Chevelle SS 396 M20

1970 Chevelle SS 396 M20

1967 Camaro SS 350 rs


President

Status: Offline
Posts: 7274
Date:
Permalink  
 

No clue what's going on with pics here, but it keeps dropping them when I post.

DSC07963.JPG?width=450&height=278&crop=f


-- Edited by Lost in the 60s on Sunday 1st of August 2021 09:51:39 AM

__________________

Mitch D.   River Falls, WI

Lifetime member of the "Cars apart Club"

Some Assembly Required

1966 Chevelle SS 396 M20

1970 Chevelle SS 396 M20

1967 Camaro SS 350 rs


President

Status: Offline
Posts: 7274
Date:
Permalink  
 

ALL the damage on the left side is now replaced with new metal and all welded together.

DSC07965.JPG?width=450&height=278&crop=f

DSC07967.JPG?width=450&height=278&crop=f

Outer wheel house

DSC07989.JPG?width=450&height=278&crop=f

DSC07990.JPG?width=450&height=278&crop=f


__________________

Mitch D.   River Falls, WI

Lifetime member of the "Cars apart Club"

Some Assembly Required

1966 Chevelle SS 396 M20

1970 Chevelle SS 396 M20

1967 Camaro SS 350 rs


President

Status: Offline
Posts: 7274
Date:
Permalink  
 

Moved to the right side to cut out rust. Outer wheel house lip had rust that had come thru the quarter skin and was still bent out of shape from a previous crash.

DSC07991.JPG?width=450&height=278&crop=f

DSC07993.JPG?width=450&height=278&crop=f

After cutting out the inner wheel house damage/rust, I cut out the arch from a patch panel I got. Many screws keeps it tight to the quarter and from moving while welding.

DSC07996(1).JPG?width=450&height=278&cro

Lower quarter patch panel in place too.

DSC08007.JPG?width=450&height=278&crop=f

I had 3 layers where the 2 patches met the quarter, so cut off a short section of the arch to make a butt weld and get the patches to match flat.

DSC08005.JPG?width=450&height=278&crop=f

DSC08006.JPG?width=450&height=278&crop=f

Should only take a skim coat of "chemical filler" as thick as the sheet metal to blend all this.

DSC08008.JPG?width=450&height=278&crop=f


__________________

Mitch D.   River Falls, WI

Lifetime member of the "Cars apart Club"

Some Assembly Required

1966 Chevelle SS 396 M20

1970 Chevelle SS 396 M20

1967 Camaro SS 350 rs


President

Status: Offline
Posts: 7274
Date:
Permalink  
 

Progress has been made, just way behind on updates.

Right patch panels welded in.

DSC08032.JPG?width=450&height=278&crop=f

Onto the last rust repair. Quarter was rusted thru at the tail panel. First patch was from a donor piece left over from a late model Malibu.

DSC08104.JPG?width=450&height=278&crop=f

DSC08106.JPG?width=450&height=278&crop=f

DSC08107.JPG?width=450&height=278&crop=f

DSC08108.JPG?width=450&height=278&crop=f

Second piece was from a left over patch from another project.

DSC08111.JPG?width=450&height=278&crop=f

I used the shrinker to put the curve in this piece to follow the contour.

DSC08112.JPG?width=450&height=278&crop=f

It doesn't take much curve.

DSC08113.JPG?width=450&height=278&crop=f

All done with that and the right side repairs are complete

DSC08117.JPG?width=450&height=278&crop=f


-- Edited by Lost in the 60s on Tuesday 24th of August 2021 05:42:58 PM

__________________

Mitch D.   River Falls, WI

Lifetime member of the "Cars apart Club"

Some Assembly Required

1966 Chevelle SS 396 M20

1970 Chevelle SS 396 M20

1967 Camaro SS 350 rs


President

Status: Offline
Posts: 7274
Date:
Permalink  
 

Back to the left side to install the gutter channel. The quarter to tail panel had a big difference in opinion of fit.


I cut out the excess and welded it back together and then down to the tail panel.


Then it was time to install the gutter. This is the same piece that was attached to the original quarter. I ran it thru the blaster cabinet and then spent some time untwisting and bending it back to the original shape to fit. It came out really nice.


__________________

Mitch D.   River Falls, WI

Lifetime member of the "Cars apart Club"

Some Assembly Required

1966 Chevelle SS 396 M20

1970 Chevelle SS 396 M20

1967 Camaro SS 350 rs

Page 1 of 1  sorted by
 
Quick Reply

Please log in to post quick replies.

Chatbox
Please log in to join the chat!