Discussion Forum - Northstar Chevelle Club

Members Login
Username 
 
Password 
    Remember Me  
Post Info TOPIC: 64-66 Chevrolet or Chevelle Under Dash AC Install Problems


2K+ Club

Status: Offline
Posts: 2689
Date:
64-66 Chevrolet or Chevelle Under Dash AC Install Problems
Permalink  


Hope someone can help out or give advise.  I decided not to change my car over the factory air and go with the under dash option.  So I just bought an 64-66 Under Dash Unit that Chevrolet called Custom AC.  Trying to source all the other parts as I only have the under dash unit and the blower and duct that hook up to the unit inside the car.   In  reading from the 66 service manual about installation and pressure checks, etc it looks like there might be and issue.  Everything is out there except possible one thing.  I am not even sure about this; but it appears there might just be a block adapter that goes on the back of the A 6 compressor that the muffler and hose  hook to that is not the standard.  It looks like the adapter has to provide access ports to the high pressure and lower pressure side of the two  hoses.  On the system with  factory AC  these ports are located in different areas.

So does anyone know about the adaptor block, I think it is shown in Fig 45 on Page 1A-31 of the 66 Chevrolet service manual, the non-typical photo. Thinking this would be true for 64-5 also since they used the same unit.  Is there something out that that might work.  Maybe there is even one in the 68 of Karl's that we messed with at the January meeting, since in had a 68 custom under dash unit.

Also looking for recommendation for some one to rebuild an old A6 compressor.


__________________

Jim L

Lake City


2K+ Club

Status: Offline
Posts: 2689
Date:
Permalink  
 

Here is a photo30F1CC1A-411B-4413-9BCA-D5F224B62DB0.jpeg


Attachments
__________________

Jim L

Lake City


Vice President

Status: Offline
Posts: 476
Date:
Permalink  
 

Jim

Not sure of any adapter, I think that what you are looking at is all one part, from between the Orings to the hoses.

If your concern is the location of the service ports, that's note important, they can be located anywhere in the hi & low side lines.

As for the compressor, I can disassemble, inspect and reseal,repair/replace clutch & brg.

If however the cyl. & drive plate assembly is worn/damaged, than you would need to do an exchange as those part are hard to find and may be costly.


__________________

Bob W.

Lino Lakes


2K+ Club

Status: Offline
Posts: 2689
Date:
Permalink  
 

Thanks Bob. The under dash unit just shipped yesterday, it should arrive Friday.  I think that  the muffler unit may have been used on all 64-68 chevy's with the dealer installed under dash ac unit.  Maybe even other gm cars like olds, buick, pontiac of the same time frame.

I talked to classic air this morning and it seems they may be able to make something to work with the A6 compressor or they  have something else that would work  if I would go with the Sanden compressor.  I kind of want to use an old A6 unit to look as original as possible.  I plan to check at Rohner's in Willmar or French Lake  for the muffler unit and a A6 at the end of April or early May.  Also It looks like maybe a 64-67 corvette muffler might work as they are suppose to be similar to the chevelle custom unit in regard to the service ports.

I would rather have you do my rebuilt if I don't go the Sanden route.  I see there is suppose to be a different 1 piece seal to replace the old 2 seal system that is suppose to be better and not throwing a leak.

Not in a big hurry, this weather today has got me anxious to drive the car.


__________________

Jim L

Lake City


Active Member

Status: Offline
Posts: 460
Date:
Permalink  
 

Again I would check with:

Auto Air & Accessories
4.824 Google reviews
Auto parts store in Blaine, Minnesota
Address: 1600 99th Ln NE, Minneapolis, MN 55449
Hours: Open ⋅ Closes 5PM

Phone: (763) 785-7878

__________________

Larry L.

Coon Rapids


2K+ Club

Status: Offline
Posts: 2689
Date:
Permalink  
 

Plan to do that Larry, especially since the service ports on a 66 corvette is suppose to be similar to the chevelle custom system.


__________________

Jim L

Lake City


Vice President

Status: Offline
Posts: 476
Date:
Permalink  
 

The one piece seal is from a GM R4 compressor but does require a good shaft to seal properly.  It is supposed to seal oil better than the 2 piece seal.

I used that seal on my compressor, I do however have a very slight leak off the front, just a few specks of what looks like oil.

I think you have right hand compressor mount so up through 68 Impala hose manifold may work also.


__________________

Bob W.

Lino Lakes


2K+ Club

Status: Offline
Posts: 2689
Date:
Permalink  
 

Bob, I am kind of just starting Kindergarten regarding how an ac system works and the correct terminology.  I thought i watched a you tube video on a A6 rebuild with a one piece seal.  Yes I have a right hand (pass) side mounting compressor.  I try to search what a hose manifold was, couldn't find much.  Are you saying that the service ports  are located on a 68 and down hose manifold?  Do you have a photo of what that is or could you direct me to a site with a photo?


Is this what a hose manifold looks like?

 https://www.parts123.com/parts123/yb.dll?parta~dyndetail~Z5Z5Z50000370a~Z5Z5Z5AAEQJ~P130.00~~~~S55X0VGLFT14019017151d~Z5Z5Z5~Z5Z5Z50000370a#

Going to be in Lino Lake for Easter Dinner at my brothers house.


Lots to learn, thanks again.


-- Edited by jim larson on Wednesday 28th of March 2018 01:48:17 PM

__________________

Jim L

Lake City


Vice President

Status: Offline
Posts: 476
Date:
Permalink  
 

The "Hose Manifold" is the term I used to describe the connector or fitting that connects the flexible hoses to the compressor. Didn't mean to cause any confusion, just didn't know what it was called, so I ckecked the parts manual, it is called a FITTING & MUFFLER ASSY. Now the good news, 64-68 Chevelle, 65-68 Impala, & 68 396 Camaro all use the same fitting & muffler assy.

For factory air, the service ports are not on the fitting & muffler assy. Lines could be made with ports, some dryers have a hi side port and a fitting could be added to the F&M Assy.

As for the video, I saw a one from Century Auto Air, Tucson AZ, good video. I have used them for A/C parts, they seem very good to work with.

PM me about Easter.


__________________

Bob W.

Lino Lakes


2K+ Club

Status: Offline
Posts: 2689
Date:
Permalink  
 

Sounds as if I could use a manifold/ muffler  and get a drier that has a high side port, then add a port of the low side.  The manifold/muffler available for the Chevrolet or Chevelle has no fitting ($80)   I think the manifold/ muffler from the corvette available has both fitting but not sure ($130).  So things are coming together.  The under dash unit is suppose to arrive tomorrow morning.  It's suppose to be NOS and still has caps on the two hose connection tubes.

You are suppose to be able to convert it to R134; but R12 is still available though it is more costly.


Attachments
__________________

Jim L

Lake City


2K+ Club

Status: Offline
Posts: 2689
Date:
Permalink  
 

This might work if I can confirm it will fit on an 6 compressor.


https://www.ebay.com/itm/62-63-CHEVROLET-A-C-MANIFOLD-MUFFLER-HOSE-FITTING/182746430872?hash=item2a8c893d98:g:lrAAAOSw7hRWOOxc&vxp=mtr


__________________

Jim L

Lake City


Vice President

Status: Offline
Posts: 476
Date:
Permalink  
 

 Jim I looked at my 75 Corvette, way different, lines go down. Also the part on Ebay does not look like it will work, in the pictures from my Impala, the low side line that turns 180* from the compressor back to the firewall. The Ebay fitting would no allow enough room for the line to turn back to the fire wall.

I would put 134a in, much cheaper, the first time out after I got my A/C running I blew a line, lost a full charge of oil & refrigerant, glad it was 134a.


Attachments
__________________

Bob W.

Lino Lakes


2K+ Club

Status: Offline
Posts: 2689
Date:
Permalink  
 

Maybe the hose routing makes a difference, my just goes from high side of compressor to condenser to drier, back to under dash unit, then back to low side of condenser.


Attachments
__________________

Jim L

Lake City


2K+ Club

Status: Offline
Posts: 2689
Date:
Permalink  
 

This is suppose to be the 66 corvette and under dash manifold with the high and low fittings.


Attachments
__________________

Jim L

Lake City


Vice President

Status: Offline
Posts: 476
Date:
Permalink  
 

Check this out.

https://originalair.com/a6a4-manifold-straight

With this adapter you can have lines made with straight, angled, with or without service ports.nana


__________________

Bob W.

Lino Lakes


2K+ Club

Status: Offline
Posts: 2689
Date:
Permalink  
 

I got the unit today, may even work with my console.  Bought from Phillips Muscel Car Parts in Tulsa OK.  Can’t believe how well every think was packed. Double boxed with foam and bubble wrap inside each box.Now I need to wait wor my 66 accessories installation manual.


-- Edited by jim larson on Friday 30th of March 2018 02:18:03 PM

Attachments
__________________

Jim L

Lake City


2K+ Club

Status: Offline
Posts: 2689
Date:
Permalink  
 

Had a good vistandinformation session at Bob Walls last night.  i got the installation manual today.  Looks like I have to fabricate one bracket for the underdash unit and two brackets for the blower fan that mounts up and in front of the inside heater box.  It needs a AC relay and a fuse, then everything should  and I can move to the engine compartment.

biggest challenge was removing the seat separator, took me about 1/2 hour to figure that out. I had all ready don that, console.here is latest photo of how it will look.


Attachments
__________________

Jim L

Lake City


2K+ Club

Status: Offline
Posts: 2689
Date:
Permalink  
 

Getting closer. Thanks to Karl I was able to get a 66 condenser.  Had it pressure checked, flushed, added some oil, and caped.  They also threw some paint at it.  Good thing I had cleaned it and straightened most fins. If anyone needs radiator or condenser work they should consider this shop.  https://www.google.com/search?q=brogen,+radiator,+mn&ie=UTF-8&oe=UTF-8&hl=en-us&client=safari#trex=m_t:lcl_akp,rc_f:nav,rc_ludocids:2345670411815564447,rc_q:Borgen%2520Radiator%2520Co,ru_q:Borgen%2520Radiator%2520Co

The owner has been in the business 40 yrs. just finshed  ordering  parts today from Custom Auto Air in Tucson.Need to rebuild compressor and add Freon.  Thanks to Larry for the tip on auto air accessories. The will add the Freon unless I find some closer to home.


Attachments
__________________

Jim L

Lake City


President

Status: Offline
Posts: 7268
Date:
Permalink  
 

Are you going to stray with R12 or convert the compressor and POA valve for R134 A ?

__________________

Mitch D.   River Falls, WI

Lifetime member of the "Cars apart Club"

Some Assembly Required

1966 Chevelle SS 396 M20

1970 Chevelle SS 396 M20

1967 Camaro SS 350 rs


2K+ Club

Status: Offline
Posts: 2689
Date:
Permalink  
 

As of now I am planning on going  with R12. They say less leak problems with the worm gear clamps and the 3 barb fittings, Less pressure, condenser works better and better Cool, and the A6 compressor runs better  with the R12.  

To go with R 134 they say you should use the new type Parallel Flow condenser, different type of clamps a crimp clamp ( I would have to get rid of all the 3 barb fitting almost impossible to do on an under dash unit and a new style compressor.  Not sure if and where the POA valve is on an under dash unit.

Current cost difference is @2.60 per ounce, with 48 ounces need for a full fill.  So far Auto Air Accessories is the only AC shop that installed R12.  Looking for different options, so I don't have to drive the metro traffic.  I would probably go up north of Sillwater and cut over west to their shop in Blaine.  Don't think I am up for attempting a fill with my limited experience.


__________________

Jim L

Lake City


Vice President

Status: Offline
Posts: 476
Date:
Permalink  
 

I used 134a, thought I would change to R12 after I got the system up and running making sure there were no unforeseen problems. Found the 134a cools very good with the original condenser and  POA valve. I did adjust the POA valve for 134a. My system only needed almost 2 LBS of 134a vs 3.75 of the R12. I'll keep the 134a. I do have a slight leak, so I have to add to the system in the spring. Might change back to the ceramic/carbon comp. seal, right now I have the R4 comp. seal now and does seep a bit of oil which should not leek at all.

Jim, Your system uses a thermostatic switch, not use a POA valve to control temps.


__________________

Bob W.

Lino Lakes


2K+ Club

Status: Offline
Posts: 2689
Date:
Permalink  
 

This Oil business is kind of confusing.  Auto Air Accessories and Century Air both say to start with Mineral oil if using R12.   If I start with R134 then I must use PAG oil.  If I start with R12 and change to R134, then I just use Easter Oil with the change; but mineral to start with.   If  you go back to R12 from R134 I never got a answer on this.  I am using the Barrier Hose as it works with both R12 and R134: you just have to be careful on the installation with the 3 barb fittings to not tear the inner nylon lining.  You MUST use the standard barrier hose if you use the original style worn gear clamp.  You can only use the reduced barrier hose if all fittings are the crimp on type. Should be a good session at Mitch's on Saturday.


__________________

Jim L

Lake City


Vice President

Status: Offline
Posts: 476
Date:
Permalink  
 

I would use mineral oil as an assembly lube for the compressor as it absorbs less moisture. Ester and PAG absorbs moisture much quicker.

Ester is can be used with R12 or R134a, Mineral is R12 only. Ester is compatible with both mineral and PAG oil. PAG is not compatible with mineral as I recall. There were roomers out out there that converting from R12 to 134a, adding PAG  to R12 systems without flushing would cause the inside of the system clog up solid. I never saw that. I however never used PAG during a R12 to 134a up grade.

We did change a lot of condensers as part of the upgrade to get better cooling on the trucks I worked with as the 134a does not cool as well. These systems were a bit marginal to begin with.  A good working GM factory system cooled very well back in the day with R12 so I thought I'd  try 134a, see how it cooled, found It cools very good.

Jim, I have not worked with the type system you have so I don't know how they will perform with 134a.


__________________

Bob W.

Lino Lakes


2K+ Club

Status: Offline
Posts: 2689
Date:
Permalink  
 

Bob the owner of the tucson shop shows in a video how to change from the two seal that original was used in the R6 compressor to the one Seal that is used in the new R4 compressor.  I wonder which he feels is better and less likely to leak and sling oil. The pho to shows a 68 manifold/muffler and a 66.  The 68 weighs about 2oz and is all alumnimun. The 66 weighs about 1 lb, not sur e what it is made of; but appears to be plated with copper and then a nickel plating that was mostly gone. So I cleaned it, primed with etch, and then a cadinum paint.  The 68 appears to be made with welds and the 66 appears some kind of solder.


-- Edited by jim larson on Thursday 26th of April 2018 02:42:42 PM

Attachments
__________________

Jim L

Lake City


President

Status: Offline
Posts: 7268
Date:
Permalink  
 

All those old A6 compressors seeped oil around the clutch shaft. GM got so tired of replacing them under warranty, that they started putting a felt seal in the shaft nut hole to prevent the leakage from showing up until AFTER the warranty period...
I went thru the GM training center in Golden Valley in the late 70's for A/C, but I don't remember much of how to rebuild a compressor. By then, the POA valves had been replaced with the orifice tube that the screen would get plugged up with gunk from moisture in the system. They were usually very difficult to pull out of their seat and would usually break, costing much more to replace.


__________________

Mitch D.   River Falls, WI

Lifetime member of the "Cars apart Club"

Some Assembly Required

1966 Chevelle SS 396 M20

1970 Chevelle SS 396 M20

1967 Camaro SS 350 rs


Vice President

Status: Offline
Posts: 476
Date:
Permalink  
 

The one piece R4 compressor seal is a lip seal that seals on the shaft, the shaft were the seal rides must not have any damage, no groves, rust, scoring and so on. They work very good. My 90 pickup is equipped with the R4, 175000 miles/no leaks.

The two piece A6 seal is a carbon/ceramic seal. One ceramic is sealed to the housing, the carbon part is sealed to and spins with the shaft. This type of seal will seep oil, it must seep slightly to seal the refrigerant. There is a felt that is installed after the sear to absorb oil seepage.

So I installed the R4 seal in my A6 just like in the Tucson shop video, the shaft looked good, but I have a very slight leak at the seal, I get a few specks of oil on the white washer bottle. Don't know if that is my refrigerant leak, leaks so slow, just need to add in the spring time.

As for the manifolds I would use the one that directs the hoses the best.


__________________

Bob W.

Lino Lakes


2K+ Club

Status: Offline
Posts: 2689
Date:
Permalink  
 

My first car with ac was a 78 Malibu’s wagon, to separate the two kids.  I drove it for 9 years with no problems, air as cold as the day I bought it.  My brother drove it another 4 years until a women driver hit him and sent the car into a swamp. Dog jumped out the window and started hunting pheasants. It will be interesting to see what these two compressors look like once you tear them apart Bob.


__________________

Jim L

Lake City


2K+ Club

Status: Offline
Posts: 2689
Date:
Permalink  
 

I installed the two hoses on the underdash unit today. The clamps from heartbeat were only 1/2” wide instead of the 9/16 like the origional so they didn’t catch all 3 barbs on the fittings the best, so I found some that were 9/16th and also onstalled a second clamp for good measure.  I don’t know how tight to clamp them, as I don’t won’t to crush the aluminum. I sounder if the is ca torque or if someone knows how much I should tighten them with a 1/4” ratchet.


__________________

Jim L

Lake City


2K+ Club

Status: Offline
Posts: 2689
Date:
Permalink  
 

Just a few things left, install the compressor, run the hose from the manifold/muffler to the condenser, hook up hose from under dash unit to manifold, install belt, and run power from the solenoid to the firewall fuse.  The have someone install the refrigerant. Should be ready for winter.  66 chassis manual say to run the AC for 15 minuets ever two weeks.


__________________

Jim L

Lake City


2K+ Club

Status: Offline
Posts: 2689
Date:
Permalink  
 

Hose clamps arrived from the UK. They are wider 5/8 as opposed to originals @ 9/16 and reproductions @ 1/2.. really heavy duty with 106 in lb of torque as opposed to 35 in lb on reproductions. I only clamped at 50 in lb.


Attachments
__________________

Jim L

Lake City


Vice President

Status: Offline
Posts: 476
Date:
Permalink  
 

I,m helping Jim with his A/C installation by inspecting and resealing a compressor. He brought two compressors to the April meeting which I thought I would take the best parts from ether. One compressor and pulley were locked up, I started with this one as it had the better case. As I started to pull the clutch the clutch broke free from the pulley and the compressor started to turn. I used the appropriate pullers for the clutch and pulley, broke the snap ring that holds the magnet. After the clutch assembly is removed the I removed the four nuts, the rear cover and valve plate, once the oil tube was remove the cyl. assy., front valve & reed plate and front cover comes out. All the internal parts look very good inducing the shaft seal surface so the later R4 "one" peace comp seal should work. The compressor had the "early" two peace seal, so it's never been apart since new some tine in the sixties. Next I'll clean and paint the housing and end plates and get ready for assembly.


Attachments
__________________

Bob W.

Lino Lakes


2K+ Club

Status: Offline
Posts: 2689
Date:
Permalink  
 

Bob, that the compressor that Karl gave me.  It came from and under dash unit which I think is a little different than the compressor used on a factory air car.  I think it has less cubic inches, I thought they would be all the same.  Also I think the fill on the lable might be different.  This unit being 3.00 lb and the factory being 3.75 Lb.  That being said is it possible to retain the label indenting the compressor?  Maybe you can paint without taking label off.  How are those 3 outboards doing?


__________________

Jim L

Lake City


Vice President

Status: Offline
Posts: 476
Date:
Permalink  
 

You are right, the under dash units (Custom System) used a 10.8 Cu. In.compressor, The factory (Four Seasons) units used a 12.6 Cu. In. compressor. I measured your compressor and found it to be a 12.6 Cu. In. The label says 3.00 lbs Refrigerant however. This compressor is equipped with the larger diameter pulley, maybe that makes up the difference. As for the label I can heat the body from the inside, see if the label loosens up, or possibly polish the area were the label is and sand blast the rest, need to do a little testing

Had the boat in the water twice, engines run great and, sound so cool.


__________________

Bob W.

Lino Lakes


2K+ Club

Status: Offline
Posts: 2689
Date:
Permalink  
 

Bobs_Place wrote:

You are right, the under dash units (Custom System) used a 10.8 Cu. In.compressor, The factory (Four Seasons) units used a 12.6 Cu. In. compressor. I measured your compressor and found it to be a 12.6 Cu. In. The label says 3.00 lbs Refrigerant however. This compressor is equipped with the larger diameter pulley, maybe that makes up the difference. As for the label I can heat the body from the inside, see if the label loosens up, or possibly polish the area were the label is and sand blast the rest, need to do a little testing

Had the boat in the water twice, engines run great and, sound so cool.


 Sounds good about heating from inside to see if label will come off. I think the information about cu in difference came from the 66 service manual. I’ll look for it today. What are they talking about when they refer to cu in? Here is the information from the 66 manual.


-- Edited by jim larson on Friday 25th of May 2018 08:46:50 AM

Attachments
__________________

Jim L

Lake City


2K+ Club

Status: Offline
Posts: 2689
Date:
Permalink  
 

Hey Bob, I see that label matches up to  one for the four-season ac compressor.  Maybe the labels were the same for both the four-season and custom unit, I was thinking they would be different due to the cu in displacement.  Maybe that compressor is not the one that came with the unit.  Anyway I have a 66 label for the four-season system, I will show your it tomorrow and then we can decide which way to go, old label or new label.


__________________

Jim L

Lake City


Vice President

Status: Offline
Posts: 476
Date:
Permalink  
 

I was able to get the label off in one piece, but it wasn't in very good shape to begin with, so we'll probably use the new label.  Cleaned up the housing, ends and clutch assy. Taped off insides of the housing and ends to prevent damage an contamination, blasted, cleaned primed and painted.

All the parts are ready, seals and orings are in so when Jim and I are able to get together we'll assemble the compressor as he wanted to be here during that process.


Attachments
__________________

Bob W.

Lino Lakes


Vice President

Status: Offline
Posts: 476
Date:
Permalink  
 

Jim came up today so assembled the his A/c compressor.

We started by mounting the body in the fixture.Jims compressor 002.JPG

Next we stacked the reed and valve plate and front cover on to the cylinder assembly.IJims compressor 003.JPG

And installed the stack into the housing.

Jims compressor 005.JPG

The rear reed and valve plate was next, then the oring and cover and torqued to spec.Jims compressor 007.JPG


We pressure tested the compressor, all looks good.Jims compressor 009.JPG


-- Edited by Bobs_Place on Wednesday 6th of June 2018 09:14:23 PM

Attachments
__________________

Bob W.

Lino Lakes


Vice President

Status: Offline
Posts: 476
Date:
Permalink  
 

With the compressor assembled and leak tested, I then press the old pulley bearing out. Pressed the new bearing on.

Jims compressor 010.JPG

Assembled the magnet and pulley assy. onto the comp.

Jims compressor 015.JPG

We pulled the clutch hub and drive plate on to the drive shaft, and finished up with the retaining washer, snap ring and nut.

Jims compressor 016.JPG

Jim put the new label on, we raped the compressor up for the trip home and for got to take a final picture.


Attachments
__________________

Bob W.

Lino Lakes


2K+ Club

Status: Offline
Posts: 2689
Date:
Permalink  
 

Getting closer. Just need to hook up manifold/Muffler and two hoses plus install ac belt.  Then add the refrigerant.


Attachments
__________________

Jim L

Lake City


2K+ Club

Status: Offline
Posts: 2689
Date:
Permalink  
 

Well I burn up the compressor due to my rant2 
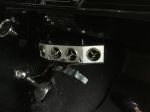
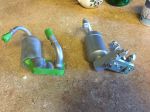
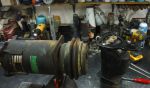
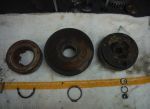
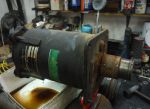
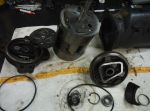
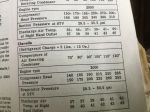
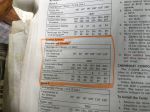
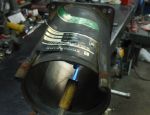
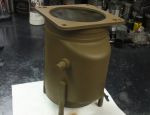
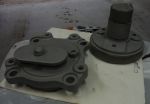
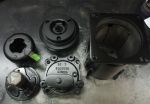
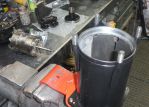
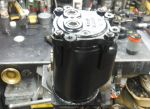
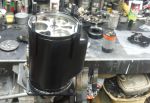
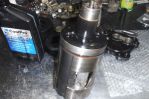
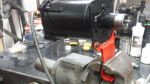
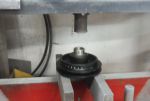
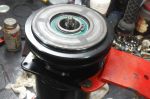
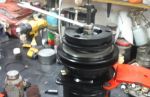
Thanks again the Bob who make one good A6 out of three.   Ready for freon.  The upcoming weather would be a good test.
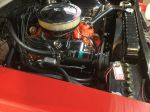
 

Notice power tocompressor is disconnected.


-- Edited by jim larson on Friday 29th of June 2018 03:29:18 PM

Attachments
__________________

Jim L

Lake City


Vice President

Status: Offline
Posts: 476
Date:
Permalink  
 

"Ready for freon." and 11oz oilnotworthy

"Notice power tocompressor is disconnected."  Thankyou


__________________

Bob W.

Lino Lakes


2K+ Club

Status: Offline
Posts: 2689
Date:
Permalink  
 

Well it's finally done, I hope!  Bob finished putting the refri in.  Cold weather, so we will have to wait until a much warmer day next summer, as we will likely have to add more refri, as we only got about 42Oz in and it calls for 48Oz, hoping there are no leaks.  The underdash unit blew cold 40-42 air; but it was only 55 F outside.


__________________

Jim L

Lake City

Page 1 of 1  sorted by
 
Quick Reply

Please log in to post quick replies.

Chatbox
Please log in to join the chat!