Discussion Forum - Northstar Chevelle Club

Members Login
Username 
 
Password 
    Remember Me  
Post Info TOPIC: A Better Mouse Trap


2K+ Club

Status: Offline
Posts: 2444
Date:
A Better Mouse Trap
Permalink  


I've always wanted a better tool for installing control are bushing, pieces of cut up tailpipe were just a pain. So with my new welding skills that still need refinement, I made this tool. The handle allows for smacking it with a hammer for removal after the bushing has been pressed in.  

It just makes those bushings want to go in 


20160522_164151.jpg20160614_124601.jpg


Attachments
__________________

Kevin

Northwestern Ohio


1K+ Club

Status: Offline
Posts: 1196
Date:
Permalink  
 

Patent it!

Should I just ship you the several sets that will need to get done.

Better yet, ROAD TRIP!!!

Karl  beers


__________________

More ambition than brains,

If you have more than 5 of anything, best to stop counting!


2K+ Club

Status: Offline
Posts: 2444
Date:
Permalink  
 

Road trip it is Karl, you're always welcome and there's plenty of room, plus trailer parking.  I'm sure we could also find some projects to play with.
I've made another handy tool. For use when installing panels that need just a bit more force to bring together before screwing or welding. A pry bar of sorts* with a chain that can be set anywhere on the bar for leverage. For use in the trunk I manufactured a J hook that fastens to the trunk lid ledge. For use on floor pans I bolt the chain to the seat belt retainer nuts. Anywhere else you can usually find a 5/16" nut.

*Requires an assistant not included with tool. 


Attachments
__________________

Kevin

Northwestern Ohio


Active Member

Status: Offline
Posts: 398
Date:
Permalink  
 

thumbsup


__________________

Keith - Rochester, MN

1970 El Camino SS 396 L78

'09 Viper SRT-10X Coupe
'09 Car Craft RSE Winner
10.76@133.73
190.0 mph Standing Mile


Founding Member

Status: Online
Posts: 2787
Date:
Permalink  
 

Great ideas!

I have taken a few lessons from Kevin myself, and have been putting nearly everything on wheels. :)

__________________

Derek Kiefer - Mantorville, MN

69 Malibu Pro-Touring stroker LS1-383/T56 - 69 SS396-325/3spd project


2K+ Club

Status: Offline
Posts: 2444
Date:
Permalink  
 

But wait there's more.
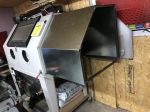
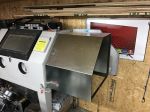
I need my blast cabinet to hold longer pieces so I'm building this two foot extension. I will be able to install and remove it quickly, it is held in place with four bolts and weights less than 20 lbs, when not in use it will stow on top of the cabinet.
When complete I'll be able to blast a core support in it.
I'll work on the sheet metal tomorrow.


Attachments
__________________

Kevin

Northwestern Ohio


Active Member

Status: Offline
Posts: 469
Date:
Permalink  
 

The perfect combination: Good ideas, the tools to make them, and the skill to use the tools. And you even put a nice coat of paint on them.

__________________

Larry L.

Coon Rapids


2K+ Club

Status: Offline
Posts: 2734
Date:
Permalink  
 

Those look good Kevin.  I wonder if you might want to explore a driveshaft loop that mounts to the bottom of the transmission mount on a 64-67 A body?  A guy in FL was making them in he past, but quit.  I have a photo you could use for a proto type that he sent me.


__________________

Jim L

Lake City


2K+ Club

Status: Offline
Posts: 2791
Date:
Permalink  
 

You're getting pretty darn good with metalworking & welding my friend!... Applying some Archimedes logic to a tricky problem - neat!

(Try this one time... get a stopwatch and from a standing position: drop the MIG & helmet, take off a shoe, and peel off a sock - all while hopping around on one foot... Record the time. I guarandamtee that in the future you will beat this time when a piece of slag/molten blob drops onto your sneaker, melts through, and starts burning a hole into your foot. Wear some boots!)


-- Edited by John D on Sunday 1st of January 2017 05:21:11 PM

__________________


John D. - St. Louis Park, MN.

1965 El Camino - LT-1, 4L60e, 4wh discs, SC&C susp.
2013 F-150 Platinum - Twin Turbo 3.5

2018 Factory Five MkIV Roadster build thread


2K+ Club

Status: Offline
Posts: 2444
Date:
Permalink  
 

John, my sides hurt from laughing. I found, or should I say the molton blob found me.......more than once. I suit up pretty well, ER trips are pricy. Remember you got me started with this welding business.

Remember the bend radius formula? One 90* and two 45* bends and the shell fits like a glove. Going to keep the door simple, just a cover like cap and bunggy cord. The floor is cut, I'll install it this week and I'm ready for blasting.

Did some welding on the Buick frame today moving, the crossmember mounts aft for the 200R4 It's a lot easer to weld thicker steel.

Jim, I'm just not ready to go into the manufacturing business. I'm struggling just trying to get my stuff done.

Started a new project this week, more on that later.


Attachments
__________________

Kevin

Northwestern Ohio


2K+ Club

Status: Offline
Posts: 2444
Date:
Permalink  
 

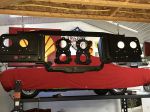
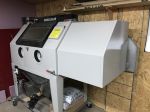
The blast cabinet is done and has been in use for some time, my core support is done. It works well and removes and stows easley after use.

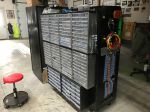
I have always used small storage cabinets for assorted hardware. The problem has been the space they take up on the work bench. So I mounted them to the back of one of my tool boxes. Before installing them, I had my brother in law the big one that drinks all my beer, hang on the back of the tool box to check the CG. Keep it simple.


Attachments
__________________

Kevin

Northwestern Ohio


Active Member

Status: Offline
Posts: 469
Date:
Permalink  
 

That is entirely too neat and organized!

__________________

Larry L.

Coon Rapids


2K+ Club

Status: Offline
Posts: 2444
Date:
Permalink  
 

And one more.
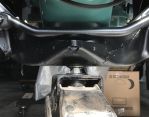
It's always tempting to jack an A Body using the main forward cross brace for tire removal or any number of reasons. More than one car guy has had the jack slide aft and ding the oil pan.
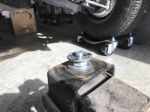
This stud type jack mount is used when jacking large aircraft. It just so happens that A Body's have a 7/8" hole right in the center or that big cross brace.
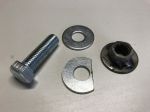
I installed a 3/4" bolt, nut and washers through the jack pad mounting hole to provide the jacking stud. It's quick and easy to swap out the jack pad or bolt.
Just need a name for the new tool....


-- Edited by dashboard on Wednesday 12th of April 2017 06:57:05 PM

Attachments
__________________

Kevin

Northwestern Ohio


Active Member

Status: Offline
Posts: 472
Date:
Permalink  
 

Thanks for sharing Kevin. What a great idea!

I will be adding this to my to do list.


__________________

Chris S.

Oak Grove

'68 Malibu (His)

'68 442 (Hers)


2K+ Club

Status: Offline
Posts: 2734
Date:
Permalink  
 

Neat Kevin.  I think i would like something a little different for my type of jack, since I am always jacking the rear when I jack the front.  Maybe just a 1 1/4  round pipe welded to a big washer/plate and a bolt welded to the washer with another washer welded to the bolt. Then all I would need to do is remove the jack plate and drop in the new plate.  Or just find a spare plate and weld a bolt to it.


i also need to figure something out for jacking the rear since I have a rear sway bar.


__________________

Jim L

Lake City


2K+ Club

Status: Offline
Posts: 2444
Date:
Permalink  
 

Good idea Jim.
These things never end up as originally envisioned. This was a quick $2.25 in nuts, bolts and washers from the hardware store. I needed to be able to lift the frame to slide the dollies under the front tires. Mod ll will be a copy of the actual jack pad with a 7/8" stud welded in the center. For my jack it will be 4"x4" x 1/2" thick. I'll also add a 1/4" reinforced rubber cushion around the stud to on the pad.

__________________

Kevin

Northwestern Ohio

Page 1 of 1  sorted by
 
Quick Reply

Please log in to post quick replies.

Chatbox
Please log in to join the chat!