Discussion Forum - Northstar Chevelle Club
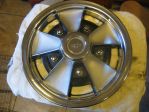
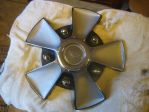
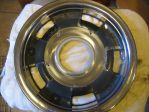
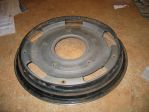
Members Login
Username 
 
Password 
    Remember Me  
Post Info TOPIC: Anyone with experience or have heard about how to re-condition the Mag Style 65-72 wheel covers?


2K+ Club

Status: Offline
Posts: 2689
Date:
Anyone with experience or have heard about how to re-condition the Mag Style 65-72 wheel covers?
Permalink  


I guess I am kind of occupied with re-conditioning the original style covers. Trying to decidedbetween the dog style and the mag style.  I have some pretty good information regarding the 66 dog dish caps.  Now I am looking at the set of 66 Mags I have.

Mitch has a set, so he might also be interested.  The covers are made of two separate parts, an inner pot metal spoked section and an outer stainless steel ring that is attached to a steel inner reinforcement ring.  The two parts are held together by screws with the inner reinforcement ring designed to hold the cap on the rim.

My center sections are in excellent condition.  The design of how the outer stainless rim and inner reinforcement ring make it difficult if not impossible to repair any imperfections.  Those come from little nick and sand particles getting down in between the 2 pieces.  I have included some photo.  The steel reinforcement part is spot welded together and it looks like the outer lip of the stainless part is rolled over the steel part.  If there is some way to separate the outer stainless part and the inner steel part and reassemble, then It would be easy to take out the dings and nick.  So has anyone had or seem a method to remove and reassembly these to parts?  Thanks.


-- Edited by jim larson on Tuesday 26th of April 2011 07:30:36 PM

Attachments
__________________

Jim L

Lake City


2K+ Club

Status: Offline
Posts: 2761
Date:
Permalink  
 

Those are sweet looking factory caps. I would ask Mike Crown or Dale M on team chevelle what they recommend for a shop. Im not sure. Couldnt any shop that does your other caps do them too?


__________________

Chris - Ramsey, MN.

Dear Optimist, Pessimist, and Realist.

While you guys were busy arguing about the glass of water. I drank it!

Sincerly,

The opportunist.


2K+ Club

Status: Offline
Posts: 2689
Date:
Permalink  
 

Chris R wrote:

Those are sweet looking factory caps. I would ask Mike Crown or Dale M on team chevelle what they recommend for a shop. Im not sure. Couldnt any shop that does your other caps do them too?


 The issue is removing the inner rienforcement ring, so that  you can remove any nicks, stone marks, etc from the outer  stainless steel ring.  And then reattaching the inner and outer rings as the inner ring with the claws holds the cap to the rim.

I am sure Mike would recommend the Finishing Touch, maybe I'll contact them.  I was thinking that if you could make some kind of a tool so that you could separate or make a little gap about 1 32" between the outer stainless bead part and the part of the inner ring that slips under it, that then you could remove the spot weld that holds the ring together and someone work it out from under the outer lip.

Otherwise you would have to take some kind of a tool and cut the inner ring near the outside peremiter and then weld it back together somehow after repairing the stainless ring.


-- Edited by jim larson on Wednesday 27th of April 2011 06:02:42 AM

__________________

Jim L

Lake City


2K+ Club

Status: Offline
Posts: 2790
Date:
Permalink  
 

What's unknown is if the steel inner has a raised/folded edge (that's truly trapped under the rolled stainless edge), or if the steel edge is straight/flat.

If it's flat, by popping/drilling the spotwelds of the steel ring, it might be possible to "contract"/ reduce the diameter of the steel ring, and get the edge of it out from under the stainless rolled bead.
(I'm thinking in reverse-engineering mode, about the cheapest way to produce something... an unwelded ring, you collapse it on itself a little bit, get the edge under the rolled bead, let it expand/spring back, hold it, and zap it in the spotwelder - done.

(it would be nice to have a totally JUNK unit to experiment on!)

__________________


John D. - St. Louis Park, MN.

1965 El Camino - LT-1, 4L60e, 4wh discs, SC&C susp.
2013 F-150 Platinum - Twin Turbo 3.5

2018 Factory Five MkIV Roadster build thread


2K+ Club

Status: Offline
Posts: 2689
Date:
Permalink  
 

John D wrote:

What's unknown is if the steel inner has a raised/folded edge (that's truly trapped under the rolled stainless edge), or if the steel edge is straight/flat.

If it's flat, by popping/drilling the spotwelds of the steel ring, it might be possible to "contract"/ reduce the diameter of the steel ring, and get the edge of it out from under the stainless rolled bead.
(I'm thinking in reverse-engineering mode, about the cheapest way to produce something... an unwelded ring, you collapse it on itself a little bit, get the edge under the rolled bead, let it expand/spring back, hold it, and zap it in the spotwelder - done.

(it would be nice to have a totally JUNK unit to experiment on!)


 That was also my  kind of my thinking.  I tried to show as much of the inner ring as possible in the photo of where it goes under the lip.  It looks like the edge of the inner ring goes up a little, just enough to help hold it.I think I will start looking for a later less valuable cap that is badly damage and take a crack at it.

I contacted The Finishing Touch Inc and sent them some photos and asked if an how they would remove the ring and reinstall the ring. They seem to indicate that they could fix it.  Waiting to here from them.


__________________

Jim L

Lake City


Mega Poster

Status: Offline
Posts: 711
Date:
Permalink  
 

On the back side of the center portion other then welding can it be rivited back on or does it have to be welded? If it does have to be welded the only thing I can think of off hand would be a stud welder with the spot weld attachment on it.

__________________


2K+ Club

Status: Offline
Posts: 2761
Date:
Permalink  
 

It definetly looks like there are spot welds at that seam. It almost looks like the factory just put in the center part and just bent over those tabs into the hub.


__________________

Chris - Ramsey, MN.

Dear Optimist, Pessimist, and Realist.

While you guys were busy arguing about the glass of water. I drank it!

Sincerly,

The opportunist.


President

Status: Offline
Posts: 7269
Date:
Permalink  
 

If they only have nicks/scratches and no dents, they can be polished out without disassembling the ring. The shop I referred you too in Forest Lake can do that. If you want to remove the steel ring for blasting/paint, take a small mirror, like a dental mirror and look under the stainless rim at the opening of the steel ring at the welded area to see if it's straight. I'm positive the steel ring was welded first because there's no way to get a spot weld tip between the ring and stainless cover. The stainless lip was rolled over the steel after welding. Trying to pry the stainless up to remove the ring will most likely destroy it, as there will be kinks on the outside from bending.


__________________

Mitch D.   River Falls, WI

Lifetime member of the "Cars apart Club"

Some Assembly Required

1966 Chevelle SS 396 M20

1970 Chevelle SS 396 M20

1967 Camaro SS 350 rs


Active Member

Status: Offline
Posts: 337
Date:
Permalink  
 

John D wrote:

What's unknown is if the steel inner has a raised/folded edge (that's truly trapped under the rolled stainless edge), or if the steel edge is straight/flat.

If it's flat, by popping/drilling the spotwelds of the steel ring, it might be possible to "contract"/ reduce the diameter of the steel ring, and get the edge of it out from under the stainless rolled bead.
(I'm thinking in reverse-engineering mode, about the cheapest way to produce something... an unwelded ring, you collapse it on itself a little bit, get the edge under the rolled bead, let it expand/spring back, hold it, and zap it in the spotwelder - done.

(it would be nice to have a totally JUNK unit to experiment on!)


 I have some pretty crappy ones that I always wanted to rebuild, I don't know if they are bad enough to scrap one, but I will take the worse one and try and work it over when I have a chance. Will keep an eye on this thread and see how Jim's come out!


__________________

Forest City, IA


President

Status: Offline
Posts: 7269
Date:
Permalink  
 

Use a spot weld drill like this.....    to mill thru the top layer of steel without going thru the second. That will give you a mark for reassembly and a place to mig weld it together again.  Northern Tool has them, if you get near one.

3377423_lg.jpg


__________________

Mitch D.   River Falls, WI

Lifetime member of the "Cars apart Club"

Some Assembly Required

1966 Chevelle SS 396 M20

1970 Chevelle SS 396 M20

1967 Camaro SS 350 rs


2K+ Club

Status: Offline
Posts: 2761
Date:
Permalink  
 

Dave's the man to talk to about how to drill spot welds.


__________________

Chris - Ramsey, MN.

Dear Optimist, Pessimist, and Realist.

While you guys were busy arguing about the glass of water. I drank it!

Sincerly,

The opportunist.


2K+ Club

Status: Offline
Posts: 2689
Date:
Permalink  
 

Lost in the 60s wrote:

If they only have nicks/scratches and no dents, they can be polished out without disassembling the ring. The shop I referred you too in Forest Lake can do that. If you want to remove the steel ring for blasting/paint, take a small mirror, like a dental mirror and look under the stainless rim at the opening of the steel ring at the welded area to see if it's straight. I'm positive the steel ring was welded first because there's no way to get a spot weld tip between the ring and stainless cover. The stainless lip was rolled over the steel after welding. Trying to pry the stainless up to remove the ring will most likely destroy it, as there will be kinks on the outside from bending.


 Having the steel ring spot welded first  is the other option I was think might be correct.  Steel ring welded, then set in place over the stainless ring, then the outside edge of the stainless part rolled over the steel ring with some sort of machine.   But maybe the steel ring could be removed by removing the 2 rivots that hold on one of the attachment tabs, then the spot weld, and then pulling the steel ring out from underneath the stainless tab. And reinstalled like John mentioned.   If not then the only way would be to cut it out and then somehow weld it back together.  Waiting to hear how The Finishing Touch would attach this problem and their cost?

Two of my rings are pretty good, all 4 good enough for a driver.  But all have little pieces of sand that got in between the stainlles part and the steel part, poping out the stainless part making a little pimple like defect.  Doe yours have the same issue Mitch?


__________________

Jim L

Lake City


2K+ Club

Status: Offline
Posts: 2689
Date:
Permalink  
 

Dan Williams wrote:
John D wrote:

What's unknown is if the steel inner has a raised/folded edge (that's truly trapped under the rolled stainless edge), or if the steel edge is straight/flat.

If it's flat, by popping/drilling the spotwelds of the steel ring, it might be possible to "contract"/ reduce the diameter of the steel ring, and get the edge of it out from under the stainless rolled bead.
(I'm thinking in reverse-engineering mode, about the cheapest way to produce something... an unwelded ring, you collapse it on itself a little bit, get the edge under the rolled bead, let it expand/spring back, hold it, and zap it in the spotwelder - done.

(it would be nice to have a totally JUNK unit to experiment on!)


 I have some pretty crappy ones that I always wanted to rebuild, I don't know if they are bad enough to scrap one, but I will take the worse one and try and work it over when I have a chance. Will keep an eye on this thread and see how Jim's come out!


 Godd luck Dan.  I have heard of some people cutting the steel ring and then epoxy welding it back together.  Probably work for show; but I wonder about driving the car.


__________________

Jim L

Lake City


President

Status: Offline
Posts: 7269
Date:
Permalink  
 

I don't have any of these wheel covers.

Dents to the outside can be tapped down and polished out. They may be from rust scale building up between too.

I wouldn't trust epoxy to hold them together for road use. That center section is heavy and would cause serious damage if it came off at speed.

Welding close to the stainless would discolor it from the heat and possibly warp it too.


__________________

Mitch D.   River Falls, WI

Lifetime member of the "Cars apart Club"

Some Assembly Required

1966 Chevelle SS 396 M20

1970 Chevelle SS 396 M20

1967 Camaro SS 350 rs


2K+ Club

Status: Offline
Posts: 2761
Date:
Permalink  
 

I agree with Mitch. I wouldnt trust Epoxy. I would trust that auto body glue stuff thats supposed to be stronger then a weld before I used epoxy. Those caps arent cheap when you find them so you dont want them to fall off. The factory didnt spot weld those after the center was in. They put the 2 together after that. So there has to be a way to get the center out without cutting the spot welds. Arent those tabs I see on the center cap engaging holes in the outer hub? 


__________________

Chris - Ramsey, MN.

Dear Optimist, Pessimist, and Realist.

While you guys were busy arguing about the glass of water. I drank it!

Sincerly,

The opportunist.


2K+ Club

Status: Offline
Posts: 2689
Date:
Permalink  
 

Lost in the 60s wrote:

I don't have any of these wheel covers.

Dents to the outside can be tapped down and polished out. They may be from rust scale building up between too.

I wouldn't trust epoxy to hold them together for road use. That center section is heavy and would cause serious damage if it came off at speed.

Welding close to the stainless would discolor it from the heat and possibly warp it too.


 Sorry Mitch, I thought you had a set.  Your right, the pot metal center section are quite heavy and held on to the stainless part by 10 screws.  Then the stainless part is molded over the steel inner ring, that the mounting tabs are secured to.  The inner steel ring looks like it extends all the way under the outer stainless lip and the steel is pretty stiff, so if you took the spot welds out, I don't know if it would be flexable enough to kind of pull out from under the lip as John mentioned, which  seems to be the only option if it is indeed possible. What I need is a power tool that would undo the lip  that  the original tool  formed.

Those little pimples sure appear to be formed by pieces of sand getting between the two rings   as the car is driven and the rims flex a little bit and then working  their way down and push outward on the SS part.  There is a pretty good gap between the two rings for the stone/sand particles can get in there. Don't see how they can be pounded out unless the stones discinagrate as you tap and because of the gapthat exists between the two rings you might end up creating a dent.

Do you think someone could  braize the two rings together without warping or discoloring?


__________________

Jim L

Lake City


2K+ Club

Status: Offline
Posts: 2689
Date:
Permalink  
 

Chris R wrote:

I agree with Mitch. I wouldn't trust Epoxy. I would trust that auto body glue stuff that'supposed to be stronger then a weld before I used epoxy. Those caps aren't cheap when you find them so you dont want them to fall off. The factory didn't spot weld those after the center was in. They put the 2 together after that. So there has to be a way to get the center out without cutting the spot welds. Aren't those tabs I see on the center cap engaging holes in the outer hub? 


 Thanks Chris, epoxy is definitely out,  I will have to read up on the auto body glue.

Yes the caps are not cheap, especially a nos set, and you never know what your getting unless you see the  caps in person.  One guy had a set of recondition caps for sale on EBay for around $1800.  Have hear nos sets go for over $2000.  I have a line on some badly damage caps for a reasonable price, that I can wreck.


__________________

Jim L

Lake City

Page 1 of 1  sorted by
 
Quick Reply

Please log in to post quick replies.

Chatbox
Please log in to join the chat!