Into the CAC-Dash/Gauge refurb, carpet/soundproofing, AC, who knows what else...
SShink said
Jan 29, 2012
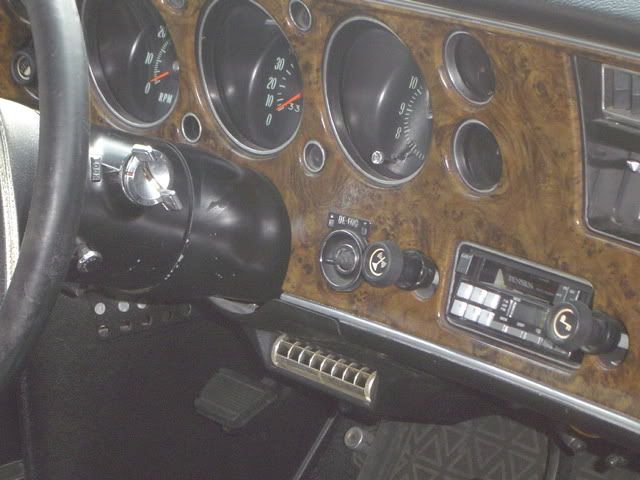
Some progress on the silver trimming. Don't pay attention to the wider parts around the edge as I need to get another paint pen to finish that off. The circles and other raised areas came out pretty good IMO. Now the aftermarket radio really bugs me. I should get the stock AM one this week to swap out for that space.
Here's the 'before':
And 'after':
-- Edited by SShink on Sunday 29th of January 2012 04:12:25 PM
-- Edited by SShink on Sunday 29th of January 2012 04:14:08 PM
-- Edited by SShink on Sunday 29th of January 2012 04:14:31 PM
John D said
Jan 29, 2012
Looks good, those paint pens are cool.
Hopefully they didn't mangle the radio opening to put the aftermarket unit in... Unless the aftermarket unit had adjustable shafts you may have a surprize under the faceplate...
SShink said
Jan 29, 2012
Looks like yesterday was the day to tear into dashes from Pushrod's post! the 'Lube' and Chad came over yesterday and tore into my interior and dash like there was no tomorrow. 2 hours later and it was spread all over the cave! Now I'll have to bribe them to come back and help me put it back together.
Before:
Seats and carpet are out:
Shades of Aztec gold...
Chad doin' his thing.
Leaning the dash back to get at the gauges:
And the whole reason for doing this:
I'm going to take the gauge pack to the speedo/gauge guy in Bloomington and have him test out everything after I replace the circuit board.
The clock also doesn't work, so that will probably get replaced.
I'm going to trim out around the gauge openings with a silver paint pen later today, and the dash will stay where it's at until I get the Classic Auto Air AC kit first of March.
In the meantime, I'm going to put down sound deadener, and new carpet.
Will be in the CAC for a couple of months...
Chris R said
Jan 29, 2012
The gauge guy in Bloomington can probably fix that clock and even put a quartz movement in it so you wont have to replace it.
SShink said
Jan 29, 2012
Chris R wrote:
The gauge guy in Bloomington can probably fix that clock and even put a quartz movement in it so you wont have to replace it.
Depends on which costs less. They are on evilbay already converted to quartz movement for $125.
Tim H said
Jan 29, 2012
Nice Stan. Seems like there is always something to do on these cars.
Pizza and beer will probably get those guys back, although you may want to wait on the refreshments until it's back together.
SShink said
Jan 29, 2012
Tim H wrote:
Nice Stan. Seems like there is always something to do on these cars.
Pizza and beer will probably get those guys back, although you may want to wait on the refreshments until it's back together.
You're right... they're never done!
Hey, since you are a master restorer Pops, does this pic look correct for the silver trim on the dash?
Anyone else, please chime in too. Thanks.
Tim H said
Jan 29, 2012
I believe the silver was not allpiled to the lettering on the wiper switch. I'll look that up and confirm it but otherwise yes. I use silve paint pens from Testors. My wife gets them from Michaels.
SShink said
Jan 29, 2012
Tim H wrote:
I believe the silver was not allpiled to the lettering on the wiper switch. I'll look that up and confirm it but otherwise yes. I use silve paint pens from Testors. My wife gets them from Michaels.
Interesting on the wiper lettering... if you look at my pics below, that's the one area that has the chrome type silver already applied.
Lost in the 60s said
Jan 29, 2012
Have John D "re-purpose" the wiring for the amp gauge to read volts. Much safer and more useful.
I used Eastwood deadener and it seems to work very well. I got a large box that almost covered the entire floor from the firewall to under the rear seat for $120 shipped when it was on sale. They also have a 5 piece add-on box for around $25. I didn't have the add-on box and skipped the deadener under the front seats in favor of the passenger footwell and under the rear seat for more noise and heat control from the mufflers.
I gotta say again, I really like the Blue over the original color...
67ss said
Jan 29, 2012
I would get rid of the amp gauge all together and buy the oil pressure gauge to go in that spot. Looks factory and is more useful.
bowtie said
Jan 30, 2012
67ss wrote:
I would get rid of the amp gauge all together and buy the oil pressure gauge to go in that spot. Looks factory and is more useful.
Yeah, I wish I would have done that. I hung my lonely oil pressure gauge off an L: bracket on my HVAC body over the tranny hump. Hard to see from outside at least.
SShink said
Jan 30, 2012
67ss wrote:
I would get rid of the amp gauge all together and buy the oil pressure gauge to go in that spot. Looks factory and is more useful.
Shiftworks may have a oil pressure gauge your looking for.
SShink said
Jan 30, 2012
Chris R wrote:
Shiftworks may have a oil pressure gauge your looking for.
Thanks Chris. I checked their website, but they only go up to '68 Chevelle dashes.
I called APT Instruments in Bloomington this a.m., and believe it or not, they will test gauges for FREE! I told them I was replacing the circuit board in mine, and asked how much they would charge to test the gauges, and he said they don't charge for that. I told him they should! There are some good honest vendors still out there!
They will get $100 from me though when I buy another speedo adaptor when I change from the 4.10's to the 3.42 gears. This is easier than swapping the speedo gears in the trans since there aren't that many 200-4R speedo gear options out there.
-- Edited by SShink on Monday 30th of January 2012 11:45:49 AM
Tim H said
Jan 31, 2012
You might have to order it online. I would use Super Glue to attach it in lieu of model glue.
-- Edited by Tim H on Tuesday 31st of January 2012 12:59:25 PM
SShink said
Jan 31, 2012
John D wrote:
Hopefully they didn't mangle the radio opening to put the aftermarket unit in... Unless the aftermarket unit had adjustable shafts you may have a surprize under the faceplate...
Yep, you were right John... the radio surround is intact other than the bottom raised area which was ground away to make the other radio fit. The good news is that it is the only area that was hacked (shaft openings are fine), and the damaged area will be hidden by the radio channel selector buttons. So I will fit it up when I get the stock radio in, and see how it looks.
Worst case, I might be able to fab up something for that spot that could be painted silver to blend in.
Tim H said
Jan 31, 2012
Worst case, I might be able to fab up something for that spot that could be painted silver to blend in.
If it's just the silver bead part they sell plastic round stock for modeling. Glue it in and use your silver pen.
SShink said
Jan 31, 2012
Tim H wrote:
Worst case, I might be able to fab up something for that spot that could be painted silver to blend in.
If it's just the silver bead part they sell plastic round stock for modeling. Glue it in and use your silver pen.
Thanks Tim. That's exactly what I was thinking. I need to pick up another paint pen, so will look for the round stock then.
Chris R said
Feb 1, 2012
You should be able to find that stuff at any place that sells model railroad supplies like a hobby shop. You might also try michaels craft store as well. Essentially what you want is styrene rod. It comes in different diameters but the selection at craft stores like Michaels may be limited to only certain diameters. I buy all sorts of model railroading supplies from Michaels.
John D said
Feb 1, 2012
Hub Hobby on Penn Ave (between Crosstown & 66th) is also a source. They've got all kinds of "scale" styrene strips, shapes, and sheets, also brass/metal stuff... just consider yourself forewarned - going in there with a loaded credit card can be very dangerous, and they are not bashful on the prices!
Chris R said
Feb 1, 2012
There is also Scale Model Supplies in St. Paul. That place is way cool as well. Hub Hobby also has a location in Little Canada off of 36.
John D said
Feb 1, 2012
Scale Model is on Lexington, just south of University across the street from White Castle... IN THE BASEMENT of the street-level stores. If it wasn't for the railroad "crossbuck" hanging on the corner of the building you'd never know it was there.
Lost in the 60s said
Feb 1, 2012
John D wrote:
Scale Model is on Lexington, just south of University across the street from White Castle... IN THE BASEMENT of the street-level stores. If it wasn't for the railroad "crossbuck" hanging on the corner of the building you'd never know it was there.
I don't dare go in there. I've heard of people coming out with thousands in HO railroad supplies...
SShink said
Feb 1, 2012
Here's a pic of the radio 'damage'.
John D said
Feb 1, 2012
My HOn3 stuff has been in boxes for 16+ years, (and you think muscle cars are money-pits!).
They've got about 100 linear feet of "vintage" plastic model car kits (up on top of the shelves of the "current" stuff) that they are asking a PREMIUM for. I can remember as a kid (circa 1974) bytching about "Revell or Monogram charging $5.99 for a model kit!!" If I only knew... like Microsoft, Yahoo, Google, Intel,
OscarZ said
Feb 1, 2012
The '72 Dash I have out of that El Camino I parted looks similar and it still has the stock radio. It never had another as far as I can tell or from what the owner could recall. Jamie has a '72 dash that looks indentical as well. He bought another thinking it had been cut too. After seeing two that way we were thinking maybe some came that way from the factory? What would be the odds that multiple people happened to trim their dash in the identical way. I will be leaving mine as it is.
-- Edited by OscarZ on Wednesday 1st of February 2012 03:58:18 PM
-- Edited by OscarZ on Wednesday 1st of February 2012 04:00:15 PM
OscarZ said
Feb 1, 2012
Here is a picture of the radio opening in the dash I have. I don't think that it has been modified.
-- Edited by OscarZ on Wednesday 1st of February 2012 10:45:39 PM
John D said
Feb 1, 2012
Man... that's "iffy". If it were me, I'd wait and see just how bad it looks when you put the OEM radio in the hole. Like you said, the selector buttons will probably conceal everything but the lower rounded corners. By "repairing" it you may draw more attention to the damage, as you'll have to paint & blend the repair.
Pushrod said
Feb 2, 2012
Hey Stan lookin good! I hope mine turns out that nice!
Chris R said
Feb 2, 2012
OscarZ wrote:
The '72 Dash I have out of that El Camino I parted looks similar and it still has the stock radio. It never had another as far as I can tell or from what the owner could recall. Jamie has a '72 dash that looks indentical as well. He bought another thinking it had been cut too. After seeing two that way we were thinking maybe some came that way from the factory? What would be the odds that multiple people happened to trim their dash in the identical way. I will be leaving mine as it is.
-- Edited by OscarZ on Wednesday 1st of February 2012 03:58:18 PM
-- Edited by OscarZ on Wednesday 1st of February 2012 04:00:15 PM
So yours and Jamies look like Stans photo as well Mike? Maybe this area gets fatigue over 40 years of going to down the road, with the weight of the radio resting on it all that time?
SteveS said
Feb 2, 2012
I think the factory bosses were not at equal heights, I bet they had to cut them out to get the radio to sit level, that and knobs on the aftermarket stuff didn't quite go as wide as the original. I had one once that had enough of a taper left in the holes that I was able to wedge a washer painted black in the hole for the nut to sit against, but it almost looks like your right side is cut off flush with the dash opening?
-- Edited by SteveS on Thursday 2nd of February 2012 08:22:01 AM
bowtie said
Feb 2, 2012
This is factory, I think you can see into the knob holes well enough.
The thing to the left of the radio, is that the De-Fog control?
I would leave yours alone if possible. Getting the textured area to match is hard formw hat I hear, and you might see a parting line that can't be covered up. Plus, yours is the "fasten seat belt" dash which isn't reproduced.
-- Edited by bowtie on Thursday 2nd of February 2012 09:40:50 AM
-- Edited by bowtie on Thursday 2nd of February 2012 09:43:11 AM
SShink said
Feb 2, 2012
OscarZ wrote:
Here is a picture of the radio opening in the dash I have. I don't think that it has been modified.
-- Edited by OscarZ on Wednesday 1st of February 2012 10:45:39 PM
Thanks Mike! That's REALLY interesting... That opening and silver trim looks VERY similar to mine.
Kevin, if you go check out your Elky progress, can you snap a pic under your radio and see if it's the same? That would confirm it for me.
Mike, after seeing yours, I realized I have a new dilemma in mounting the radio... Mine was modified in that someone removed the pockets where the shafts come through in order to make the aftermarket radio fit. The plastic bosses are completely gone. It looks like someone drilled them out now that I look closer. I'll have to fab something up to go between the shaft nuts and the radio to mount it to the dash.
SteveS said
Feb 2, 2012
How was the aftermarket stereo held in place? Did they just tighten the nuts against the face plate since they cut the pockets out?
SShink said
Feb 2, 2012
SteveS wrote:
How was the aftermarket stereo held in place? Did they just tighten the nuts against the face plate since they cut the pockets out?
Exactly...
John D said
Feb 2, 2012
Mike's & Bryan's main opening is un-cut. The aftermarket radios probably have adjustable width shafts, and didn't need the cups cut.
Rather than fabbing new pieces, put the word out for a sweep or SS dash that's total crap except for the radio opening. You could cut the pieces you need from it and graft them into your dash.
The pipe cap thing is a GREAT idea!! What you need is someone to measure the back of an un-molested dash to see how "deep" the mounting cups stick out for each side. (and yes, they are different depths)
By all means use some plumber's strap and support the back of the radio once installed. Not only for support, but this also is part of the ground circuit for the dash harness! (the metal radio chassis is tied to the dash steel, and the black wire in the power plug continues/supplies ground for the circuit)
The dash plastic should be ABS. If you can find ABS (black) pipe caps of the proper size you could use ABS pipe cement and chemically weld/melt the cups on and they'd never come loose.
If you have to use PVC caps (white), take a scrap/junk PVC fitting with some ABS (black) pipe cement and do a "test stick" on the back of the dash to an un-seen area. Wiggle and press it like you were cementing pipe, then pull it loose. Hopefully the dash plastic and the fitting have melted and started to chemically weld. If this is the case, I'd use the ABS cement - as you will be chemically welding/melting the parts together... stronger than epoxy.
SShink said
Feb 2, 2012
SteveS wrote:
I think the factory bosses were not at equal heights, I bet they had to cut them out to get the radio to sit level, that and knobs on the aftermarket stuff didn't quite go as wide as the original. I had one once that had enough of a taper left in the holes that I was able to wedge a washer painted black in the hole for the nut to sit against, but it almost looks like your right side is cut off flush with the dash opening?
-- Edited by SteveS on Thursday 2nd of February 2012 08:22:01 AM
Both sides were cut flush with the opening. I'm going to have to figure out some way to connect it to the dash.
SShink said
Feb 2, 2012
bowtie wrote:
This is factory, I think you can see into the knob holes well enough.
The thing to the left of the radio, is that the De-Fog control?
I would leave yours alone if possible. Getting the textured area to match is hard formw hat I hear, and you might see a parting line that can't be covered up. Plus, yours is the "fasten seat belt" dash which isn't reproduced.
-- Edited by bowtie on Thursday 2nd of February 2012 09:40:50 AM
-- Edited by bowtie on Thursday 2nd of February 2012 09:43:11 AM
That's interesting Bryan on the radio area. I wonder if it's different because that is a Monte Carlo dash that has the wood grain overlay?
Yes, the switch to the left of the radio is for the Defog fan in the back deck. And, it even works! I think the switch bezel looks a lot like the convertible top switch one.
Tim H said
Feb 2, 2012
SShink wrote:
SteveS wrote:
I think the factory bosses were not at equal heights, I bet they had to cut them out to get the radio to sit level, that and knobs on the aftermarket stuff didn't quite go as wide as the original. I had one once that had enough of a taper left in the holes that I was able to wedge a washer painted black in the hole for the nut to sit against, but it almost looks like your right side is cut off flush with the dash opening?
-- Edited by SteveS on Thursday 2nd of February 2012 08:22:01 AM
Both sides were cut flush with the opening. I'm going to have to figure out some way to connect it to the dash.
I fixed three of these dashes in the past two years. I bought 1/2" or 3/4" pvc plumbing pipe caps (I can't remember which was the right diameter for the hole) and glued them with good 2 part epoxy type plastic glue to the backside of the dash over the knob holes. Drill a hole in the cap the size of the radio shaft and you now have new mounts. Support the radio off the dash so that not all the stress is on the glued caps. Paint the caps black. It worked well on the dashes I've done.
SShink said
Feb 2, 2012
Tim H wrote:
SShink wrote:
SteveS wrote:
I think the factory bosses were not at equal heights, I bet they had to cut them out to get the radio to sit level, that and knobs on the aftermarket stuff didn't quite go as wide as the original. I had one once that had enough of a taper left in the holes that I was able to wedge a washer painted black in the hole for the nut to sit against, but it almost looks like your right side is cut off flush with the dash opening?
-- Edited by SteveS on Thursday 2nd of February 2012 08:22:01 AM
Both sides were cut flush with the opening. I'm going to have to figure out some way to connect it to the dash.
I fixed three of these dashes in the past two years. I bought 1/2" or 3/4" pvc plumbing pipe caps (I can't remember which was the right diameter for the hole) and glued them with good 2 part epoxy type plastic glue to the backside of the dash over the knob holes. Drill a hole in the cap the size of the radio shaft and you now have new mounts. Support the radio off the dash so that not all the stress is on the glued caps. Paint the caps black. It worked well on the dashes I've done.
Tim, great idea! That's exactly what I was envisioning in my head. I was thinking of some sort of plastic tube and supporting the bottom of the radio, but didn't think of the pipe caps. Yet another reason why I love this club, all the great help and previous experiences! Thanks!
dashboard said
Feb 3, 2012
It's a little dusty but you can clearly see that the silver trim gos all the way around the radio. I don't think Mike's is the origional radio.
Kevin that is a stock AM radio in the dash. It says Delco in the bottom right corner and the numbers and dashes are white and go from 5 - 16. It is identical to the one in my '71. The El Camino it's out of had a delivery date of 9/30/1971 so maybe they changed them on later '72 cars? Is that a stock FM radio you have? When Jamie was helping me with the car he said the dash that came with the '72 he is restoring had the silver end in the same place as this one so we thought possibly some came that way. If it's cut they did a good job and it's hidden well by the radio buttons.
dashboard said
Feb 3, 2012
Mike, anything is possible with these cars. There may have been some minor changes from year to year as this dash was used for three model years. There where lots of different size AM and FM radios made by AC Delco for several different models. Is it possible someone swapped out a non-working radio for a working one from another car?
It is possible that production line workers at six different plants modified dashes depending on what radio was on the build sheet. I have never seen an aftermarket dash without the silver bead under the radio.
So having said all that, just when I think I am starting to understand these cars; I realize how much I do not know. Yes mine is a AM/FM
John D said
Feb 3, 2012
I'll throw this in... '64 & '65 dashes, and clusters are interchangable with 3 exceptions: - obvious appearance, '64 is flat, '65 is "peaked"... to match the front sheetmetal - clock stem. '65s are 1" longer to reach out to the peak - radio opening and shaft cup depth (!)
For one frlippin' model year they changed the nose & shafts on a radio! The nose opening difference is miniscule, but they won't interchange.
Production line guys aren't "skilled" enough to be filing/cutting dashes for specific radios as the car is moving along at 2ft./sec and they have 4 minutes to slamdunk their assigned part into place.
I'm guessing that there was an nearly imperceptable change in the noses of the '71 & '72 model year radios, and with the enthusiast's general thinking that 99.9% of these two years is interchangable someone tried to fit a unit into the wrong year. OR Over the 35 years of the car, somewhere/someday an aftermarket radio was put in. When the car was sold the spendy Kraco was pulled and the Delco went back in.
Pushrod said
Feb 3, 2012
They do make glue for PVC to ABS Ive seen it at menards/hd/lowes
Tim H said
Feb 3, 2012
I like to take a piece of plastic pipe and cut it into a chair to put under the radio at the back so it supports the radio and keeps it pushed forward. I glue the chair in after the radio is in place. It works better than the strap but taking the radio out later takes some work. I use epoxy rather than the glue that welds the pieces together because I don't want to possibly distort the dash face by having the dash melt. Just my 2 cents worth.
SShink said
Feb 3, 2012
Wow! This is a great discussion on the radio. I should have started a separate post just for that!
So, here's my theory:
1. I'm with John that 'most' of the stock radios in these cars got pulled out for that $99 radio and speaker set from Wal Mart. Lord knows I did it in all my cars in high school and college.
2. I think Kevin's right that when the cars were sold, the owner pulled out the aftermarket one and stuck the stock one back in to try to cover up the lower opening damage. Lord knows I did that too...
3. Since my Chevelle isn't a numbers matching, 999 out of 1000 point cars, putting the stock radio in with the lower part of the opening missing is fine with me.
Tim, I understand the chair idea, and will probably do that too.
John, I'm going to put the stock radio facce up against the opening in the dash and measure the backspacing to know where to cut the plastic caps. I'm going to drill the shaft holes before I glue the caps so that I'm not pushing on them after they are glued.
All great stuff guys. Thanks!
SShink said
Feb 3, 2012
Today I ordered a '72 white face quartz movement converted clock, and a '72 Corvette NOS oil pressure gauge to see if I can replace the Amp gauge with it. Should have them in a week so that I can start putting the gauge package together, have it tested, and reassemble the dash.
The axle is coming out this weekend in preparation of the gear swap. So much fun!
Some progress on the silver trimming. Don't pay attention to the wider parts around the edge as I need to get another paint pen to finish that off. The circles and other raised areas came out pretty good IMO. Now the aftermarket radio really bugs me. I should get the stock AM one this week to swap out for that space.
Here's the 'before':
And 'after':
-- Edited by SShink on Sunday 29th of January 2012 04:12:25 PM
-- Edited by SShink on Sunday 29th of January 2012 04:14:08 PM
-- Edited by SShink on Sunday 29th of January 2012 04:14:31 PM
Looks good, those paint pens are cool.
Hopefully they didn't mangle the radio opening to put the aftermarket unit in... Unless the aftermarket unit had adjustable shafts you may have a surprize under the faceplate...
Looks like yesterday was the day to tear into dashes from Pushrod's post! the 'Lube' and Chad came over yesterday and tore into my interior and dash like there was no tomorrow. 2 hours later and it was spread all over the cave! Now I'll have to bribe them to come back and help me put it back together.
Before:
Seats and carpet are out:
Shades of Aztec gold...
Chad doin' his thing.
Leaning the dash back to get at the gauges:
And the whole reason for doing this:
I'm going to take the gauge pack to the speedo/gauge guy in Bloomington and have him test out everything after I replace the circuit board.
The clock also doesn't work, so that will probably get replaced.
I'm going to trim out around the gauge openings with a silver paint pen later today, and the dash will stay where it's at until I get the Classic Auto Air AC kit first of March.
In the meantime, I'm going to put down sound deadener, and new carpet.
Will be in the CAC for a couple of months...
The gauge guy in Bloomington can probably fix that clock and even put a quartz movement in it so you wont have to replace it.
Depends on which costs less. They are on evilbay already converted to quartz movement for $125.
Pizza and beer will probably get those guys back, although you may want to wait on the refreshments until it's back together.
You're right... they're never done!
Hey, since you are a master restorer Pops, does this pic look correct for the silver trim on the dash?
Anyone else, please chime in too. Thanks.
Interesting on the wiper lettering... if you look at my pics below, that's the one area that has the chrome type silver already applied.
Have John D "re-purpose" the wiring for the amp gauge to read volts. Much safer and more useful.
I used Eastwood deadener and it seems to work very well. I got a large box that almost covered the entire floor from the firewall to under the rear seat for $120 shipped when it was on sale. They also have a 5 piece add-on box for around $25. I didn't have the add-on box and skipped the deadener under the front seats in favor of the passenger footwell and under the rear seat for more noise and heat control from the mufflers.
I gotta say again, I really like the Blue over the original color...
I would get rid of the amp gauge all together and buy the oil pressure gauge to go in that spot. Looks factory and is more useful.
Yeah, I wish I would have done that. I hung my lonely oil pressure gauge off an L: bracket on my HVAC body over the tranny hump. Hard to see from outside at least.
Would that be something like this? http://www.ebay.com/itm/72-73-Corvette-Oil-Pressure-Gauge-New-Repro-/350261467943?hash=item518d35db27&item=350261467943&pt=Motors_Car_Truck_Parts_Accessories&vxp=mtr
Here's a NOS one that goes to 80 psi:
http://www.ebay.com/itm/NOS-Corvette-Oil-Pressure-Gauge-1972-1973-1974-AC-GM-/170770431001?fits=Year:1972&hash=item27c2b5fc19&item=170770431001&pt=Vintage_Car_Truck_Parts_Accessories&vxp=mtr
It's for a Corvette, so not sure if it would need anything special to connect up to it like a different sending unit or connections?
Here is the link, scroll down the page.
http://www.tachman.com/
Shiftworks may have a oil pressure gauge your looking for.
Thanks Chris. I checked their website, but they only go up to '68 Chevelle dashes.
I called APT Instruments in Bloomington this a.m., and believe it or not, they will test gauges for FREE! I told them I was replacing the circuit board in mine, and asked how much they would charge to test the gauges, and he said they don't charge for that. I told him they should! There are some good honest vendors still out there!
They will get $100 from me though when I buy another speedo adaptor when I change from the 4.10's to the 3.42 gears. This is easier than swapping the speedo gears in the trans since there aren't that many 200-4R speedo gear options out there.
-- Edited by SShink on Monday 30th of January 2012 11:45:49 AM
You might have to order it online. I would use Super Glue to attach it in lieu of model glue.
Here is a place you can get it.
http://www.hobbylinc.com/Model_Scratch_Building_Plastic_Supplies
-- Edited by Tim H on Tuesday 31st of January 2012 12:59:25 PM
Yep, you were right John... the radio surround is intact other than the bottom raised area which was ground away to make the other radio fit. The good news is that it is the only area that was hacked (shaft openings are fine), and the damaged area will be hidden by the radio channel selector buttons. So I will fit it up when I get the stock radio in, and see how it looks.
Worst case, I might be able to fab up something for that spot that could be painted silver to blend in.
If it's just the silver bead part they sell plastic round stock for modeling. Glue it in and use your silver pen.
Thanks Tim. That's exactly what I was thinking. I need to pick up another paint pen, so will look for the round stock then.
You should be able to find that stuff at any place that sells model railroad supplies like a hobby shop. You might also try michaels craft store as well. Essentially what you want is styrene rod. It comes in different diameters but the selection at craft stores like Michaels may be limited to only certain diameters. I buy all sorts of model railroading supplies from Michaels.
There is also Scale Model Supplies in St. Paul. That place is way cool as well. Hub Hobby also has a location in Little Canada off of 36.
Here's a pic of the radio 'damage'.
They've got about 100 linear feet of "vintage" plastic model car kits (up on top of the shelves of the "current" stuff) that they are asking a PREMIUM for.
I can remember as a kid (circa 1974) bytching about "Revell or Monogram charging $5.99 for a model kit!!" If I only knew... like Microsoft, Yahoo, Google, Intel,
The '72 Dash I have out of that El Camino I parted looks similar and it still has the stock radio. It never had another as far as I can tell or from what the owner could recall. Jamie has a '72 dash that looks indentical as well. He bought another thinking it had been cut too. After seeing two that way we were thinking maybe some came that way from the factory? What would be the odds that multiple people happened to trim their dash in the identical way. I will be leaving mine as it is.
-- Edited by OscarZ on Wednesday 1st of February 2012 03:58:18 PM
-- Edited by OscarZ on Wednesday 1st of February 2012 04:00:15 PM
Here is a picture of the radio opening in the dash I have. I don't think that it has been modified.
-- Edited by OscarZ on Wednesday 1st of February 2012 10:45:39 PM
Like you said, the selector buttons will probably conceal everything but the lower rounded corners. By "repairing" it you may draw more attention to the damage, as you'll have to paint & blend the repair.
Hey Stan lookin good! I hope mine turns out that nice!
So yours and Jamies look like Stans photo as well Mike? Maybe this area gets fatigue over 40 years of going to down the road, with the weight of the radio resting on it all that time?
I think the factory bosses were not at equal heights, I bet they had to cut them out to get the radio to sit level, that and knobs on the aftermarket stuff didn't quite go as wide as the original. I had one once that had enough of a taper left in the holes that I was able to wedge a washer painted black in the hole for the nut to sit against, but it almost looks like your right side is cut off flush with the dash opening?
-- Edited by SteveS on Thursday 2nd of February 2012 08:22:01 AM
This is factory, I think you can see into the knob holes well enough.
The thing to the left of the radio, is that the De-Fog control?
I would leave yours alone if possible. Getting the textured area to match is hard formw hat I hear, and you might see a parting line that can't be covered up. Plus, yours is the "fasten seat belt" dash which isn't reproduced.
-- Edited by bowtie on Thursday 2nd of February 2012 09:40:50 AM
-- Edited by bowtie on Thursday 2nd of February 2012 09:43:11 AM
Thanks Mike! That's REALLY interesting... That opening and silver trim looks VERY similar to mine.
Kevin, if you go check out your Elky progress, can you snap a pic under your radio and see if it's the same? That would confirm it for me.
Mike, after seeing yours, I realized I have a new dilemma in mounting the radio... Mine was modified in that someone removed the pockets where the shafts come through in order to make the aftermarket radio fit. The plastic bosses are completely gone. It looks like someone drilled them out now that I look closer. I'll have to fab something up to go between the shaft nuts and the radio to mount it to the dash.
How was the aftermarket stereo held in place? Did they just tighten the nuts against the face plate since they cut the pockets out?
Exactly...
Mike's & Bryan's main opening is un-cut. The aftermarket radios probably have adjustable width shafts, and didn't need the cups cut.
Rather than fabbing new pieces, put the word out for a sweep or SS dash that's total crap except for the radio opening. You could cut the pieces you need from it and graft them into your dash.
The pipe cap thing is a GREAT idea!! What you need is someone to measure the back of an un-molested dash to see how "deep" the mounting cups stick out for each side. (and yes, they are different depths)
By all means use some plumber's strap and support the back of the radio once installed. Not only for support, but this also is part of the ground circuit for the dash harness! (the metal radio chassis is tied to the dash steel, and the black wire in the power plug continues/supplies ground for the circuit)
The dash plastic should be ABS. If you can find ABS (black) pipe caps of the proper size you could use ABS pipe cement and chemically weld/melt the cups on and they'd never come loose.
If you have to use PVC caps (white), take a scrap/junk PVC fitting with some ABS (black) pipe cement and do a "test stick" on the back of the dash to an un-seen area. Wiggle and press it like you were cementing pipe, then pull it loose. Hopefully the dash plastic and the fitting have melted and started to chemically weld. If this is the case, I'd use the ABS cement - as you will be chemically welding/melting the parts together... stronger than epoxy.
Both sides were cut flush with the opening. I'm going to have to figure out some way to connect it to the dash.
That's interesting Bryan on the radio area. I wonder if it's different because that is a Monte Carlo dash that has the wood grain overlay?
Yes, the switch to the left of the radio is for the Defog fan in the back deck. And, it even works! I think the switch bezel looks a lot like the convertible top switch one.
I fixed three of these dashes in the past two years. I bought 1/2" or 3/4" pvc plumbing pipe caps (I can't remember which was the right diameter for the hole) and glued them with good 2 part epoxy type plastic glue to the backside of the dash over the knob holes. Drill a hole in the cap the size of the radio shaft and you now have new mounts. Support the radio off the dash so that not all the stress is on the glued caps. Paint the caps black. It worked well on the dashes I've done.
Tim, great idea! That's exactly what I was envisioning in my head. I was thinking of some sort of plastic tube and supporting the bottom of the radio, but didn't think of the pipe caps. Yet another reason why I love this club, all the great help and previous experiences! Thanks!
It's a little dusty but you can clearly see that the silver trim gos all the way around the radio. I don't think Mike's is the origional radio.
Kevin that is a stock AM radio in the dash. It says Delco in the bottom right corner and the numbers and dashes are white and go from 5 - 16. It is identical to the one in my '71. The El Camino it's out of had a delivery date of 9/30/1971 so maybe they changed them on later '72 cars? Is that a stock FM radio you have? When Jamie was helping me with the car he said the dash that came with the '72 he is restoring had the silver end in the same place as this one so we thought possibly some came that way. If it's cut they did a good job and it's hidden well by the radio buttons.
It is possible that production line workers at six different plants modified dashes depending on what radio was on the build sheet. I have never seen an aftermarket dash without the silver bead under the radio.
So having said all that, just when I think I am starting to understand these cars; I realize how much I do not know. Yes mine is a AM/FM
'64 & '65 dashes, and clusters are interchangable with 3 exceptions:
- obvious appearance, '64 is flat, '65 is "peaked"... to match the front sheetmetal
- clock stem. '65s are 1" longer to reach out to the peak
- radio opening and shaft cup depth (!)
For one frlippin' model year they changed the nose & shafts on a radio! The nose opening difference is miniscule, but they won't interchange.
Production line guys aren't "skilled" enough to be filing/cutting dashes for specific radios as the car is moving along at 2ft./sec and they have 4 minutes to slamdunk their assigned part into place.
I'm guessing that there was an nearly imperceptable change in the noses of the '71 & '72 model year radios, and with the enthusiast's general thinking that 99.9% of these two years is interchangable someone tried to fit a unit into the wrong year.
OR
Over the 35 years of the car, somewhere/someday an aftermarket radio was put in. When the car was sold the spendy Kraco was pulled and the Delco went back in.
They do make glue for PVC to ABS Ive seen it at menards/hd/lowes
Wow! This is a great discussion on the radio. I should have started a separate post just for that!
So, here's my theory:
1. I'm with John that 'most' of the stock radios in these cars got pulled out for that $99 radio and speaker set from Wal Mart. Lord knows I did it in all my cars in high school and college.
2. I think Kevin's right that when the cars were sold, the owner pulled out the aftermarket one and stuck the stock one back in to try to cover up the lower opening damage. Lord knows I did that too...
3. Since my Chevelle isn't a numbers matching, 999 out of 1000 point cars, putting the stock radio in with the lower part of the opening missing is fine with me.
Tim, I understand the chair idea, and will probably do that too.
John, I'm going to put the stock radio facce up against the opening in the dash and measure the backspacing to know where to cut the plastic caps. I'm going to drill the shaft holes before I glue the caps so that I'm not pushing on them after they are glued.
All great stuff guys. Thanks!
Today I ordered a '72 white face quartz movement converted clock, and a '72 Corvette NOS oil pressure gauge to see if I can replace the Amp gauge with it. Should have them in a week so that I can start putting the gauge package together, have it tested, and reassemble the dash.
The axle is coming out this weekend in preparation of the gear swap. So much fun!