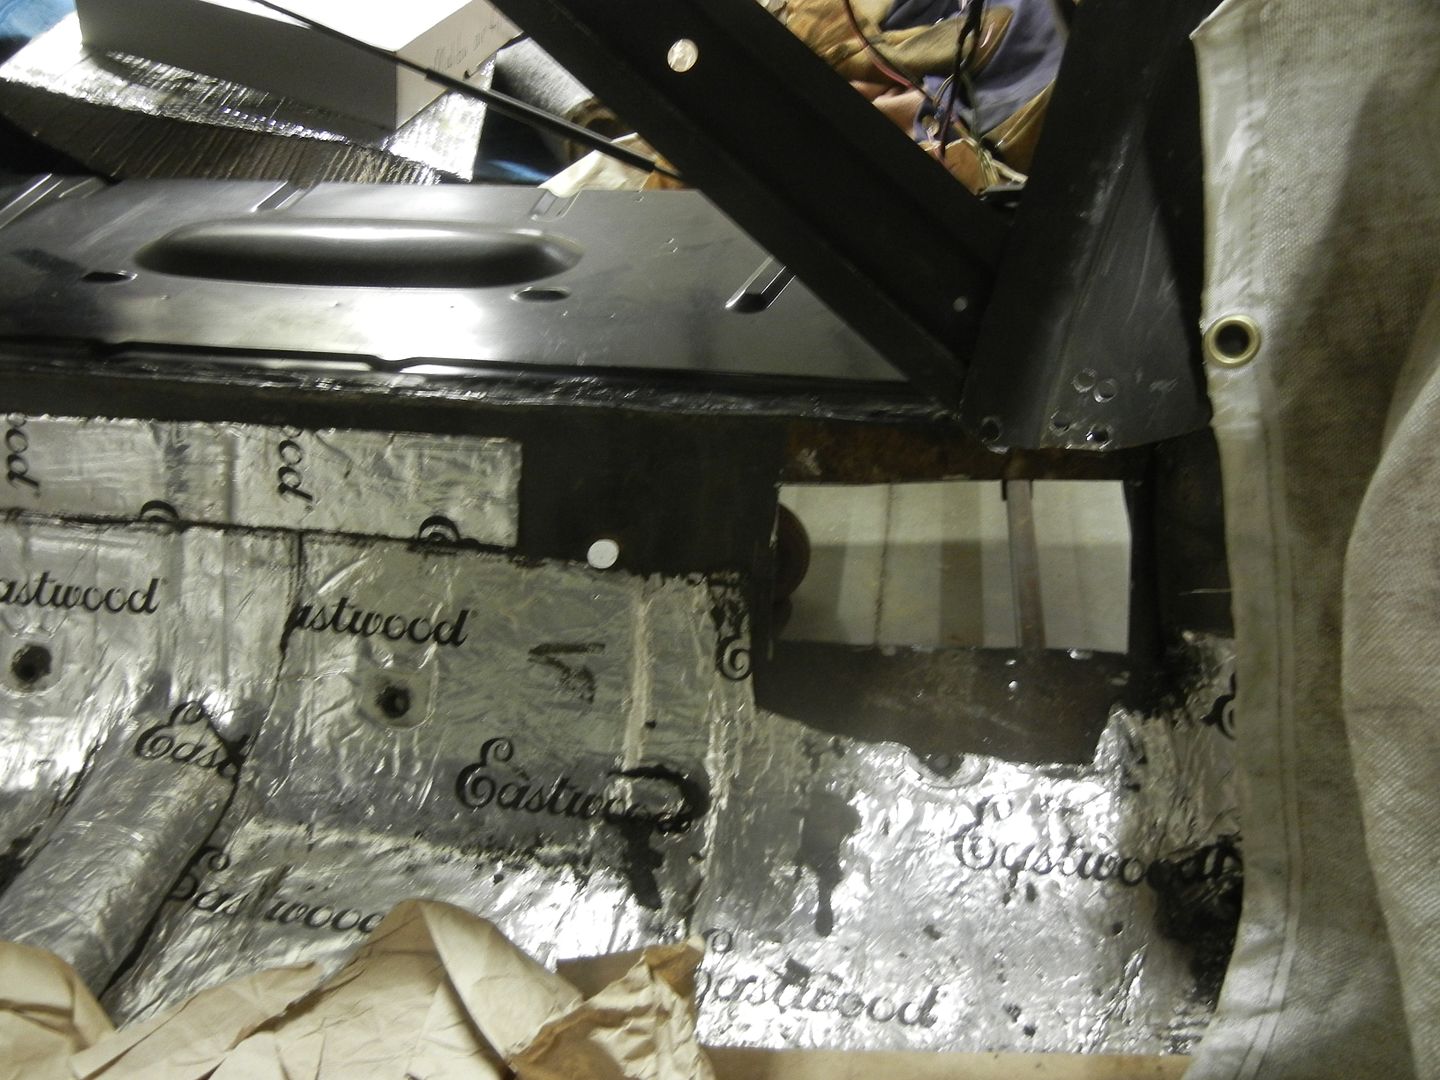
I started the rust extraction on the right kick panel.
First up was scrapping the sound deadener off.
Ready for plasma surgery.
Lost in the 60s said
Mar 20, 2016
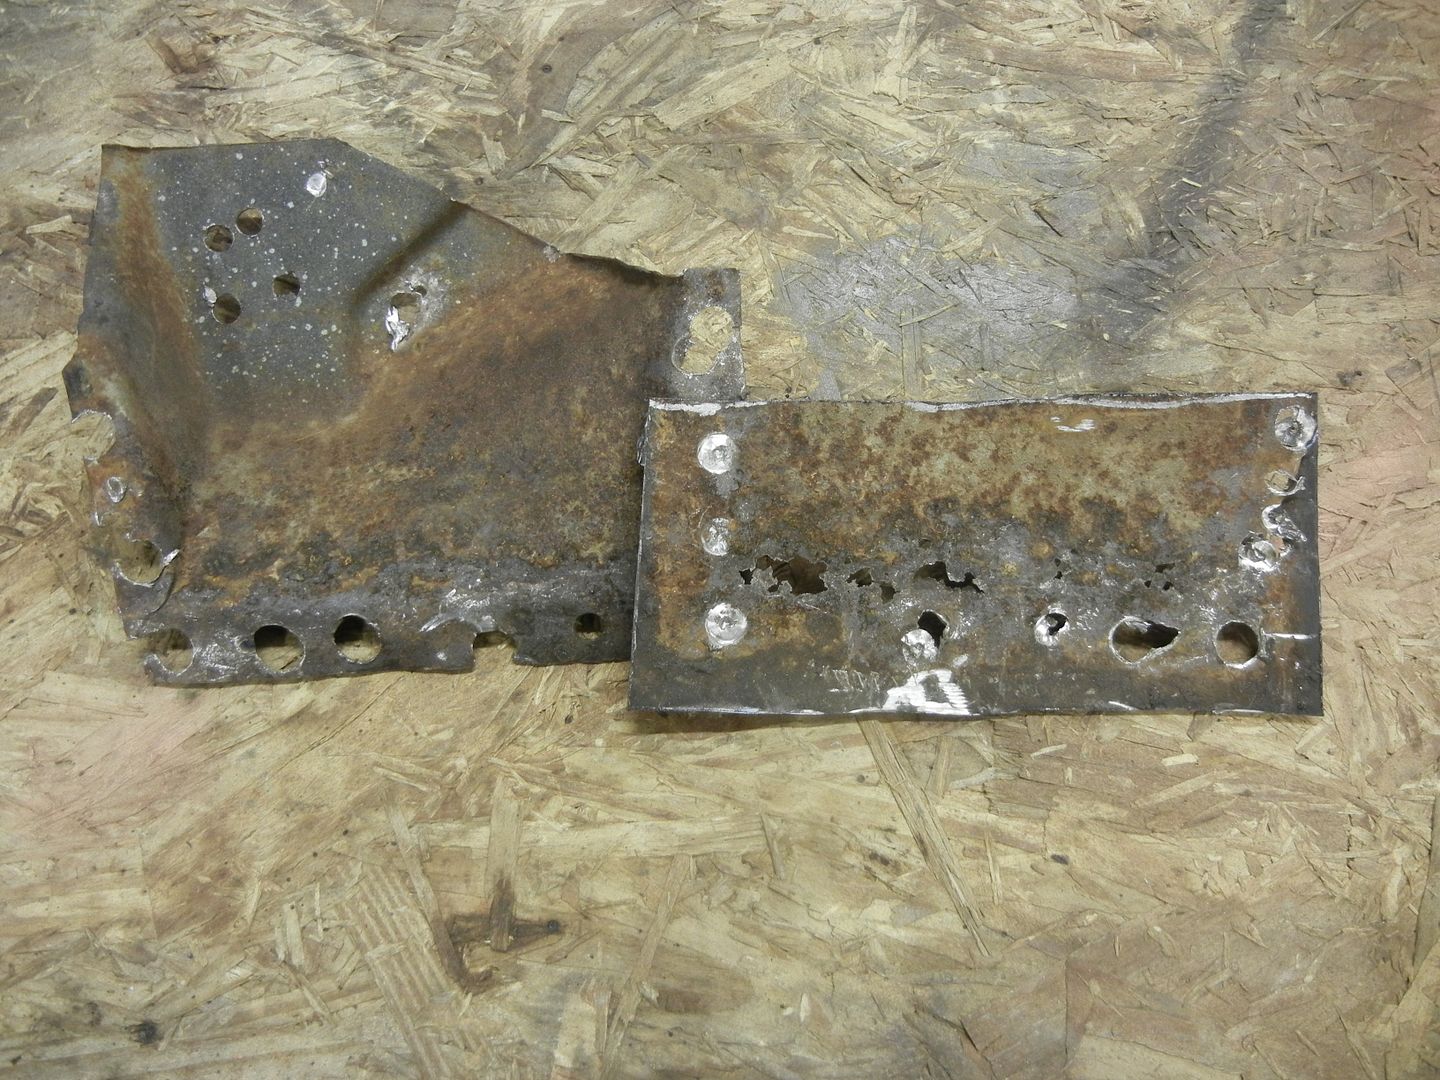
I made a cut above the rust on the inner cowl and removed all the nasty.
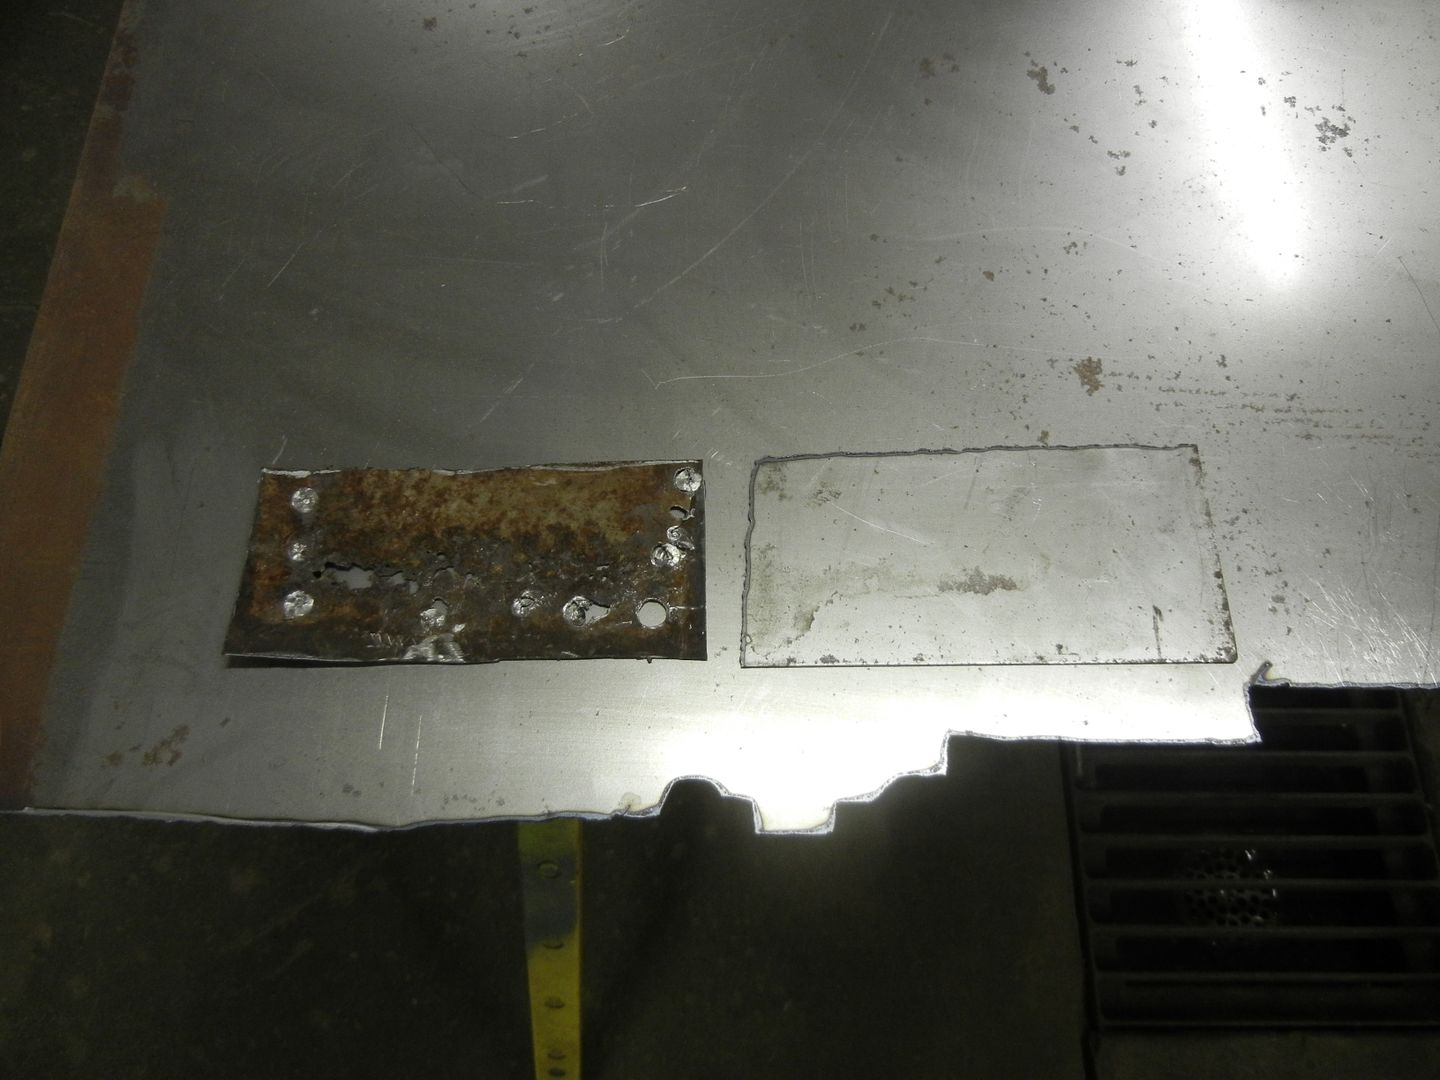
Not enough left to use as a pattern, so I made a cardboard one.
Couple minutes with the plasma and another 5-6 with the 2" disc sander and I have a new panel.
Parts I picked up at Auto City.
Chris S said
Mar 20, 2016
Nice work Mitch!
How thick is the metal you use when you make patches like that?
dashboard said
Mar 20, 2016
How hard is it to get the sound deadener up/off?
Lost in the 60s said
Mar 20, 2016
Chris S wrote:
Nice work Mitch!
How thick is the metal you use when you make patches like that?
18 gauge
Kevin, it wasn't near as bad as I projected. I thought of warming it but tried it cold and the asphalt stayed together quite well. Once I had an edge lifted, I gently pulled that and pried with the edge of a putty knife right on the metal and it let go fairly well.
Lost in the 60s said
Mar 23, 2016
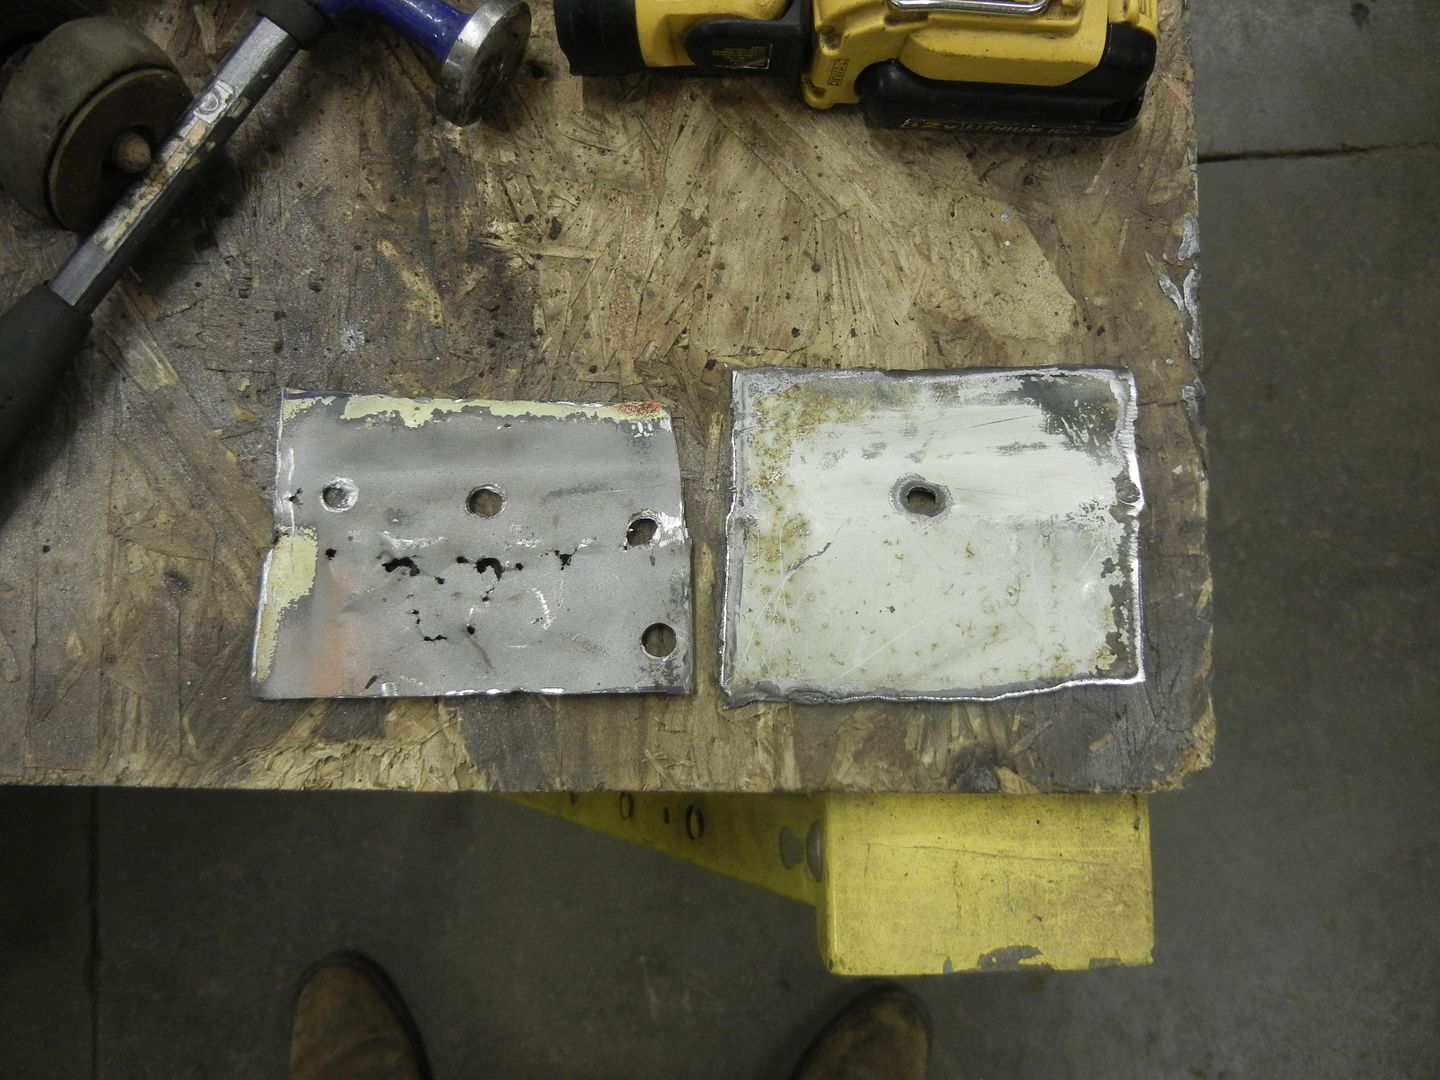
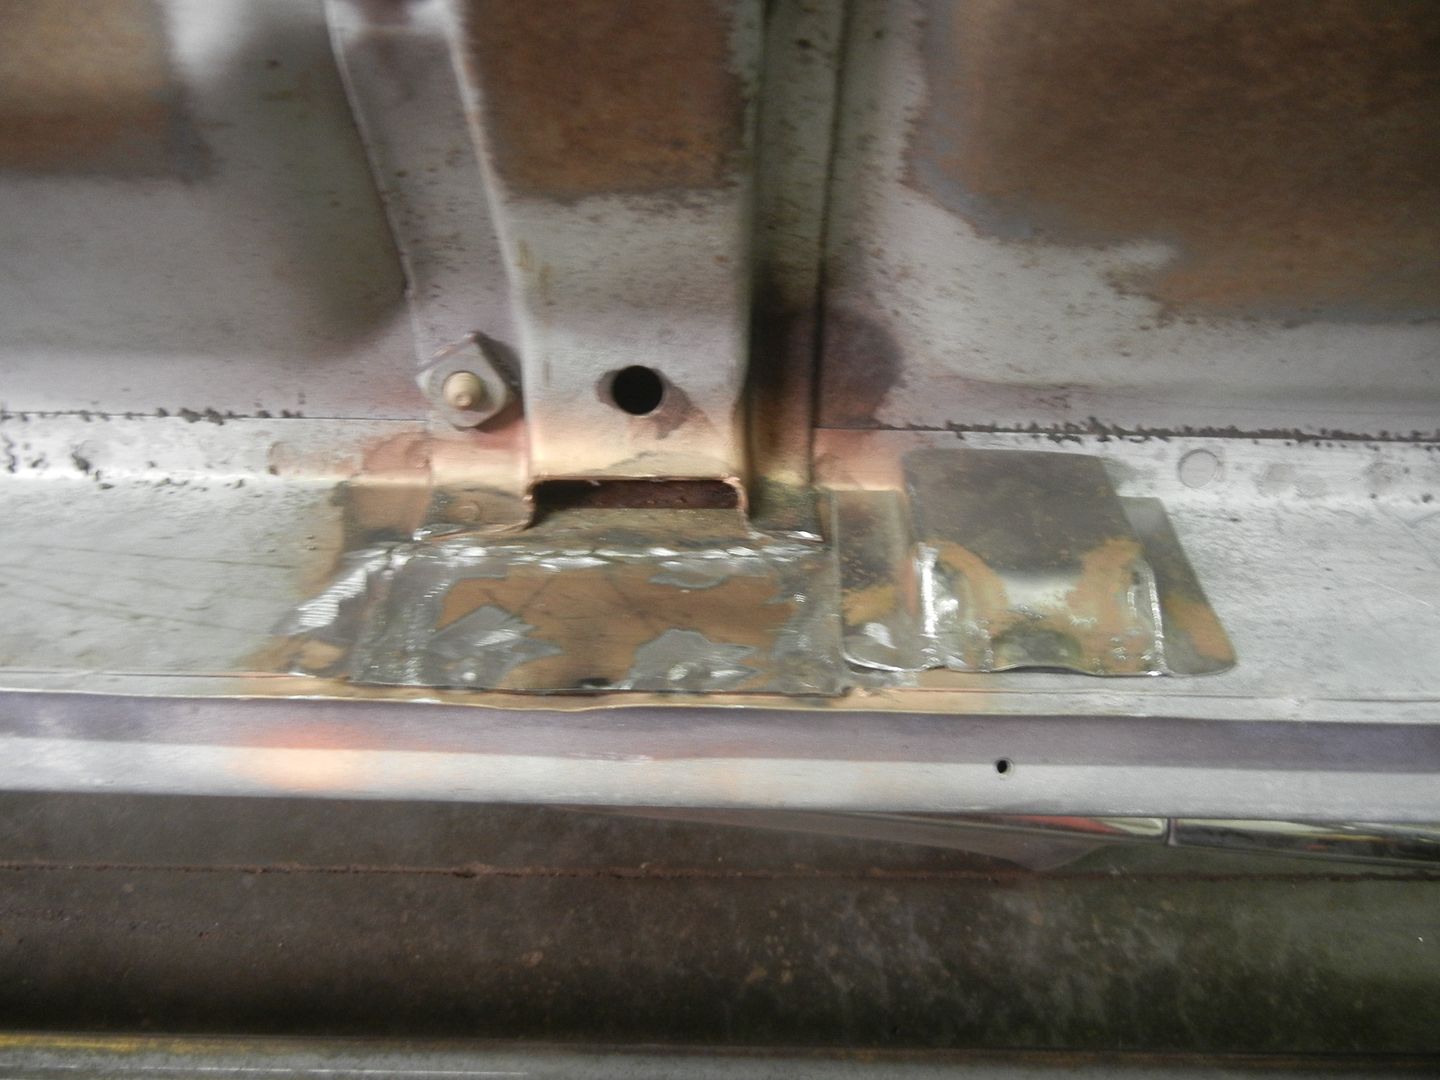
Install of the patch.
AMD is now having these reinforcement plates made. WHAT a time and frustration saver these are !! It had a little too much curve going from top to bottom, but a few hits with a plastic deadblow and it fit nearly perfect !!.
-- Edited by Lost in the 60s on Wednesday 23rd of March 2016 07:33:48 AM
Lost in the 60s said
Mar 25, 2016
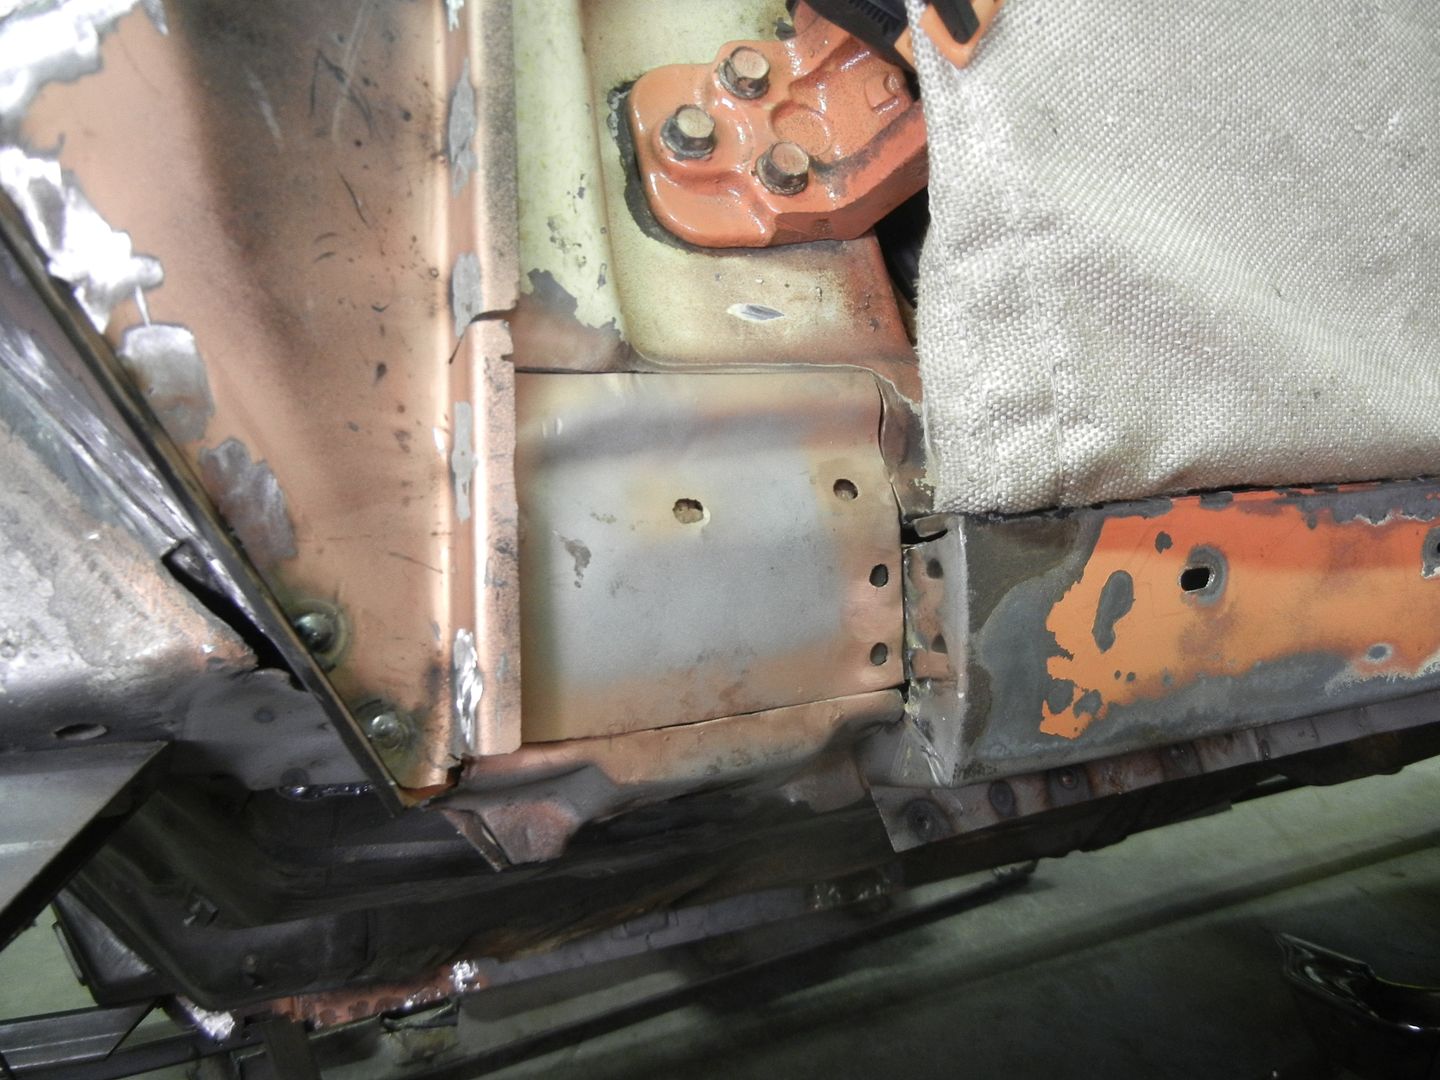
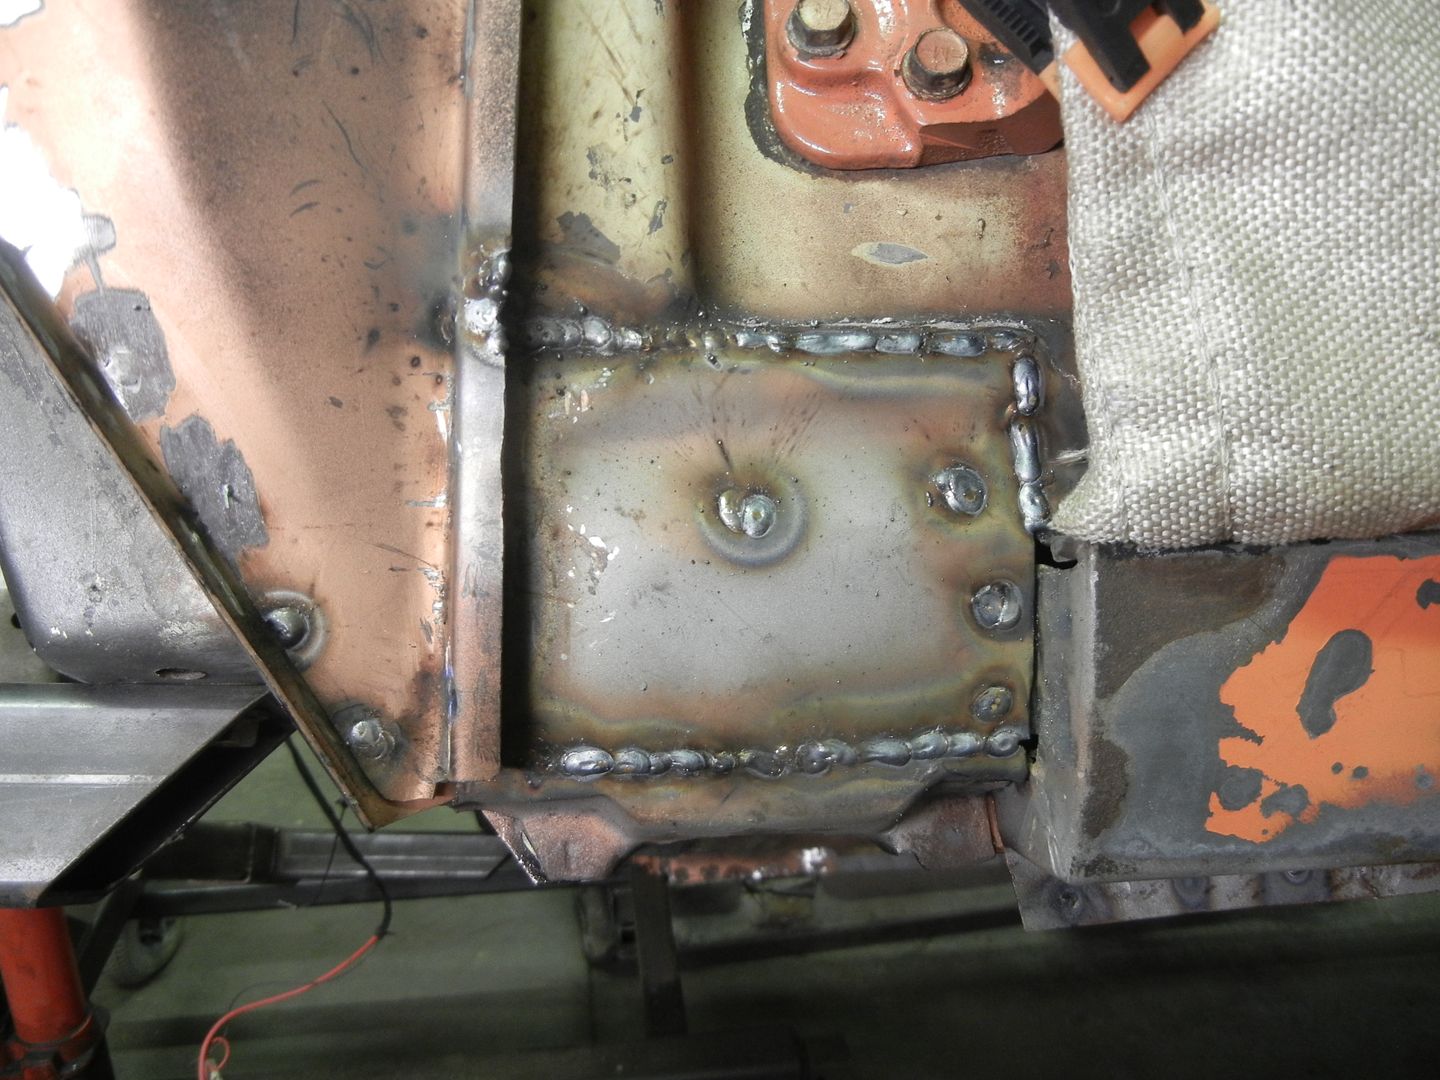
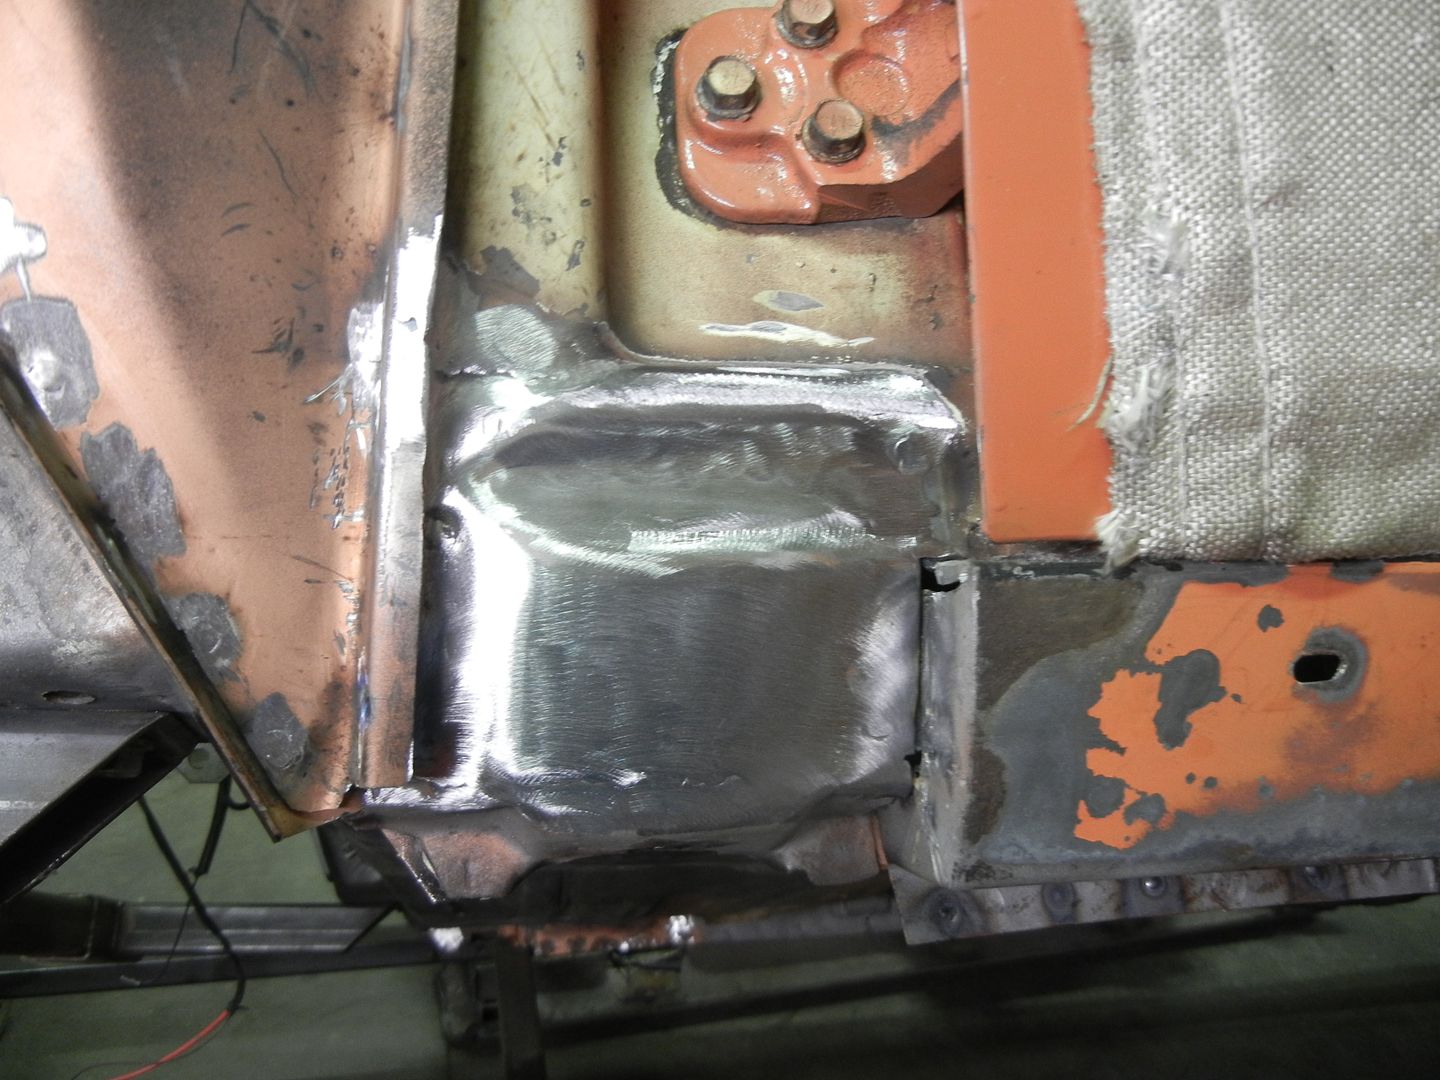
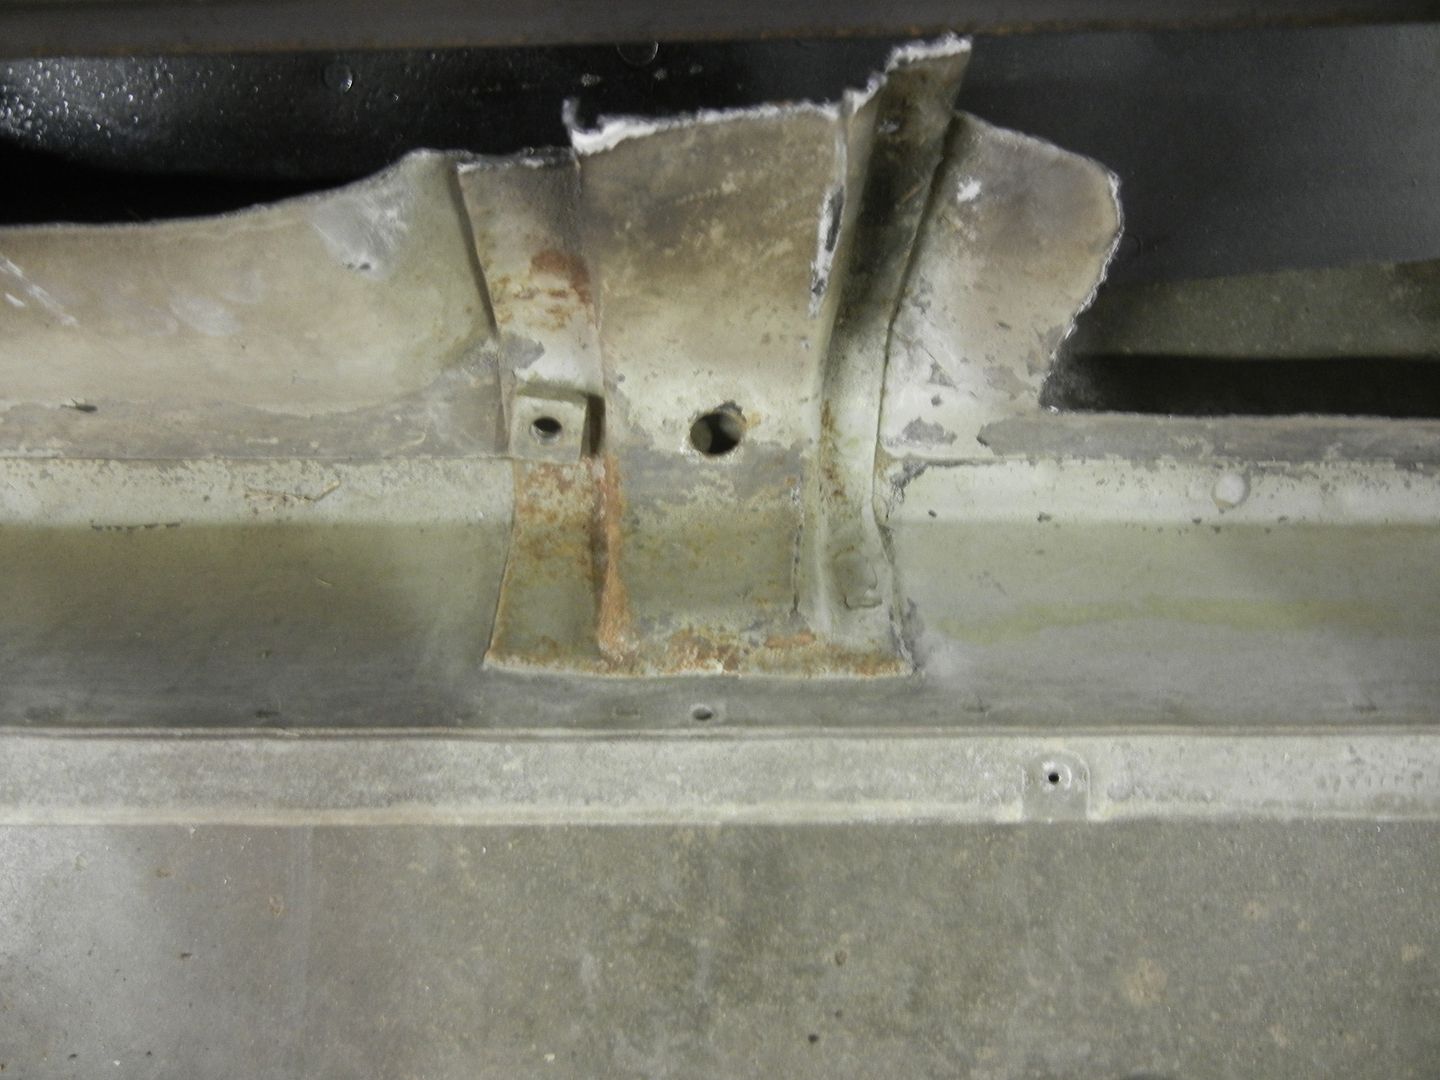
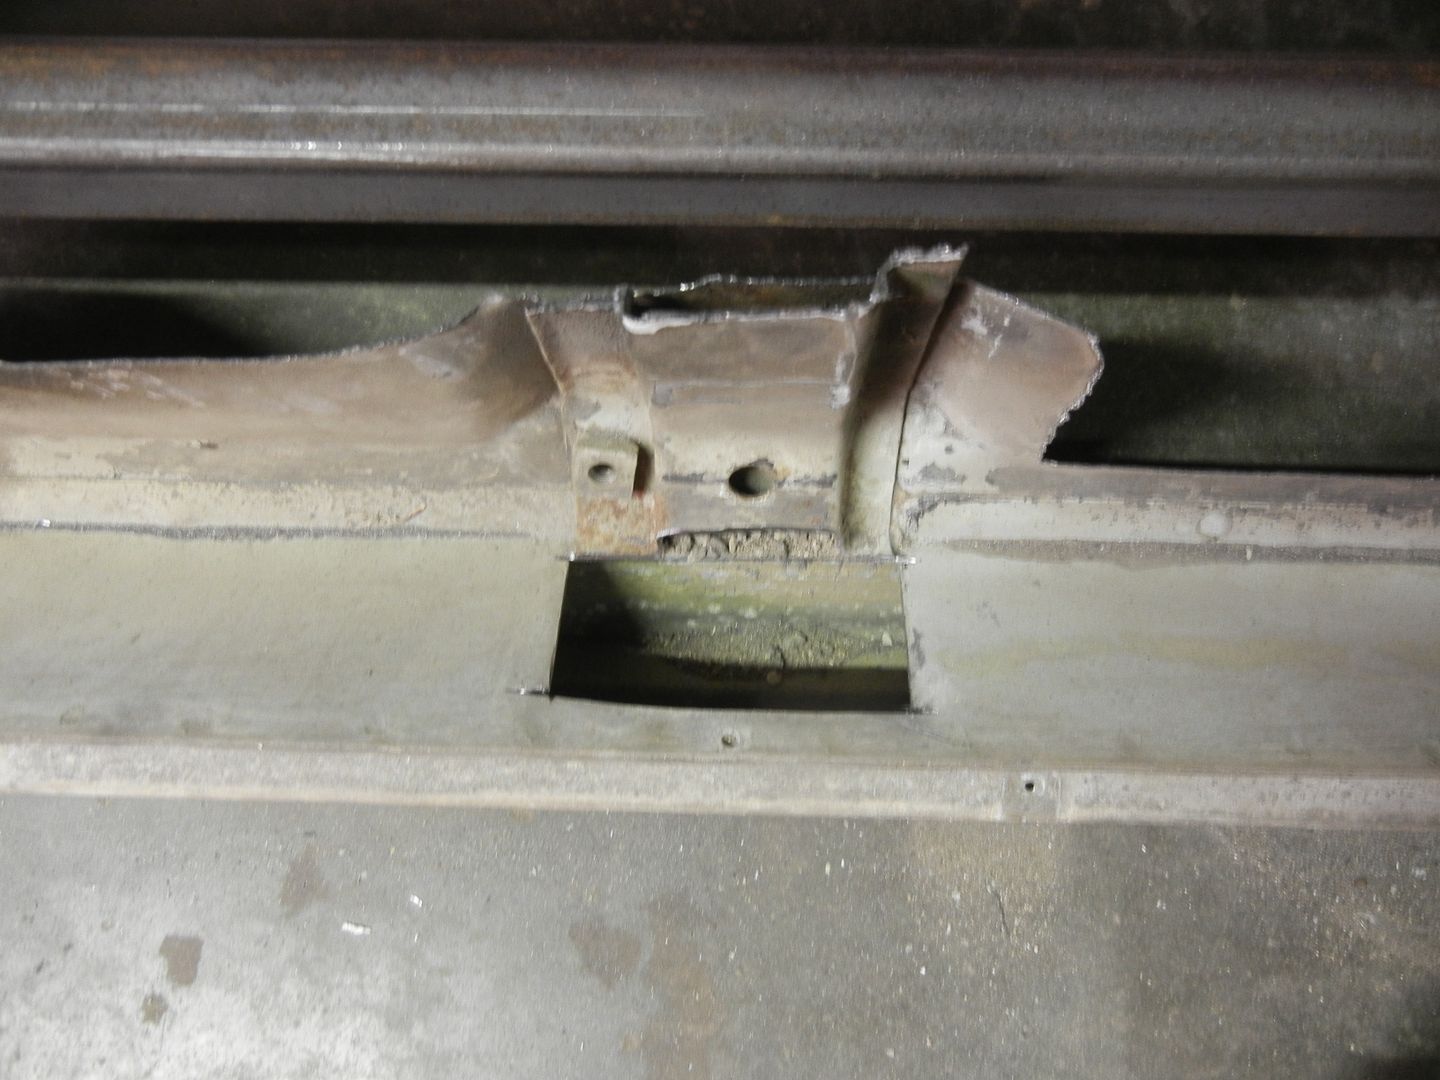
Marked the plate to punch plug weld holes and then welded it on.
Cut a patch out of the repro floor pan and installed it too.
dashboard said
Mar 25, 2016
That's a nifty looking sander. Where can I get one?
Lost in the 60s said
Mar 25, 2016
That's an eraser wheel on it to remove the decal it had. The full kit does come with abrasive wheels for removing paint and wire wheels for removing some undercoating, scaly rust and general crud.
Work has been progressing, just a little slower. I haven't been working on it over the week ends. I've let John do much of the cutting, fitting, welding and grinding of the rocker pieces. Good place for him to learn this "craft" and if it gets messed up, no one will see it. He needs to develop skill and confidence for when he starts collecting his own "projects"....
Lost in the 60s said
May 11, 2016
We have been slowly plugging away but with the better weather, we both have other obligations to attend to. We did cut out the rusted inner rocker and floor braces on the left side and have them mostly done.
We also cut out a section of the floor where the package tray brace attaches. Apparently when the rear window had leaked in the past, it allowed water to run down into that brace and it rusted out both sides.
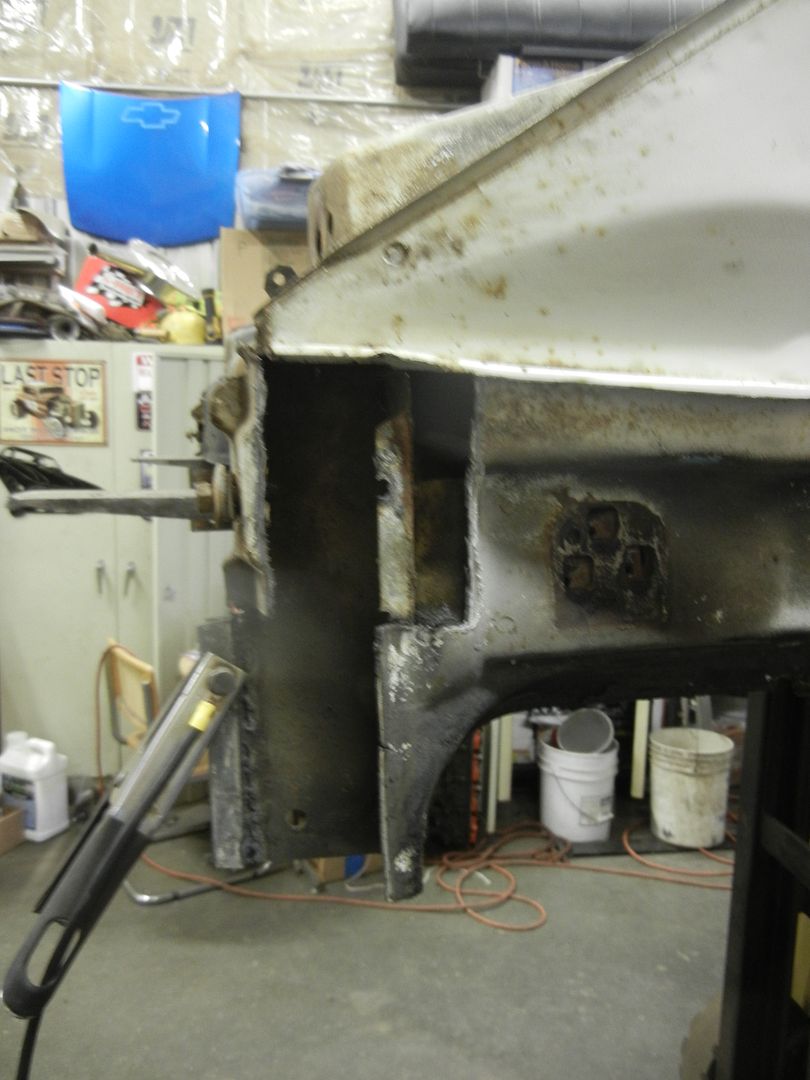
Then it was on to repairing the left kick panel area, the same as the right.
After scraping the deadener off, I used a few different tools to cut the floor pan loose from the brace. Most of this pan was new 4 years ago so I wanted to save this side.
Then I used the plasma to cut it out.
Removed a section of the inner rocker to reveal the entire brace and inner cowl panel.
Brace removed and the inner cowl ready to cut out.
Cut out the cowl panel for a patch. I used the cardboard template from the other side again.
The cowl treated with rust converter and the patch ready to weld on.
Some drill screws and vise grips to hold it tight, then weld and grind and it's done.
Then I prepped and welded on the brace, again, using drill screws and clamps to get it tight.
I've been turning the pics so it looks like the car is upright, but the work has been while it's on the left side. We have had to work from the bottom and standing inside the window opening to do all this. I have to crawl under the car to stand up in the window opening...
Then I got to roll the body upright to weld the floor pan back in.
Mostly done. For some reason, I got a LOT of contamination pits on the inner seam. I'm dumbfounded as to why because I cleaned all the paint and old sealer off before coating it with weld thru primer. I've never had this happen after such a thorough attempt to have everything clean, but there it is. I'll have to go over that area again with the welder next time.
Lost in the 60s said
May 13, 2016
Today, I went after the rust in the pillar and cowl panels. When I was patching the inner cowl, I could see the front cowl panel was deeply pitted, so that came out along with the side cowl.
I cut the patch 1/2" longer to overlap weld it for strength.
Fits good so far. The front panel won't be here until next week.
Lost in the 60s said
Jun 5, 2016
We're still working on this, but much too slowly. Summer and other projects keep getting in the way.
I was waiting for a front cowl patch and got side tracked with the '62 and '38...
Friday, I had John prep and weld in the cowl panels.
Lost in the 60s said
Jun 29, 2016
Another small step towards finishing this metal replacement phase.
John drilled out the rear seat brace and cut out the rusted section of the floor. I then cut out a patch from a sheet and he welded it in. I have the brace from AMD to put in next.
Lost in the 60s said
Jul 7, 2016
Now that the crunch to get the '38 ready for Des Moines is over, I can get back to work on the Chevelle. I came across a donor cowl/firewall and rockers a couple weeks back and cut out the patch I needed for that.
I also needed a floor brace end and tried to fab one a while back. Didn't turn out very good.
The rockers on the donor car are very nice, as it came from Texas, so I cut the piece I needed out of that and sectioned it on.
I neglected to take an after pic, but it's part of the car now.
The center body bolt was broke off too, so I used the mig to build up a weld stud to grab with the vise grips and heated the nut with the electromagnetic heater. I broke the studs off twice before I got that stubborn bolt to come out.
more ambition than brains said
Jul 8, 2016
You are an artist!!
Karl
Lost in the 60s said
Jul 8, 2016
more ambition than brains wrote:
You are an artist!!
Karl
It's a lot easier when you have proper fitting donor parts...
Now, if I could get someone to teach me final body work and paint, I would be all set...
Lost in the 60s said
Jul 8, 2016
John came over today and we finished up the rear seat brace and floor repairs...
jim larson said
Jul 9, 2016
Looking good Mitch. After seeing you work I wonder how much of the old body on that 4 dr parts car I should save, as someone might need some sheet metal? I plan to save the whole firewall,windshield/dash, and front door pillars as one piece.
on those heads, I might go to NSP on the 15th, are you planning to go or will be home on the 15th? Or I will be in you area sometime on the 21st.
Lost in the 60s said
Jul 9, 2016
The 15th is Street Machine Nationals and I will most likely be at that all day. I can leave them accessible to pick up on your way to NSP, or I will be home on your way back. Another idea is, if I drive the '62 or '67 to SMN, I can go directly to NSP too...
Let me ponder that for a few days and we'll figure something out.
Lost in the 60s said
Jul 13, 2016
John and I had a very productive day Tuesday. We cut out another floor brace at the inner rocker and used donor parts from an El Camino. Also welded up a bunch of extra holes from previous owners. As of now, there is a couple hours of grinding and clean up left on the underside, but I THINK we are done repairing and will next sand blast the underside for sealer and paint...
-- Edited by Lost in the 60s on Wednesday 13th of July 2016 09:07:06 PM
Lost in the 60s said
Aug 23, 2016
I'll eliminate some of the boredom and just say all the floor/rocker/cowl work was completed along with welding shut "extra" holes from previous owners.
I wrapped the body to keep out as much sand as possible and rolled it out in the driveway last Monday to blast it. What a SUCK job that is. 12 HOURS later, I pulled it back in. Tuesday I rolled it back out to unwrap and blow sand out of every orifice it got into.
Found another rust hole that we cut out and patched. There is more clean up and some sanding of spots I missed with the blaster, but it is very close to paint now. I have an epoxy primer/sealer here for when I'm ready.
SShink said
Aug 23, 2016
Lookin' good Mitch!
Lost in the 60s said
Sep 18, 2016
Spent more time over the past couple weeks getting this ready for primer. The weather hasn't been very co-operative either, but today was perfect. It is now in Urethane epoxy primer...
OscarZ said
Sep 19, 2016
Looks great!
Lost in the 60s said
Sep 20, 2016
Thanks, Mike !!
It's now Meteor Metallic Gray !!
OscarZ said
Sep 20, 2016
Same color as 67SS's Mazda?
Lost in the 60s said
Sep 20, 2016
OscarZ wrote:
Same color as 67SS's Mazda?
No clue, mine is a single stage urethane from Eastwood.
Chris S said
Sep 20, 2016
Looks great Mitch!
It must feel good to get to that point? That has been a large project.
Lost in the 60s said
Sep 20, 2016
Chris S wrote:
Looks great Mitch!
It must feel good to get to that point? That has been a large project.
This step has been a LOOOOOOONG time coming. I had hoped to be done with this paint 2 months ago, but other things kept getting in the way. Won't get to drive it this year but I will assemble enough to fire off the new engine and have it mobile under it's own power.
Lost in the 60s said
Nov 9, 2016
More work...John and I sanded the quarter skin seams inside and then I painted them with epoxy primer and covered that with seam sealer to prevent any moisture from getting in the seam and causing rust.
Looking thru the vent window u-channel back to the tail panel. It was really difficult to get a spray can in there and to hand brush the sealer on, but I got 'er done.
I saw that it would be easier to deal with the underside of the package tray with the body upside down on the roto and thought I would do a "little" more cleaning of the package tray and epoxy it and then the body would be ready to mount on the frame. Yeah, right...the first thing I noticed is the package tray has beads in the area where the speakers are now supposed to flush mount. Now what ?
I remembered the plastic spacer I used as a template to mark the holes for cutting and got them off the shelf. YES, I can use this and it also takes care of the speaker issue too. The speaker has a center cone that sits higher than the mounting frame and would have protruded into the tray cover anyway.
Then I looked at the window opening at the roof line and decided to grind all the old paint and rust off while it would fall on the floor instead of in the trunk.
The hinges were pretty rusty and always creaked and groaned when I opened/closed the lid, so I drilled out the pivot rivets and out they came.
Fresh out of the blast cabinet.
Freshly epoxy primered...
THEN, I got to cleaning the tray. There is still enough rust that I sprayed it with converter and will let that dry overnight. I'll need to wipe it with lacquer thinner to remove the converter where it won't stick to clean metal and paint. Then it will get painted.
Lost in the 60s said
Nov 9, 2016
A couple months back, I fitted the Hedman headers before sending them off for coating. These headers don't really fit this application, although they claim they do. I spent 2 days butchering them to fit. I also had to buy spacer plates to raise the engine so they wouldn't sit on the crossmember or the right upper control arm pivot shaft.
The left collector pointed up into the rear crossmember.
I cut a 3/8 pie wedge out of the bottom and welded it back together.
On the right side, the #4 tube extended over the nut on the rear bolt of the control arm shaft. There was no way to get a wrench on to set alignment. I cut 3/16 out of that tube and welded it together.
Chris S said
Nov 10, 2016
WOW! That is a lot of work. The finished product is a work of art. Nice job.
67ss said
Nov 10, 2016
I just don't understand how header companies stay in business building crap like that. The used headers my buddy bought for his 70 fit perfectly other then having to grind for head bolt clearance because I used newer style bolts. How can they not know they don't fit?
Lost in the 60s said
Nov 10, 2016
Chris S wrote:
WOW! That is a lot of work. The finished product is a work of art. Nice job.
Thanks Chris. It's been a long road with many frustrations but it gets a little further along each time.
Once I got the headers back, it was time to get them mated up to the exhaust. Hmmm.... the collector ID is about 2 7/8 while the exhaust OD is 2 1/2.
I couldn't find an adapter anywhere for that combo, so I bought 2 connectors and made a reducer.
They each fit one end but were still a little loose on each other. I cut them right in the middle and used the narrow center to get a tighter fit and tacked them together.
Since these collectors are the ball and socket, I needed them to be a slip fit inside the collector to slide that onto the ball. I cleaned up the welds to get a nice fit.
I then tacked them onto the pipe.
I'm still going to need a band clamp to eliminate leaks, but it's a lot better than leaving the huge gap and expecting a band to hold that together.
I really like the ball and socket, especially with used exhaust that doesn't match up perfect to 3 bolt collector flanges.
I then put both the new stainless fuel and brake lines on.
I had to cut and re-flare the brake line to mate up to my re-located distribution block. Flaring stainless is harder than mild steel. I HOPE it doesn't leak.
It's coming together...
Lost in the 60s said
Nov 10, 2016
I didn't have a clutch fork when I threw the engine/trans in the chassis. I got an NOS fork a couple weeks ago and removed the trans and bell to install it. While doing that, I cleaned up the bell some and found a crack !! DANG, back to Summit for a bellhousing. I got a Lakewood steel replacement type bell. It's not SFI rated, but should be a lot stronger and safer if the clutch should let go. I had a VERY close call with one of those in the mid seventies drag racing my '70 SS 454 car at Northstar. Don't need that excitement again. HEY, I just remembered, that was with this SAME engine !!! Anyway I went to put it on and the bolts that Lakewood supplied WITH the bell are the same length as a stock cast aluminum one. The bolts bottomed out in the block before tightening...
Also, the hole above the starter was distorted away from the threads and I had to grind it out to get the bolt in.
I then cut 3/8" off all the bolts and put it together. The bolt above the starter only got the lock washer, as there is no room for a flat one to sit flat on the bell.
I finally got it all back together and everyone seems happy now.
In preparation for putting the body back on the frame, I strapped the fuel tank down while the body was upside down...much easier than holding it up from below...
Lost in the 60s said
Nov 11, 2016
I bought a bung for a CO2 sensor for future tuning, ground a contour in it to match the pipe better and installed that.
I needed a way to attach a clutch rod retainer spring. I believe the spring originally went over to the fame and that isn't possible with the headers. I made a loop out of spring steel.
The left header has to come out for the steering shaft, so I went to complete the right side with the Percy's gaskets and they are rather large and protruded into the spark plug area, so I trimmed a little off.
Then John arrived and it was SHOW TIME...
more ambition than brains said
Nov 12, 2016
Is the movie "cars" missing a forklift??
Seriously, great progress, you set an example few can achieve.
Karl
Lost in the 60s said
Nov 12, 2016
Thank You...
I should paint the forklift wheels black, but it doesn't seem to be a priority. It also was a major PITA yesterday. It was running rough earlier this year so I had put new points and condenser in it a few weeks ago to have it ready for this event and it was running like a top ! It took an HOUR yesterday to get it to run enough to get this done..
I went back and noted the date this thread was started.. Nov 20th and the body came off the frame on January 12th of this year. It feels like a LONG time to me, but you are right. John and I have plugged along on this and have it further along than others get in many more years. I didn't get to drive it this year, but it will be on the street next year, painted or not..
SShink said
Nov 12, 2016
Awesome work Mitch, and a huge step forward!
It's always a big step and feels great when things go back together, and you know what's underneath all that shiny paint. No question you will drive it painted or not (which I think is great) as I remember you drove it to the Christmas party in Apple Valley in December when it sleeted that day!
dashboard said
Nov 12, 2016
Very nice work Mitch. I just completed a similar 'cowl shoulder' repair on my red car.
Larry Lucast said
Nov 14, 2016
What a great feeling to get to that point. It looks incredible! You set the standard for the rest of us to aim for.
Lost in the 60s said
Jan 3, 2017
I have been struggling with what to do with the doors. They are both repops from a few years back and the left one doesn't fit, or match, very well. I really want to go back to original but the left door was badly rotted off on the bottom, rear. I bought another door out of Kansas a couple weeks ago and had it shipped up here only to find a long crease under a ton of bondo and a multitude of other issues that made it not a good candidate to repair. Today I drug my old, original, door down of the racking and cut them both up. I am using the Kansas door for donor parts to restore my original.
The patch is oversize, which was the goal, to have enough to trim down for a perfect fit. Still be a couple hours of work to get it ready to weld on, but at least I made a decision and moved ahead with this.
Lost in the 60s said
Jan 10, 2017
John and I cut up more of the donor door last Friday. I needed the bottom skin flange for the right side. I cut out the mirror brace to weld in the right door also.
After some "tweaking" I clamped it on the door and welded it on.
Lost in the 60s said
Feb 18, 2017
We have been working on this but I'm way behind on updates.
Welded the repair patch on the left door and then removed both of the skins.
Then we looked at the small strip of original extension panel I left on and discovered it was full of pin holes too, SO, I succumbed to John's goading and gave into my CDO buy removing the entire extension panel !!!
Then we decided to just replace the whole friggin' rusty package tray.....I am going backward here instead of having it ready for paint.
New tray, extension panel and door skin in the background.
I also bought 11" brake kits from Karl at the Brunch. We pulled the axles and discovered the bearings were starting to pit and the spider gears were pitted and galled on the center pin !! Arrrgg, will the junk/rusted parts ever end ?
I had a "spare" 3 series posi carrier on the shelf and, fortunately, all the internals were good and they will go back in the car.
Lost in the 60s said
Feb 20, 2017
Today was "rear end day"...the cars, not mine...
I installed "repair" axle bearing assemblies because both of the axles were starting to show wear and pitting. These move the bearing outboard to a good surface of the axle. The seal is part of the outer bearing housing.
Then the new 11" brake assemblies went on.
Then came the fun of putting all that posi "stuff' back in the carrier while laying under the car. It was a "bit" of a challenge and took a couple hours, but I managed to prevail.
Lost in the 60s said
Mar 8, 2017
Haven't had much time to work on this but the diff is closed up and full of lube. I am getting it ready to move to the cold storage side of the shop in preparation for Jim's car next week. John and I bled the new rear brakes and then threw the clip back on to get more floor space and now it looks so much like a car, I'm going to get it running and moving under it's own power.
more ambition than brains said
Mar 8, 2017
"Threw" the front clip on?
Appears more like carefully reassembled front clip, among other things!
Looking good!!!!!!!!
Karl
Lost in the 60s said
Mar 8, 2017
When we pulled it last year, we put the fender bolts back in their respective locations with the shims. All we did was put everything back where it came from and "tweaked" it a little...
jim larson said
Mar 9, 2017
Where did you get those spaces for the rear springs? I have something similar; but they still use the clips to secure the springs to the spacers/ spring pads?
I plan to pick up Keith's trailer next Tuesday and load the car. I will bring the car up on Wednesday as that looks to be no snow. Just wondering if there is an arrival time you would prefer.
I started the rust extraction on the right kick panel.
First up was scrapping the sound deadener off.
Ready for plasma surgery.
I made a cut above the rust on the inner cowl and removed all the nasty.
Not enough left to use as a pattern, so I made a cardboard one.
Couple minutes with the plasma and another 5-6 with the 2" disc sander and I have a new panel.
Parts I picked up at Auto City.
Nice work Mitch!
How thick is the metal you use when you make patches like that?
18 gauge
Kevin, it wasn't near as bad as I projected. I thought of warming it but tried it cold and the asphalt stayed together quite well. Once I had an edge lifted, I gently pulled that and pried with the edge of a putty knife right on the metal and it let go fairly well.
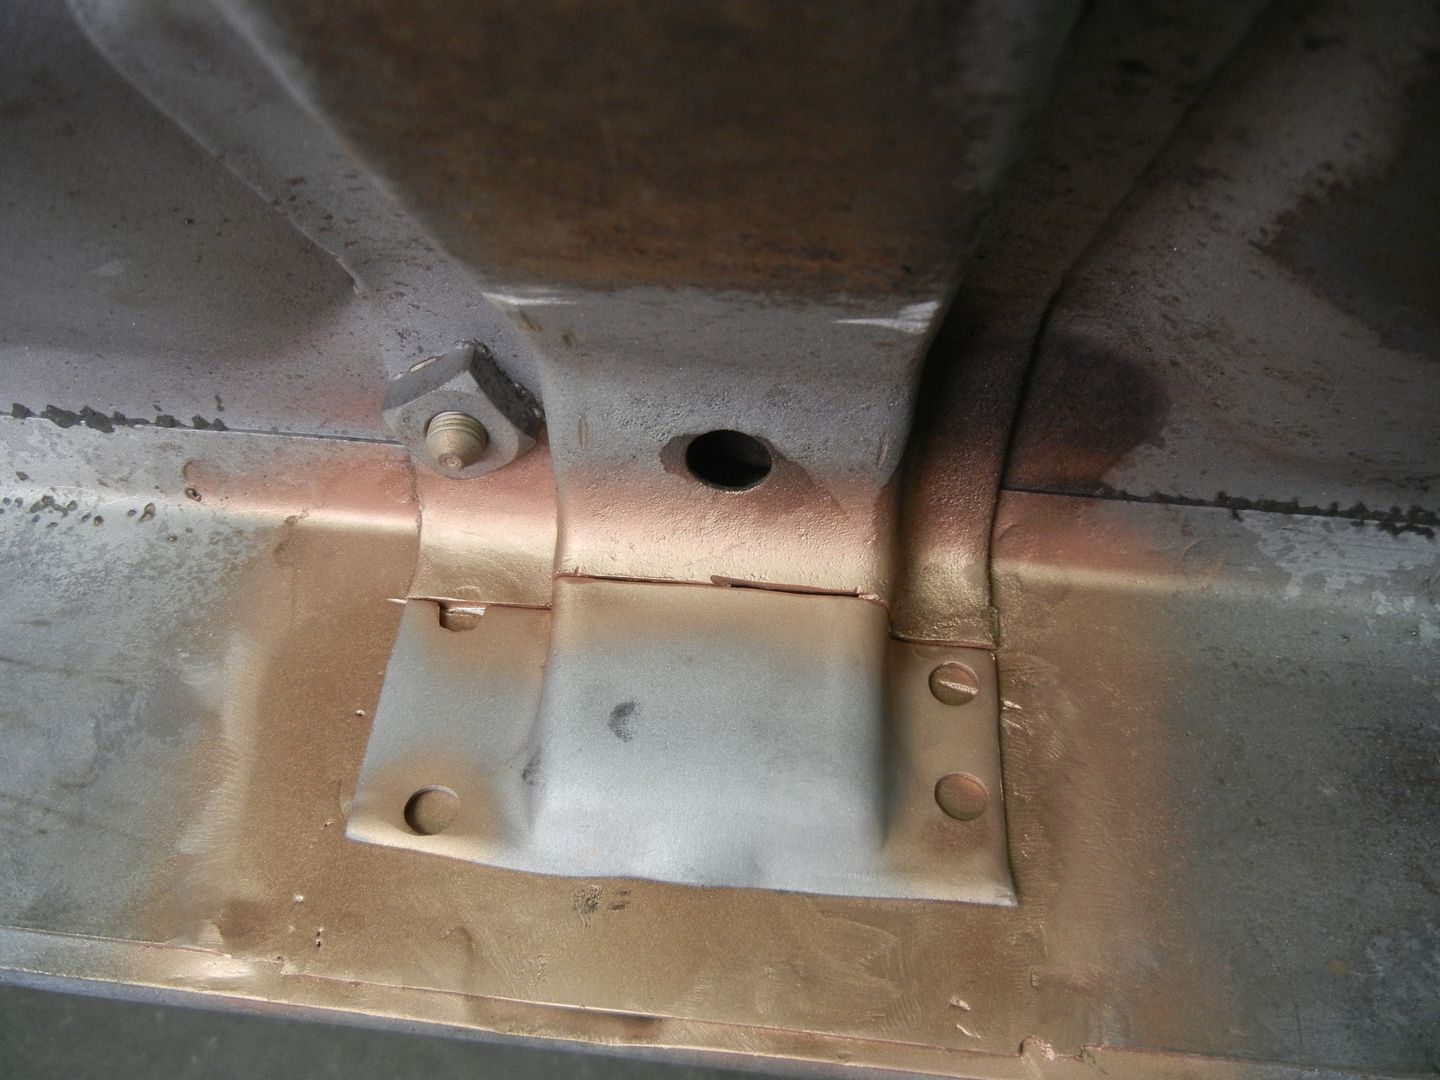
Install of the patch.
AMD is now having these reinforcement plates made. WHAT a time and frustration saver these are !! It had a little too much curve going from top to bottom, but a few hits with a plastic deadblow and it fit nearly perfect !!.
-- Edited by Lost in the 60s on Wednesday 23rd of March 2016 07:33:48 AM
Marked the plate to punch plug weld holes and then welded it on.
Cut a patch out of the repro floor pan and installed it too.
That's an eraser wheel on it to remove the decal it had. The full kit does come with abrasive wheels for removing paint and wire wheels for removing some undercoating, scaly rust and general crud.
http://www.amazon.com/Dent-Fix-Equipment-Eliminator-DF-700DX/dp/B0017R7EHM
Work has been progressing, just a little slower. I haven't been working on it over the week ends. I've let John do much of the cutting, fitting, welding and grinding of the rocker pieces. Good place for him to learn this "craft" and if it gets messed up, no one will see it. He needs to develop skill and confidence for when he starts collecting his own "projects"....
We have been slowly plugging away but with the better weather, we both have other obligations to attend to. We did cut out the rusted inner rocker and floor braces on the left side and have them mostly done.
We also cut out a section of the floor where the package tray brace attaches. Apparently when the rear window had leaked in the past, it allowed water to run down into that brace and it rusted out both sides.
Then it was on to repairing the left kick panel area, the same as the right.
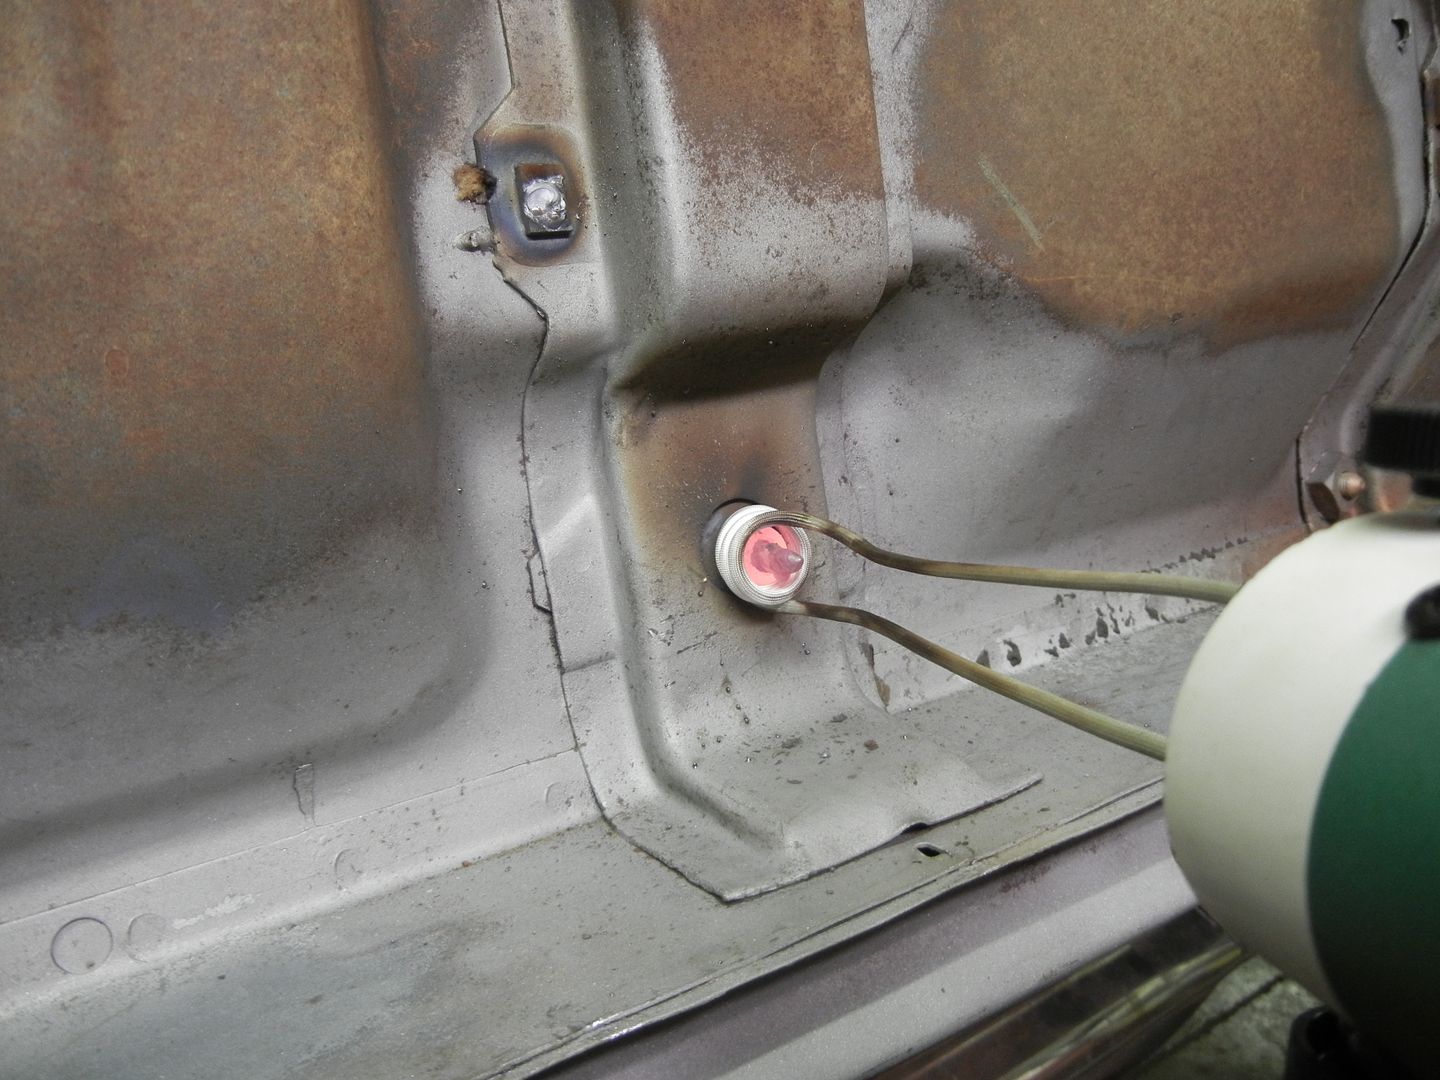
After scraping the deadener off, I used a few different tools to cut the floor pan loose from the brace. Most of this pan was new 4 years ago so I wanted to save this side.
Then I used the plasma to cut it out.
Removed a section of the inner rocker to reveal the entire brace and inner cowl panel.
Brace removed and the inner cowl ready to cut out.
Cut out the cowl panel for a patch. I used the cardboard template from the other side again.
The cowl treated with rust converter and the patch ready to weld on.
Some drill screws and vise grips to hold it tight, then weld and grind and it's done.
Then I prepped and welded on the brace, again, using drill screws and clamps to get it tight.
I've been turning the pics so it looks like the car is upright, but the work has been while it's on the left side. We have had to work from the bottom and standing inside the window opening to do all this. I have to crawl under the car to stand up in the window opening...
Then I got to roll the body upright to weld the floor pan back in.
Mostly done. For some reason, I got a LOT of contamination pits on the inner seam. I'm dumbfounded as to why because I cleaned all the paint and old sealer off before coating it with weld thru primer. I've never had this happen after such a thorough attempt to have everything clean, but there it is. I'll have to go over that area again with the welder next time.
Today, I went after the rust in the pillar and cowl panels. When I was patching the inner cowl, I could see the front cowl panel was deeply pitted, so that came out along with the side cowl.
I cut the patch 1/2" longer to overlap weld it for strength.
Fits good so far. The front panel won't be here until next week.
We're still working on this, but much too slowly. Summer and other projects keep getting in the way.
I was waiting for a front cowl patch and got side tracked with the '62 and '38...
Friday, I had John prep and weld in the cowl panels.
Another small step towards finishing this metal replacement phase.

John drilled out the rear seat brace and cut out the rusted section of the floor. I then cut out a patch from a sheet and he welded it in. I have the brace from AMD to put in next.
Now that the crunch to get the '38 ready for Des Moines is over, I can get back to work on the Chevelle. I came across a donor cowl/firewall and rockers a couple weeks back and cut out the patch I needed for that.
I also needed a floor brace end and tried to fab one a while back. Didn't turn out very good.
The rockers on the donor car are very nice, as it came from Texas, so I cut the piece I needed out of that and sectioned it on.
I neglected to take an after pic, but it's part of the car now.
The center body bolt was broke off too, so I used the mig to build up a weld stud to grab with the vise grips and heated the nut with the electromagnetic heater. I broke the studs off twice before I got that stubborn bolt to come out.
You are an artist!!
Karl
It's a lot easier when you have proper fitting donor parts...
Now, if I could get someone to teach me final body work and paint, I would be all set...
John came over today and we finished up the rear seat brace and floor repairs...
Looking good Mitch. After seeing you work I wonder how much of the old body on that 4 dr parts car I should save, as someone might need some sheet metal? I plan to save the whole firewall,windshield/dash, and front door pillars as one piece.
on those heads, I might go to NSP on the 15th, are you planning to go or will be home on the 15th? Or I will be in you area sometime on the 21st.
The 15th is Street Machine Nationals and I will most likely be at that all day. I can leave them accessible to pick up on your way to NSP, or I will be home on your way back.
Another idea is, if I drive the '62 or '67 to SMN, I can go directly to NSP too...
Let me ponder that for a few days and we'll figure something out.
John and I had a very productive day Tuesday. We cut out another floor brace at the inner rocker and used donor parts from an El Camino. Also welded up a bunch of extra holes from previous owners. As of now, there is a couple hours of grinding and clean up left on the underside, but I THINK we are done repairing and will next sand blast the underside for sealer and paint...
-- Edited by Lost in the 60s on Wednesday 13th of July 2016 09:07:06 PM
I'll eliminate some of the boredom and just say all the floor/rocker/cowl work was completed along with welding shut "extra" holes from previous owners.
I wrapped the body to keep out as much sand as possible and rolled it out in the driveway last Monday to blast it. What a SUCK job that is. 12 HOURS later, I pulled it back in. Tuesday I rolled it back out to unwrap and blow sand out of every orifice it got into.
Found another rust hole that we cut out and patched. There is more clean up and some sanding of spots I missed with the blaster, but it is very close to paint now. I have an epoxy primer/sealer here for when I'm ready.
Lookin' good Mitch!
Spent more time over the past couple weeks getting this ready for primer. The weather hasn't been very co-operative either, but today was perfect. It is now in Urethane epoxy primer...
Thanks, Mike !!
It's now Meteor Metallic Gray !!
No clue, mine is a single stage urethane from Eastwood.
Looks great Mitch!
It must feel good to get to that point? That has been a large project.
This step has been a LOOOOOOONG time coming. I had hoped to be done with this paint 2 months ago, but other things kept getting in the way. Won't get to drive it this year but I will assemble enough to fire off the new engine and have it mobile under it's own power.
More work...John and I sanded the quarter skin seams inside and then I painted them with epoxy primer and covered that with seam sealer to prevent any moisture from getting in the seam and causing rust.
Looking thru the vent window u-channel back to the tail panel. It was really difficult to get a spray can in there and to hand brush the sealer on, but I got 'er done.
I saw that it would be easier to deal with the underside of the package tray with the body upside down on the roto and thought I would do a "little" more cleaning of the package tray and epoxy it and then the body would be ready to mount on the frame. Yeah, right...the first thing I noticed is the package tray has beads in the area where the speakers are now supposed to flush mount. Now what ?

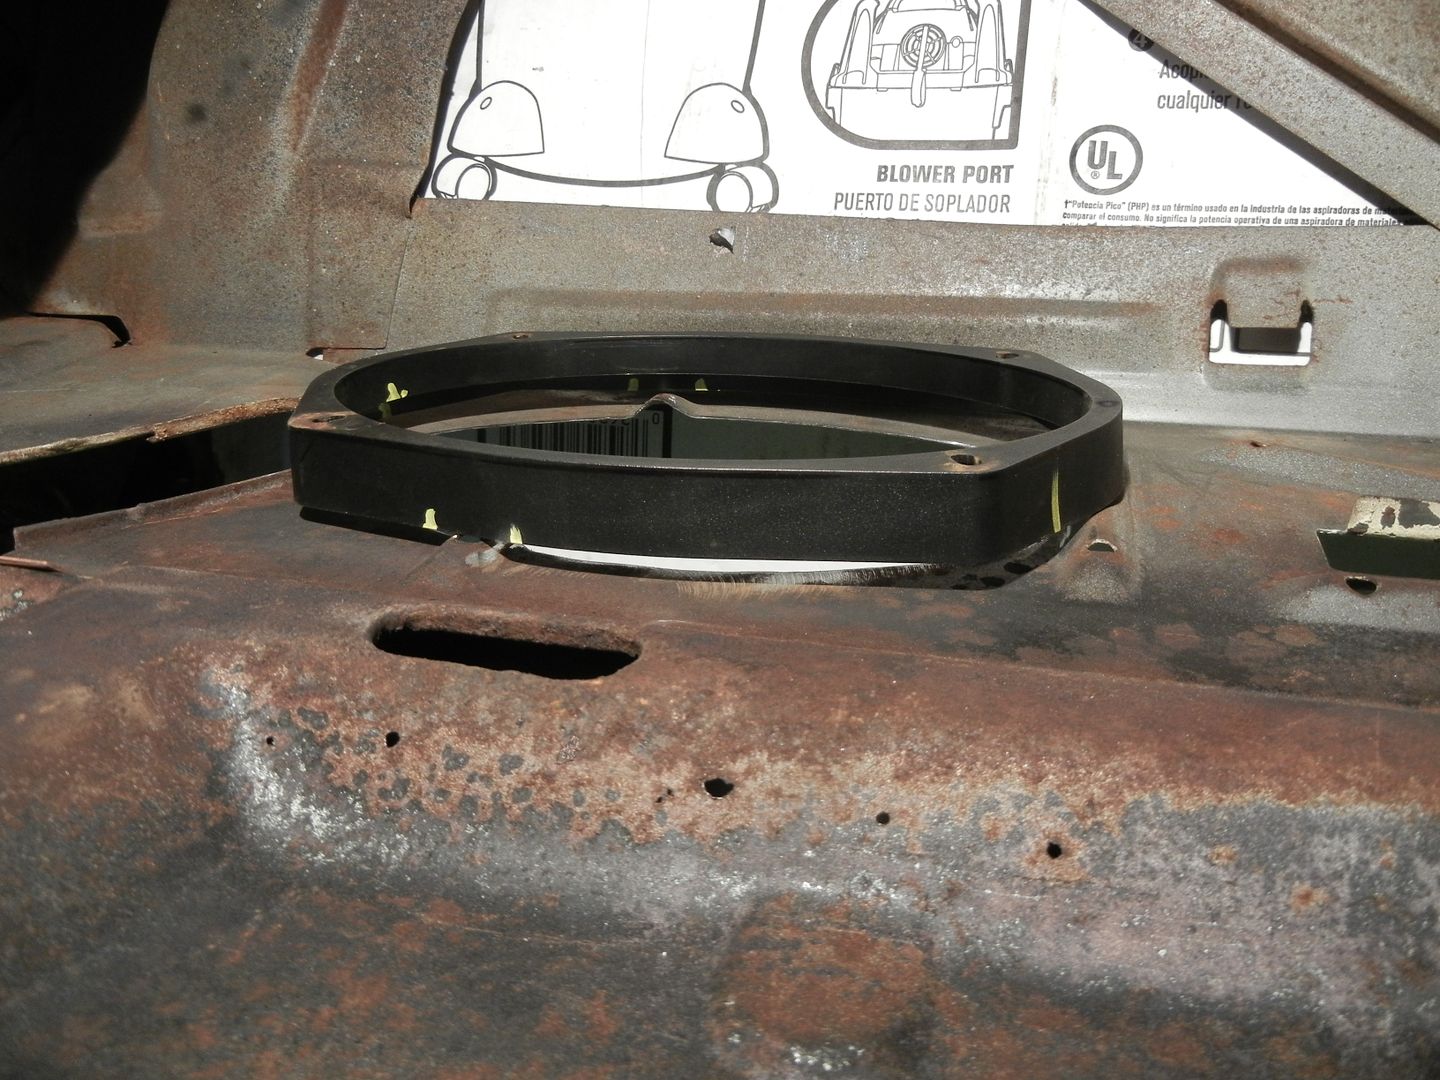
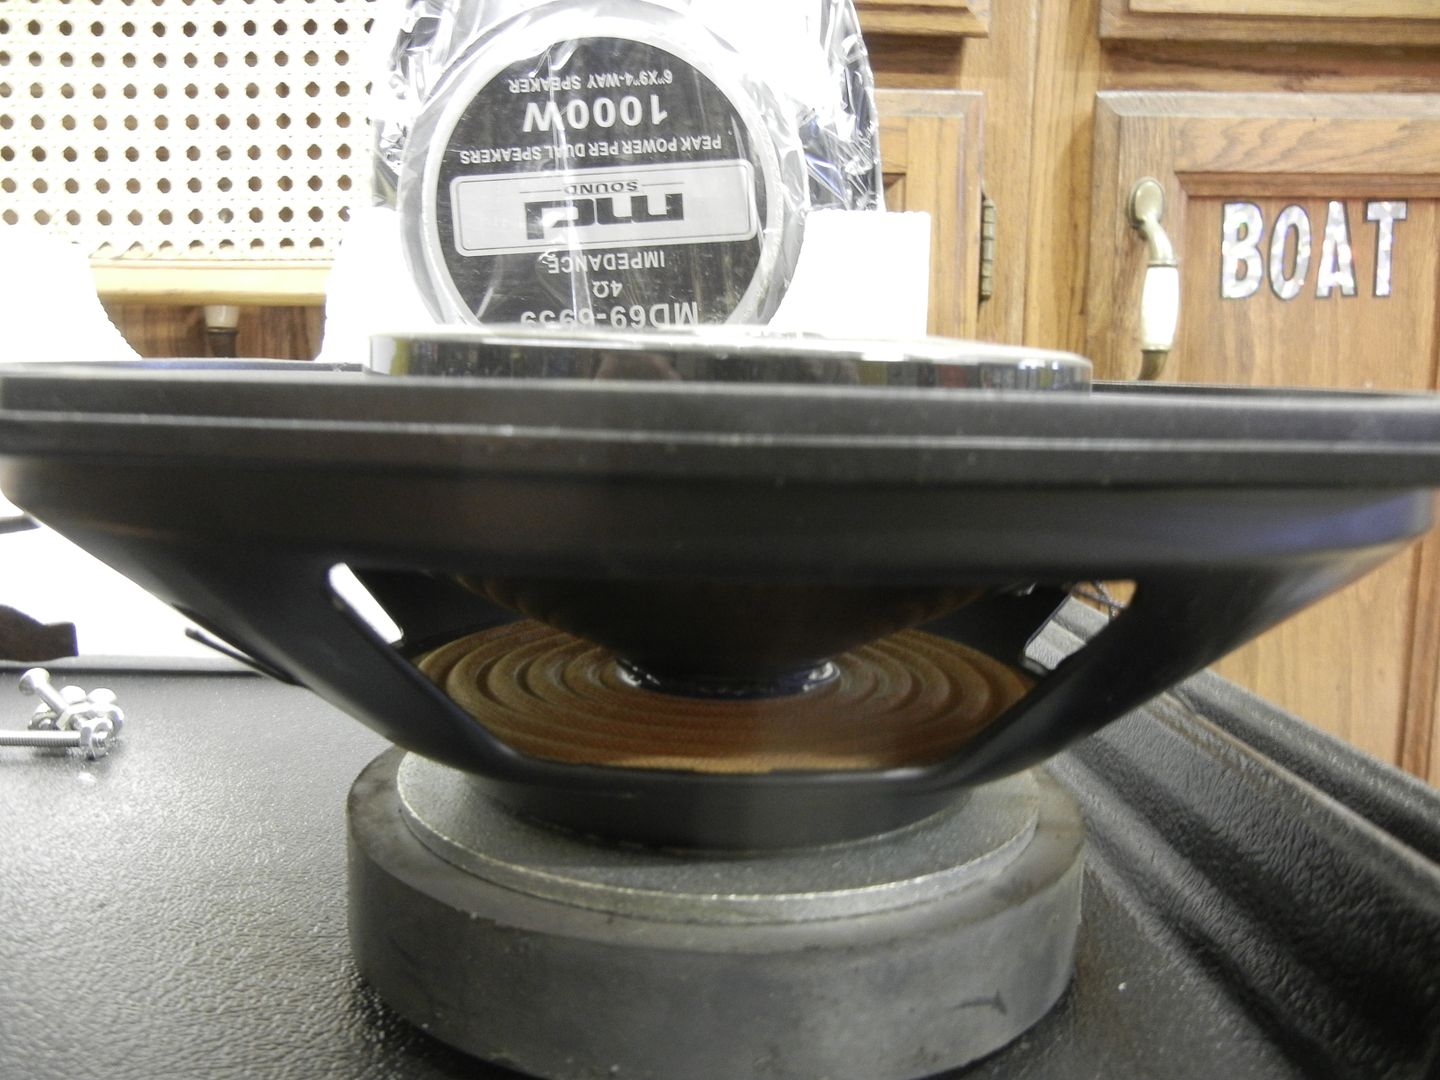
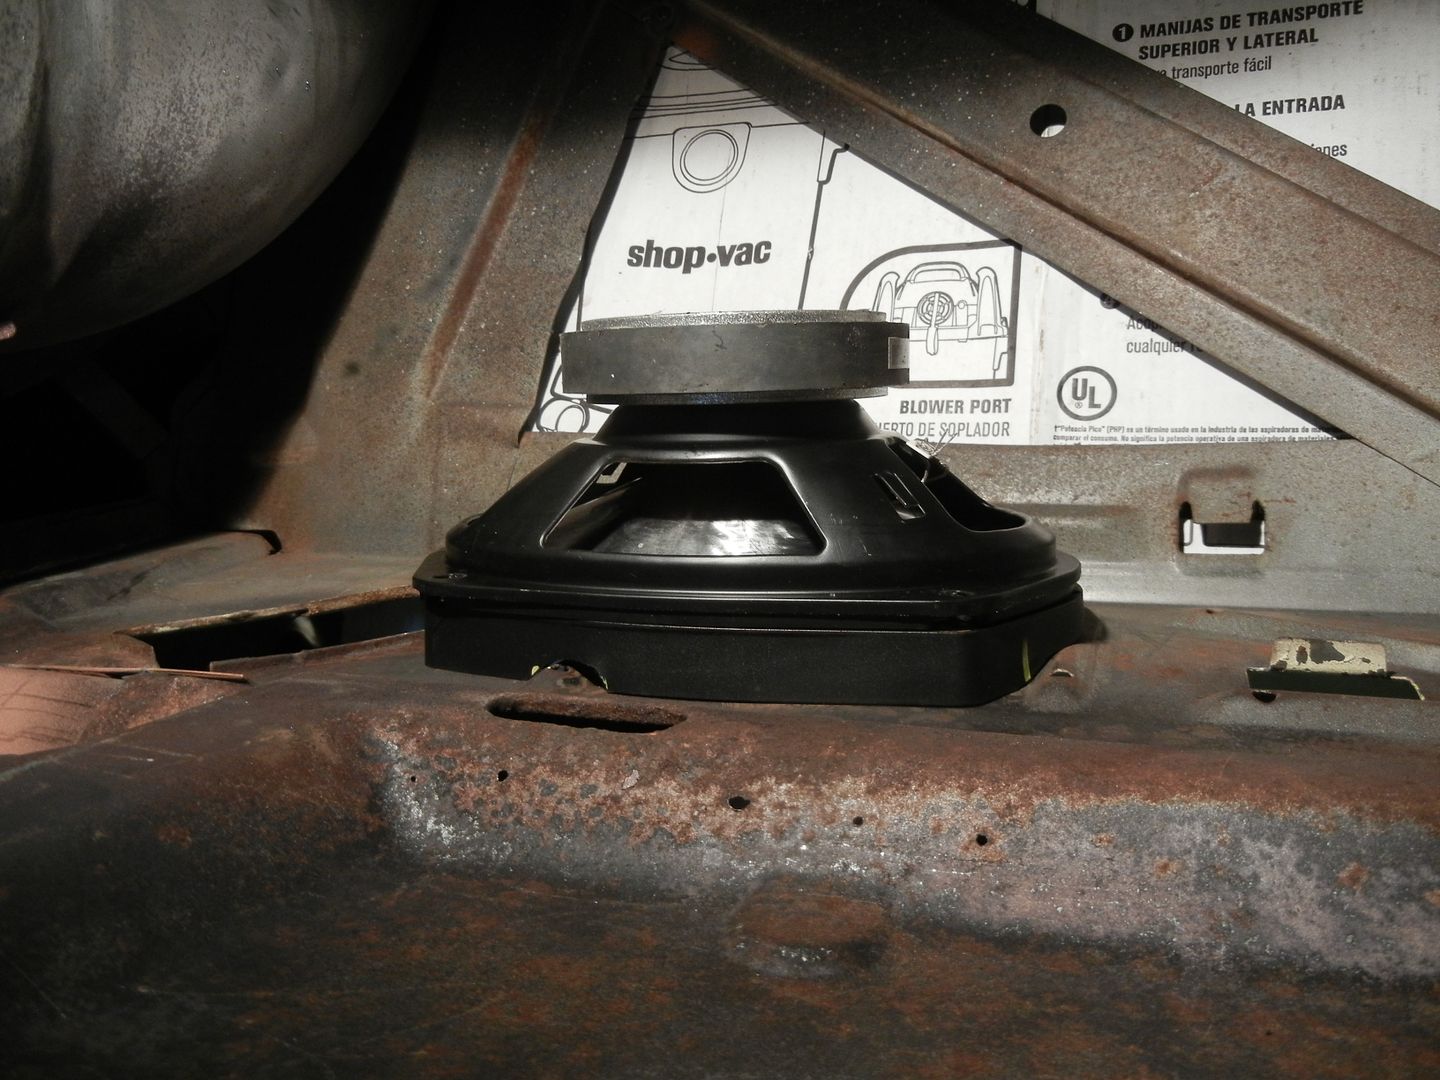
I remembered the plastic spacer I used as a template to mark the holes for cutting and got them off the shelf. YES, I can use this and it also takes care of the speaker issue too. The speaker has a center cone that sits higher than the mounting frame and would have protruded into the tray cover anyway.
Then I looked at the window opening at the roof line and decided to grind all the old paint and rust off while it would fall on the floor instead of in the trunk.
The hinges were pretty rusty and always creaked and groaned when I opened/closed the lid, so I drilled out the pivot rivets and out they came.
Fresh out of the blast cabinet.
Freshly epoxy primered...
THEN, I got to cleaning the tray. There is still enough rust that I sprayed it with converter and will let that dry overnight. I'll need to wipe it with lacquer thinner to remove the converter where it won't stick to clean metal and paint. Then it will get painted.
A couple months back, I fitted the Hedman headers before sending them off for coating. These headers don't really fit this application, although they claim they do. I spent 2 days butchering them to fit. I also had to buy spacer plates to raise the engine so they wouldn't sit on the crossmember or the right upper control arm pivot shaft.
The left collector pointed up into the rear crossmember.
I cut a 3/8 pie wedge out of the bottom and welded it back together.
On the right side, the #4 tube extended over the nut on the rear bolt of the control arm shaft. There was no way to get a wrench on to set alignment. I cut 3/16 out of that tube and welded it together.
WOW! That is a lot of work. The finished product is a work of art. Nice job.
I just don't understand how header companies stay in business building crap like that. The used headers my buddy bought for his 70 fit perfectly other then having to grind for head bolt clearance because I used newer style bolts. How can they not know they don't fit?
Thanks Chris. It's been a long road with many frustrations but it gets a little further along each time.
Once I got the headers back, it was time to get them mated up to the exhaust. Hmmm.... the collector ID is about 2 7/8 while the exhaust OD is 2 1/2.
I couldn't find an adapter anywhere for that combo, so I bought 2 connectors and made a reducer.
They each fit one end but were still a little loose on each other. I cut them right in the middle and used the narrow center to get a tighter fit and tacked them together.
Since these collectors are the ball and socket, I needed them to be a slip fit inside the collector to slide that onto the ball. I cleaned up the welds to get a nice fit.
I then tacked them onto the pipe.
I'm still going to need a band clamp to eliminate leaks, but it's a lot better than leaving the huge gap and expecting a band to hold that together.
I really like the ball and socket, especially with used exhaust that doesn't match up perfect to 3 bolt collector flanges.
I then put both the new stainless fuel and brake lines on.
I had to cut and re-flare the brake line to mate up to my re-located distribution block. Flaring stainless is harder than mild steel. I HOPE it doesn't leak.
It's coming together...
I didn't have a clutch fork when I threw the engine/trans in the chassis. I got an NOS fork a couple weeks ago and removed the trans and bell to install it. While doing that, I cleaned up the bell some and found a crack !! DANG, back to Summit for a bellhousing. I got a Lakewood steel replacement type bell. It's not SFI rated, but should be a lot stronger and safer if the clutch should let go. I had a VERY close call with one of those in the mid seventies drag racing my '70 SS 454 car at Northstar. Don't need that excitement again. HEY, I just remembered, that was with this SAME engine !!! Anyway I went to put it on and the bolts that Lakewood supplied WITH the bell are the same length as a stock cast aluminum one. The bolts bottomed out in the block before tightening...
Also, the hole above the starter was distorted away from the threads and I had to grind it out to get the bolt in.
I then cut 3/8" off all the bolts and put it together. The bolt above the starter only got the lock washer, as there is no room for a flat one to sit flat on the bell.
I finally got it all back together and everyone seems happy now.
In preparation for putting the body back on the frame, I strapped the fuel tank down while the body was upside down...much easier than holding it up from below...
I bought a bung for a CO2 sensor for future tuning, ground a contour in it to match the pipe better and installed that.
I needed a way to attach a clutch rod retainer spring. I believe the spring originally went over to the fame and that isn't possible with the headers. I made a loop out of spring steel.
The left header has to come out for the steering shaft, so I went to complete the right side with the Percy's gaskets and they are rather large and protruded into the spark plug area, so I trimmed a little off.
Then John arrived and it was SHOW TIME...
Is the movie "cars" missing a forklift??
Seriously, great progress, you set an example few can achieve.
Karl
Thank You...
I should paint the forklift wheels black, but it doesn't seem to be a priority. It also was a major PITA yesterday. It was running rough earlier this year so I had put new points and condenser in it a few weeks ago to have it ready for this event and it was running like a top ! It took an HOUR yesterday to get it to run enough to get this done..
I went back and noted the date this thread was started.. Nov 20th and the body came off the frame on January 12th of this year. It feels like a LONG time to me, but you are right. John and I have plugged along on this and have it further along than others get in many more years. I didn't get to drive it this year, but it will be on the street next year, painted or not..
Awesome work Mitch, and a huge step forward!
It's always a big step and feels great when things go back together, and you know what's underneath all that shiny paint. No question you will drive it painted or not (which I think is great) as I remember you drove it to the Christmas party in Apple Valley in December when it sleeted that day!
I have been struggling with what to do with the doors. They are both repops from a few years back and the left one doesn't fit, or match, very well. I really want to go back to original but the left door was badly rotted off on the bottom, rear. I bought another door out of Kansas a couple weeks ago and had it shipped up here only to find a long crease under a ton of bondo and a multitude of other issues that made it not a good candidate to repair. Today I drug my old, original, door down of the racking and cut them both up. I am using the Kansas door for donor parts to restore my original.
The patch is oversize, which was the goal, to have enough to trim down for a perfect fit. Still be a couple hours of work to get it ready to weld on, but at least I made a decision and moved ahead with this.
John and I cut up more of the donor door last Friday. I needed the bottom skin flange for the right side. I cut out the mirror brace to weld in the right door also.
After some "tweaking" I clamped it on the door and welded it on.
We have been working on this but I'm way behind on updates.
Welded the repair patch on the left door and then removed both of the skins.
Then we looked at the small strip of original extension panel I left on and discovered it was full of pin holes too, SO, I succumbed to John's goading and gave into my CDO buy removing the entire extension panel !!!
Then we decided to just replace the whole friggin' rusty package tray.....I am going backward here instead of having it ready for paint.
New tray, extension panel and door skin in the background.
I also bought 11" brake kits from Karl at the Brunch. We pulled the axles and discovered the bearings were starting to pit and the spider gears were pitted and galled on the center pin !! Arrrgg, will the junk/rusted parts ever end ?
I had a "spare" 3 series posi carrier on the shelf and, fortunately, all the internals were good and they will go back in the car.
Today was "rear end day"...the cars, not mine...
I installed "repair" axle bearing assemblies because both of the axles were starting to show wear and pitting. These move the bearing outboard to a good surface of the axle. The seal is part of the outer bearing housing.
Then the new 11" brake assemblies went on.
Then came the fun of putting all that posi "stuff' back in the carrier while laying under the car. It was a "bit" of a challenge and took a couple hours, but I managed to prevail.
Haven't had much time to work on this but the diff is closed up and full of lube. I am getting it ready to move to the cold storage side of the shop in preparation for Jim's car next week. John and I bled the new rear brakes and then threw the clip back on to get more floor space and now it looks so much like a car, I'm going to get it running and moving under it's own power.
"Threw" the front clip on?
Appears more like carefully reassembled front clip, among other things!
Looking good!!!!!!!!
Karl
When we pulled it last year, we put the fender bolts back in their respective locations with the shims. All we did was put everything back where it came from and "tweaked" it a little...
Where did you get those spaces for the rear springs? I have something similar; but they still use the clips to secure the springs to the spacers/ spring pads?
I plan to pick up Keith's trailer next Tuesday and load the car. I will bring the car up on Wednesday as that looks to be no snow. Just wondering if there is an arrival time you would prefer.